
Oh, that craving hits hard, doesn’t it? You know, that specific salty, savory, deeply satisfying crunch that only a truly perfect egg roll can deliver. For years, I thought the only way to get that beautiful golden shell was by ordering takeout, but trust me—I spent months testing fillings and frying methods until I cracked the code. This isn’t just *an* egg roll recipe; this is the blueprint for achieving that restaurant-quality crispiness right here in your own kitchen.
Growing up, the language of love in my home was definitely the sound of the skillet sizzling, and nothing tastes more like comfort and home than biting into one of these babies fresh from the oil. We are going to swap out those disappointing, soggy versions for something truly spectacular. Get ready, because this is hands-down the best egg roll recipe I’ve ever developed.
- Why This is the Best egg roll Recipe You Will Ever Make
- Ingredients for the Ultimate Homemade egg roll Filling
- How to Roll egg rolls Like a Pro
- Step-by-Step Instructions for the Perfect Fried egg roll
- Serving Suggestions for your Crispy egg roll Appetizer
- Storage and Reheating Instructions for Leftover egg roll
- Variations: Beyond the Classic Chicken egg roll
- Frequently Asked Questions About Making an egg roll
- Nutrition Estimate for this Classic egg roll Recipe
Why This is the Best egg roll Recipe You Will Ever Make
I won’t lie—making homemade egg rolls takes a little patience, but the payoff is huge. I tested this filling combination nearly a dozen times, adjusting the soy sauce, vinegar, and ginger ratio until the flavor wasn’t just good, it was better than what we usually get delivered. Why bother making them at home? Because ours turn out perfectly seasoned and, more importantly, they stay crispier longer than the takeout versions!
Honestly, the difference between a decent homemade roll and a five-star roll comes down to technique. We aren’t just throwing things together; this is scientifically sound cooking! You’ll see in the instructions that we let the filling cool completely. That little step stops the wrappers from getting gummy before they even hit the oil. Plus, if deep-frying just isn’t your thing right now, this filling works beautifully whether you choose to bake or air fry them. We prioritize flavor and texture, no matter how you cook them.
Achieving Perfect Crispy egg rolls Texture
Listen, if you want truly crispy egg rolls, you have to respect the oil temperature. It needs to hit exactly 350°F (175°C). If it’s too cold, the wrapper soaks up grease and gets floppy fast. If it’s too hot, you burn the wrapper before the filling heats through. My trick? Use a candy or deep-fry thermometer! Don’t eyeball it; that thermometer is your secret weapon for that signature golden crunch. Seal the wrappers tightly with just water—but make sure you use a thin, even layer so the edges bond securely before frying.
Ingredients for the Ultimate Homemade egg roll Filling
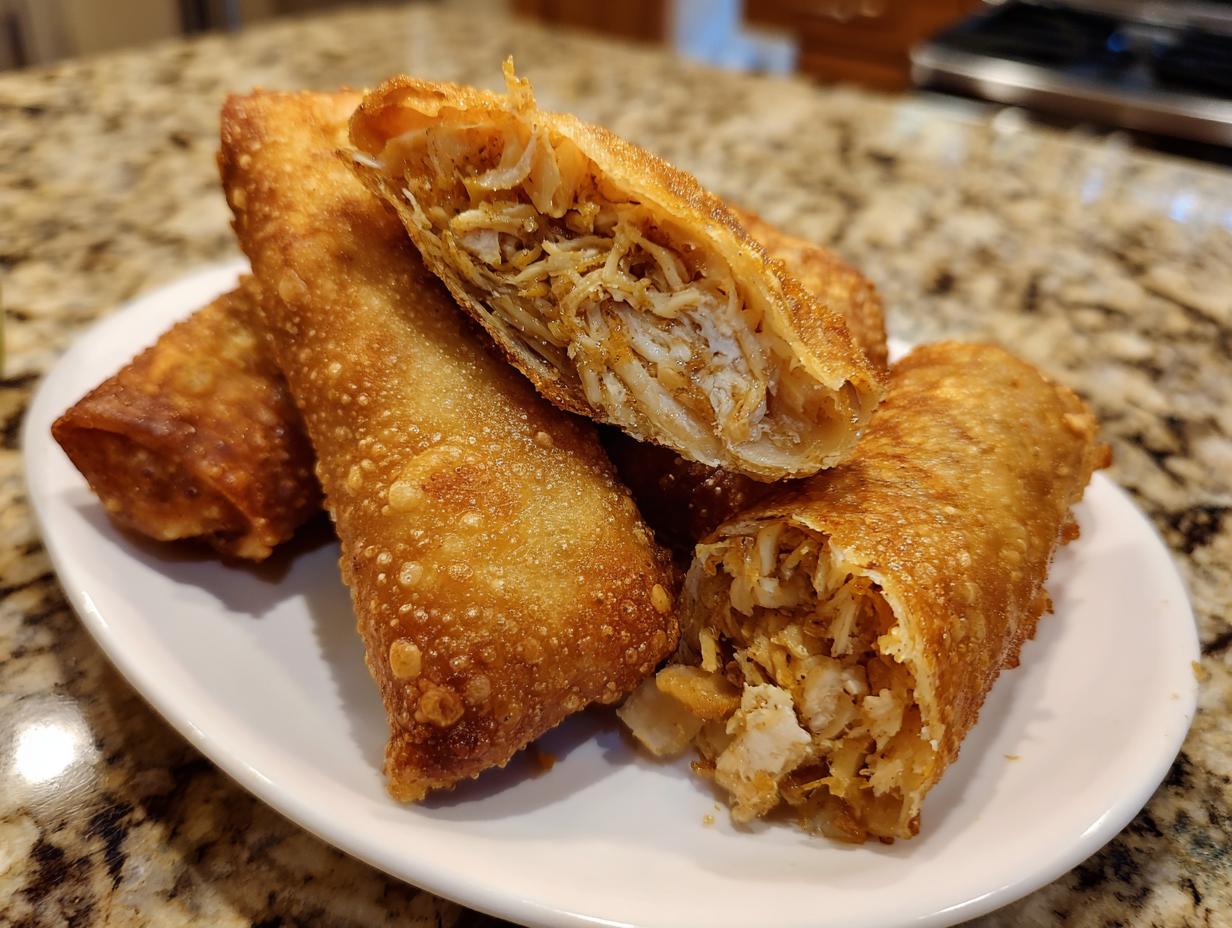
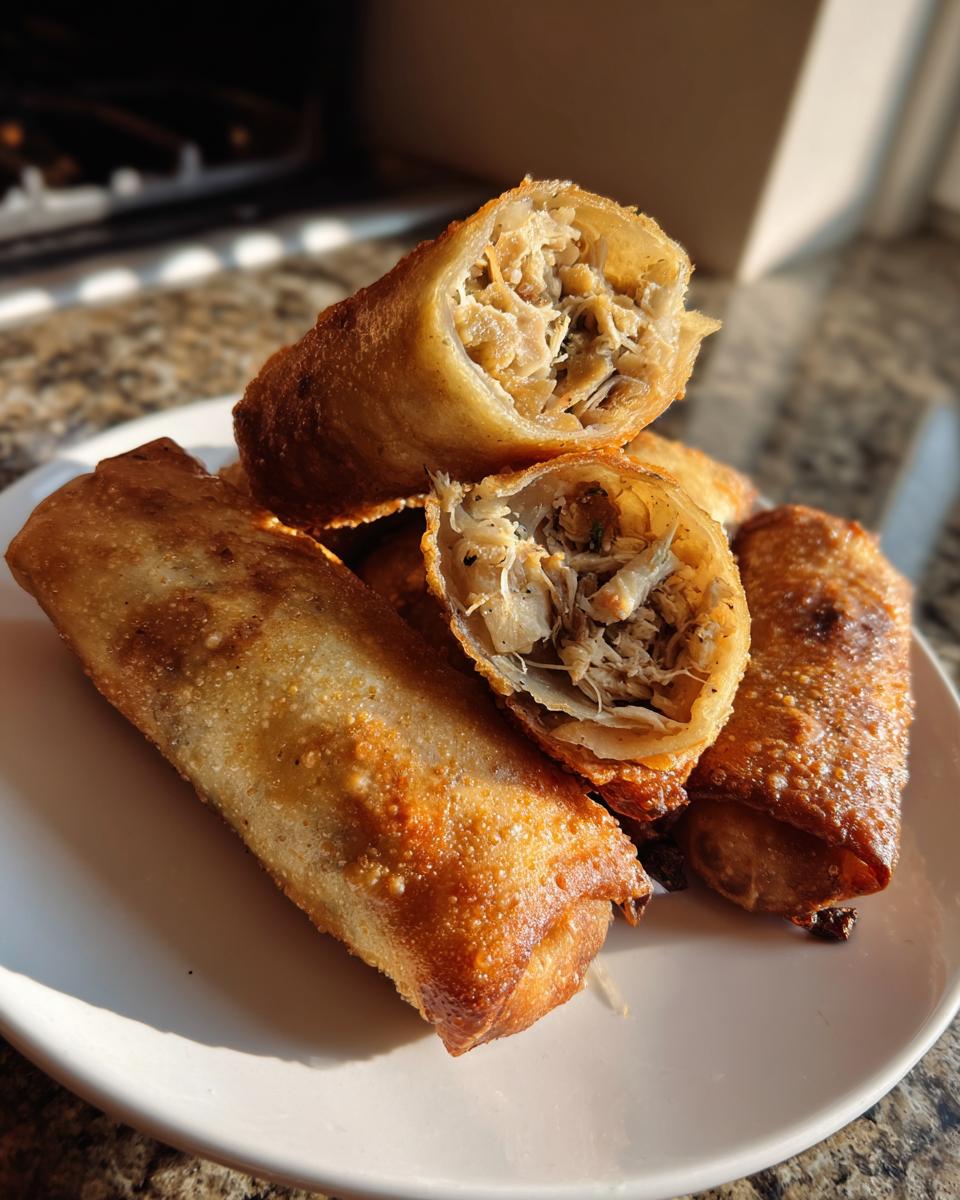
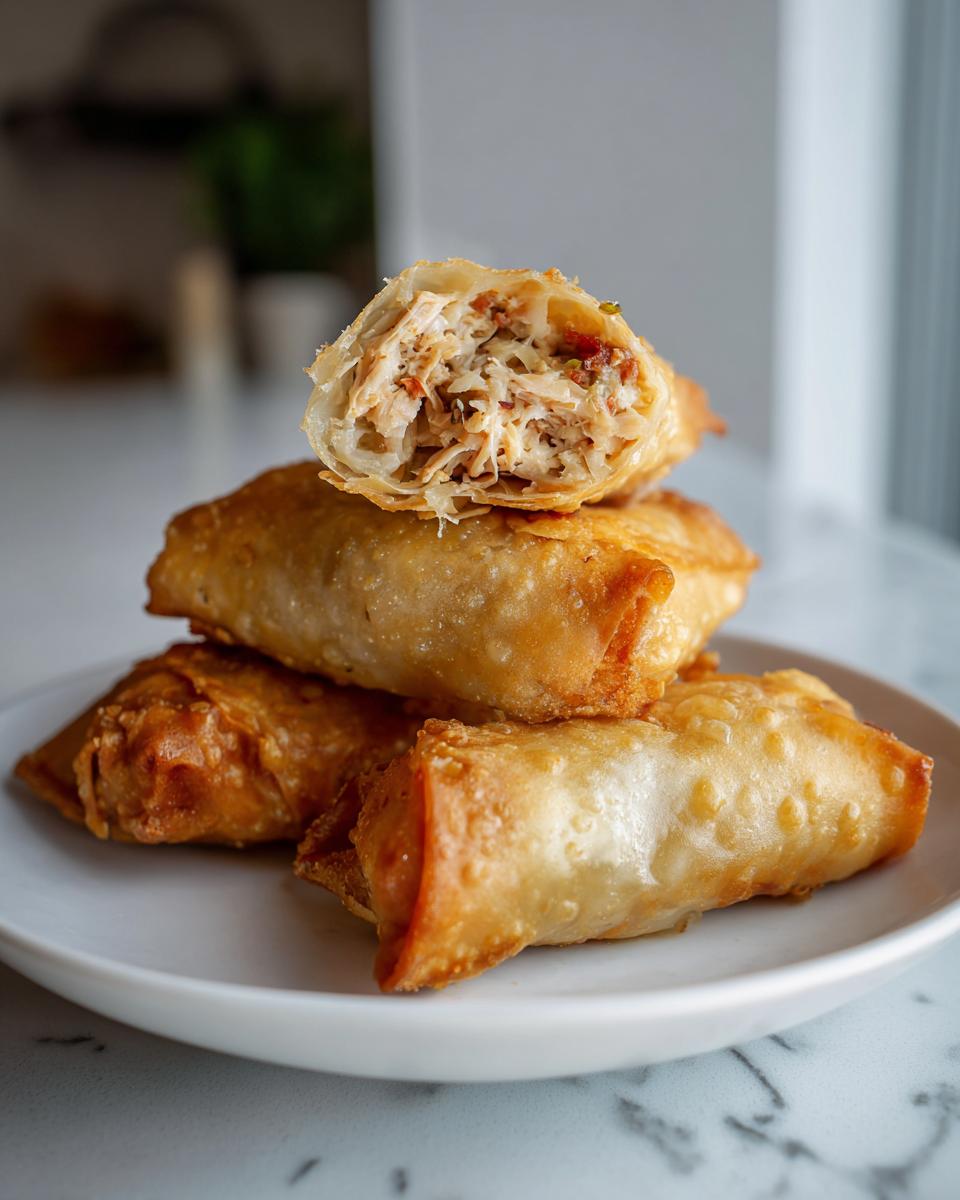
When we talk about making the best homemade egg rolls, the filling is where all the magic starts. We want flavor that pops, but we also have to respect the wrapper, which means the filling can’t be soaking wet! I’ve designed this simple mix using chicken because it cooks quickly and absorbs flavor beautifully, but please don’t feel limited. We’re keeping it straightforward here—just pure savory goodness.
Make sure you have everything prepped and ready to go before you start cooking. Remember, the flavors need time to meld, and the mixture absolutely must cool down before you start rolling. You don’t want a melted wrapper horror show on your hands!
- 3 tbsp olive oil
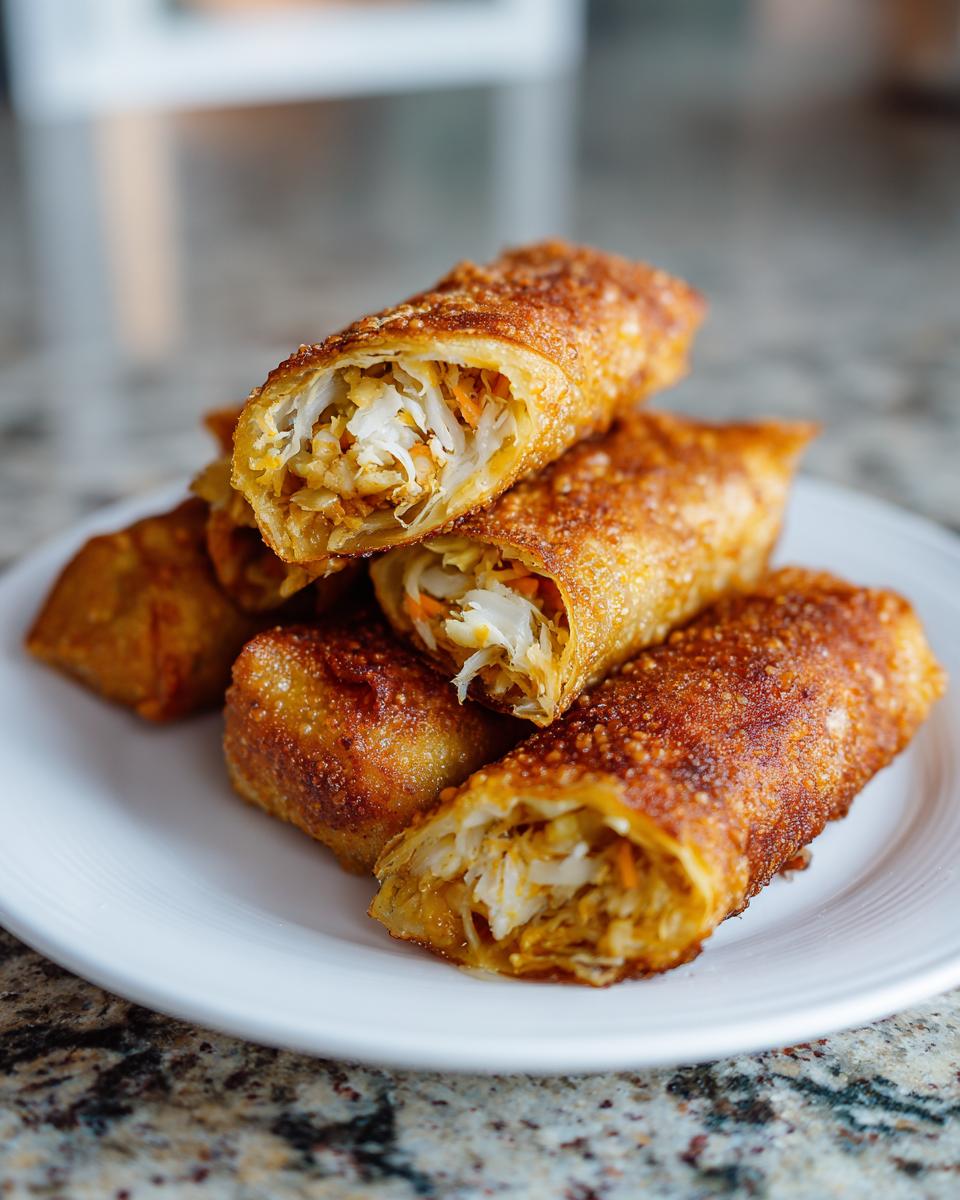
- 1 (16 oz) package tri-color coleslaw mix
- 2 cups cooked chicken, finely chopped or shredded
- 1 small onion, finely minced
- 2 cloves garlic, minced
- 1 tsp ground ginger
- 2 tbsp soy sauce
- 1 tsp rice vinegar
- 1/2 tsp sesame oil
- Salt and black pepper, to taste
- 12–15 egg roll wrappers
- Vegetable oil, for frying
- Water, for sealing
Ingredient Notes and Substitutions for your egg roll
This is important for building that flavor profile! If you can’t find the tri-color coleslaw mix, standard green cabbage and carrot shreds work just fine, but I love the extra color from the tri-color mix in mine. When it comes to protein, feel free to swap that chicken out. Ground pork works brilliantly here; you’ll want to brown it first in the skillet instead of frying onions in oil first, then drain off most of the rendered fat before adding the vegetables. Shredded beef works wonderfully too, especially if you’re using leftover roast!
The absolute non-negotiable step, even more than the flavor, is cooling. Once the filling is cooked, get it into a wide, shallow bowl and pop it in the fridge for about 20 minutes while you clean up. If the filling is warm, it steams the wrapper from the inside, leading to soggy bottoms. We want crispiness, remember? Patience here builds authority over your cooking, not frustration!
How to Roll egg rolls Like a Pro
Alright, deep breaths! This is the part that intimidates everyone, but I promise you, once you get this down, you’ll be churning out perfect homemade egg rolls faster than you can say “pass the dipping sauce.” Mastering how to roll egg rolls is all about geometry and a gentle touch. Don’t worry if your first one looks like a wonky burrito; mine certainly did!
Lay your wrapper flat on your counter or cutting board with one corner pointing directly toward you—this diamond orientation is key. Next, we gently spoon in about two tablespoons of the cooled filling, right near the bottom corner. Don’t overfill! That’s the absolute main mistake people make. You need enough space left at the top to seal it properly.
Here’s the technique: Take that bottom corner (the one pointing at you) and fold it snugly up and over the filling. Make sure it tucks in tightly around the mound of chicken and cabbage. Now, fold the two side corners—the ones pointing left and right—in towards the center, cinching them nicely against the roll. It should start looking like an envelope from the bottom.
Finally, roll it upwards toward that top, pointy corner. Keep it firm but not tight enough to rip the wrapper. When you get to the very top edge, grab a small bowl of water—just plain tap water works perfectly. Dip your pointer finger in the water and moisten that top edge thoroughly. Then, press down firmly where it overlaps the roll. The moisture activates the starch and seals it shut like glue. Boom! You have a perfectly sealed little package ready for its golden moment!
If you want to skip frying altogether, you can assemble all the rolls now and brush them lightly with oil before popping them in the oven or air fryer. For the crispiest results when frying, make sure you’ve sealed every single edge well, maybe even adding an extra tiny dab of water right on the final seam just to be safe. I love watching people learn this part, because once they see the technique, they realize it’s easier than rolling a complicated gift!
If you want some extra guidance on the mechanics of this, check out some tips on crafting the perfect roll on this fantastic guide. It really helps visualize that folding motion!

Step-by-Step Instructions for the Perfect Fried egg roll
Okay, now that you have your perfectly cooled filling and your wrappers are ready to go, it’s time to put on our chef hats and cook these beauties! I think of this like a little assembly line. Following these steps in order ensures a smooth process so you don’t end up with a pile of wrapper scraps and lukewarm filling.
First things first: the filling prep. Grab your wide skillet and get that 3 tablespoons of olive oil heating up over medium heat. Toss in your minced onion first. We want those to sweat until they are soft and clear—that usually takes about three minutes. Be patient here; you’re building the flavor base!
Next, add your minced garlic and ground ginger. Oh, the smell when those hit the heat! It only takes about 30 seconds until they are fragrant—don’t let them burn, or the whole batch tastes bitter. Then, your coleslaw mix goes in. Let that cook down just a bit, maybe three or four minutes, so it wilts but keeps just a tiny bit of crunch. Now, pile in the shredded chicken, soy sauce, rice vinegar, and sesame oil. Give it a good stir and let everything marry together for about two more minutes.
Crucially, take that skillet off the heat immediately. Let the filling cool down so it’s comfortable to handle. Once it’s cool enough, you’ll get that perfect roll we practiced earlier. Ready to cook? Heat up a good few inches of vegetable oil in a deep, heavy-bottomed pot or Dutch oven until it hits exactly 350°F (175°C). Trust me on the thermometer! We are aiming for deep golden brown in just a few minutes.
Carefully lower your assembled egg roll into the hot oil—don’t overcrowd the pan, or the oil temperature will drop instantly! Fry them for about 3 to 4 minutes, turning them gently a few times so all sides get that amazing color. Once they look deep golden and impossibly crispy, use tongs to pull them out and set them right on a paper towel-lined plate to drain off any extra oil. Serve them hot immediately! If you want an extra layer of appreciation for that crunch, check out these tips on making restaurant-style rolls over here.
Healthier Cooking Methods for your egg roll
I know deep frying isn’t for everyone, and maybe you’re looking for an easy appetizer that feels lighter for a Tuesday night dinner. Good news: this filling is so flavorful, it shines even when we skip the fryer! If you’re trying to do air fryer egg rolls, lightly brush the outside of your rolled egg rolls with a bit of oil—don’t skip that brushing or they’ll dry out! Air fry or bake them at 375°F (190°C) for about 10 to 12 minutes, flipping halfway through. That gets you close to that desirable crisp texture without submerging them in oil.
For those sticking to traditional baking, bump the temperature up slightly to 400°F (200°C). You’ll need about 15 to 20 minutes, flipping them halfway through for even browning. These baked egg rolls are fantastic for meal prepping too, since they hold up well.
Serving Suggestions for your Crispy egg roll Appetizer
You’ve done the hard work! The filling is savory, the wrappers are impossibly golden and crisp—now we need the entourage! These incredible appetizer recipes really come alive with the right sauce on the side. Honestly, these rolls are great just dipped straight into goodness; they are hearty enough to stand on their own as a fantastic game day snack.
My absolute go-to dips change depending on my mood. If I’m feeling classic, you can’t beat a good bottle of bright, tangy store-bought sweet and sour sauce. But if you’re feeling ambitious, a homemade duck sauce or even a spicy mustard brings out the ginger in the filling beautifully. I actually have a recipe for the best stuffed mushrooms if you need another appetizer to round out the platter!
For a little heat, skip the standard duck sauce and whisk together a little soy sauce, rice vinegar, a spoonful of brown sugar, and a healthy shake of chili flakes or Sriracha for a quick, customized spicy mustard dip. You just dunk, dip, and enjoy that crunch—it’s that simple!
Storage and Reheating Instructions for Leftover egg roll
So, you managed to have leftovers? Wow, that rarely happens in my house! Whether you have extra filling, uncooked assembled rolls, or fully cooked golden lovelies, figuring out how to store them correctly is crucial to keeping that beautiful texture intact. Nobody wants a soggy egg roll the next day, right?
Let’s talk about the uncooked ones first, because this is a game-changer for easy dinners later. If you have assembled rolls that you haven’t fried yet, you need to freeze them properly so they don’t stick together. Lay the sealed rolls out flat on a baking sheet—make sure they aren’t touching! Place that sheet directly into the freezer until the rolls are totally solid. Once they are rock hard (we call this flash freezing), you can transfer them into a heavy-duty, airtight freezer bag. They will keep for about three months, and you can fry them straight from frozen when you’re ready; just add a minute or two to the frying time!
Now, for the cooked ones. If you have leftover fried egg rolls, store them in a single layer in an airtight container in the fridge for up to three days. If you stack them while they are warm, steam gets trapped, and that’s how you turn a crispy classic into a mushy mess overnight!
Reheating is where we bring back the magic. Please, I beg you, do not use the microwave unless you absolutely have to. Microwaving will heat them, sure, but it also steams the wrapper and guarantees sogginess. We want crunch back!
Your best bet for reviving that perfect texture is using the oven or the air fryer. Preheat your oven to about 375°F (190°C). Place the cooked egg roll right on the wire rack over a baking sheet so air can circulate underneath. Bake for about 8 to 10 minutes, flipping them halfway through, until they are sizzling hot and the wrapper is crisp again. If you use the air fryer, it’s even faster: 360°F (180°C) for about 5 minutes, shaking the basket once halfway through. They will taste almost exactly like they did fresh out of the oil!
Variations: Beyond the Classic Chicken egg roll
Okay, once you’ve mastered the technique for the classic chicken version, you realize that the filling is just a canvas waiting for your creative touch! This is where the fun really begins, and you can start experimenting with all sorts of delicious egg roll filling ideas. My goal is always to make sure you never get bored with a recipe, even a family favorite like this one.
Think about football Sunday or when you have guests over—you can totally pivot this flavor profile! Have you ever thought about making a spicy beef taco version? All you need to do is swap the chicken for seasoned ground beef, add a little chili powder and cumin to the seasoning mix, and maybe even toss in some shredded cheddar cheese near the end (let it cool perfectly before rolling, of course!). Or, if you’re feeling indulgent, my favorite party twist involves using leftover Buffalo chicken dip filling. That version is absolutely unreal. If you want to try that spicy, creamy flavor profile in a different dish, you can check out my recipe for Buffalo Chicken Casserole!
If you’re looking for flavor inspiration that totally switches gears, you should definitely check out recipes for Southwest variations; they really bring a nice kick! You can see a great example of that fusion style right here.
Making an egg roll in a bowl Low Carb Alternative
Now, I know some of you are reading this thinking, “Kate, I love the filling, but I’m trying to cut carbs right now,” and I totally get that! The wonderful thing about this recipe is that the savory filling we built is absolutely fantastic on its own, wrapper-free. This is the secret to making an incredible egg roll in a bowl!
If you want a low carb egg roll option, you just stop right before you assemble the roll. You take that cooked filling, scoop it into a bowl, and eat it just like a hearty, Asian-inspired stir-fry. It’s savory, full of texture from the cabbage, and rich with flavor from the ginger and sesame oil. It’s a complete, delicious one-pan meal that satisfies that craving without any of the carbs from the wrapper. It’s perfect for keeping things super easy on a busy weeknight or if you’re sticking to a keto egg roll recipe plan!
To boost the flavor for the bowl version, I often add a little extra drizzle of sesame oil right at the end, or toss in some chopped green onions for freshness. It’s so fast and really captures the essence of the egg roll without any fuss!
Frequently Asked Questions About Making an egg roll
I know that when you commit to making homemade egg rolls, you want zero guesswork! It’s always great hearing from you all with your cooking questions. Over the years, I’ve figured out the best answers to keep your rolls consistently crispy and delicious. These are the issues I see come up most often when people are trying this easy egg roll recipe for the first time. If you need more quick meal ideas, I always suggest looking over my collection of easy lunch ideas!
Can I freeze uncooked egg rolls?
Yes, you absolutely can, and I highly recommend it for your future self! If you find yourself with extra filling or just want to prep for a party, freezing the uncooked rolls is the perfect solution for an easy dinner idea later on. Once you’ve rolled and sealed them tightly (remember to use water and really press those seams), lay them flat on wax paper or parchment paper so they aren’t touching. Place that entire tray into the freezer until they are hard—this usually takes an hour or two. Once they are completely frozen solid, you can transfer them into a large, heavy-duty freezer bag. When you’re ready to cook, fry them straight from frozen, but add about 1 to 2 extra minutes to the frying time!
What is the best dipping sauce for a fried egg roll?
This is purely personal preference, but I feel like the best dipping sauce needs to cut through the richness of the fried wrapper. While sweet and sour sauce is classic, my favorite dipping sauce for a fried appetizer like this is a simple blend of warm flavors. I usually mix equal parts soy sauce and rice vinegar, then whisk in about half a teaspoon of honey or brown sugar until dissolved, and finish it with just a tiny splash of that reserved sesame oil from the filling. It’s savory, light, and doesn’t overpower the wonderful flavors we worked so hard to get into the filling!
For a truly great experience, I always recommend serving these immediately after draining them. But if you’re looking for a little something extra to serve alongside them, think about preparing a simple spicy mustard dip—it highlights the fresh ginger in the sautéed mixture so beautifully.
Nutrition Estimate for this Classic egg roll Recipe
I always like to give you an idea of what you’re working with, especially since we are trying to make these a regular feature in our rotation! Remember that because this recipe gives you the option to pan-fry, bake, or air fry, the nutritional breakdown changes quite a bit depending on the cooking method you choose. The numbers below are baseline estimates based on the recipe ingredients listed, assuming a traditional deep-fry method and averaging out the yield.
Please keep in mind these are guidelines only—if you use ground pork instead of chicken or use a different brand of soy sauce, the final macros will shift slightly. But this should give you a great starting point! I think you’ll be pleased that even deep-frying results in a portion that isn’t overly heavy, provided you drain them really well!
- Serving Size: 1 egg roll
- Calories: 180
- Fat: 10g
- Saturated Fat: 2g
- Carbohydrates: 15g
- Protein: 8g
- Sugar: 1g
- Sodium: 350mg
Crispy Homemade Fried Egg Rolls: A Better Than Takeout Recipe

Make restaurant-quality crispy homemade egg rolls right in your kitchen. This recipe provides a savory, juicy filling and clear steps for achieving that perfect golden crunch when you fry them. This is the best egg roll recipe for appetizers or a satisfying dinner.
- Prep Time: 20 min
- Cook Time: 15 min
- Total Time: 35 min
- Yield: 12-15 servings 1x
- Category: Appetizer
- Method: Frying
- Cuisine: Asian
- Diet: Low Fat
Ingredients
- 3 tbsp olive oil
- 1 (16 oz) package tri-color coleslaw mix
- 2 cups cooked chicken, finely chopped or shredded
- 1 small onion, finely minced
- 2 cloves garlic, minced
- 1 tsp ground ginger
- 2 tbsp soy sauce
- 1 tsp rice vinegar
- 1/2 tsp sesame oil
- Salt and black pepper, to taste
- 12–15 egg roll wrappers
- Vegetable oil, for frying
- Water, for sealing
Instructions
- Heat the olive oil in a wide skillet over medium heat.
- Add the minced onion and cook until soft and translucent, about 3 minutes.
- Stir in the garlic and ground ginger and cook briefly until fragrant.
- Add the coleslaw mix and cook for 3–4 minutes, stirring often, until slightly wilted but still crisp.
- Add the cooked chicken, soy sauce, rice vinegar, sesame oil, salt, and black pepper. Stir well and cook for 2 more minutes.
- Remove the mixture from heat and allow it to cool slightly before rolling.
- Place an egg roll wrapper on a flat surface with one corner pointing toward you.
- Spoon filling into the center, fold the bottom corner over the filling, fold in the sides, and roll tightly. Seal the edge with water.
- Heat vegetable oil in a deep pan to 350°F (175°C).
- Fry egg rolls in batches for 3–4 minutes, turning as needed, until deeply golden and crisp.
- Transfer to paper towels to drain before serving.
Notes
- For air fryer egg rolls: Lightly brush the assembled rolls with oil and cook at 375°F (190°C) for 10–12 minutes, flipping halfway, until golden brown.
- For baked egg rolls: Brush rolls with oil and bake at 400°F (200°C) for 15–20 minutes, flipping halfway.
- You can substitute the chicken with ground pork or shredded beef for different flavor profiles.
- Serve these crispy egg rolls immediately with your favorite dipping sauce for the best texture.
Nutrition
- Serving Size: 1 egg roll
- Calories: 180
- Sugar: 1
- Sodium: 350
- Fat: 10
- Saturated Fat: 2
- Unsaturated Fat: 8
- Trans Fat: 0
- Carbohydrates: 15
- Fiber: 1
- Protein: 8
- Cholesterol: 25