
Sometimes you just crave that classic, comforting bite of Boston Cream Pie, right? But maybe you don’t want to commit to a whole pie that needs slicing and careful transport. I totally get it! That’s why I developed these vanilla wafer boston cream pie cookies. When I was developing recipes to make classic desserts more fun and manageable for my busy friends, transforming that rich pastry cream and dark chocolate topping into a sturdy cookie felt like a brilliant shortcut. They have all that decadent flavor, but they fit perfectly in your hand! Forget baking failures—this recipe is designed to bring that bakery-style comfort right to your kitchen counter, easily.
- Why You Will Love These Vanilla Wafer Boston Cream Pie Cookies
- Essential Ingredients for Your Vanilla Wafer Boston Cream Pie Cookies
- Step-by-Step Guide to Making Vanilla Wafer Boston Cream Pie Cookies
- Tips for Perfect Vanilla Wafer Boston Cream Pie Cookies
- Ingredient Notes and Substitutions for Your Vanilla Wafer Boston Cream Pie Cookies
- Storage and Keeping Your Vanilla Wafer Boston Cream Pie Cookies Fresh
- Frequently Asked Questions About Boston Cream Pie Cookies Recipe
- Serving Suggestions for Your Decadent Chocolate Cream Cookies
- Share Your Vanilla Wafer Boston Cream Pie Cookies Creations
Why You Will Love These Vanilla Wafer Boston Cream Pie Cookies
I promise you, these aren’t just any sandwiched cookies. We are taking inspiration from one of America’s favorite desserts and shrinking it down into something wonderfully manageable. If you’re looking for that perfect blend of soft cookie, creamy filling, and chocolatey finish, you’ve found your winner. Here’s why these need to be on your baking sheet:
- Authentic Flavor Profile: We nail those signature notes—the soft vanilla of the cake base, the luscious homemade pastry cream, and that rich chocolate coating. It truly tastes like a mini pie!
- Smart Use of Vanilla Wafers: Crushing those crisp vanilla wafers right into the cookie dough adds a subtle depth of vanilla flavor and helps give the base just the right structure so it doesn’t crumble apart after filling.
- Accessible Baking: This recipe avoids complicated, fussy pastry techniques. You get a show-stopping dessert cookie without needing advanced skills. It’s wonderfully straightforward.
- Perfect Portion Control: They are perfectly handheld! You can enjoy the indulgence of a cream pie without worrying about leftovers or perfect pie slices.
Essential Ingredients for Your Vanilla Wafer Boston Cream Pie Cookies
When making something inspired by a true classic, the ingredients matter! We need quality components for the cookie, the creamy center, and the glossy topping. Don’t worry; you can find everything needed at your regular grocery store. I’ve broken down exactly what you need below.
For the Cookie Base Dough
- 1 cup (2 sticks) unsalted butter, softened
- 1 cup granulated sugar
- 2 large eggs
- 1 teaspoon vanilla extract
- 2 1/2 cups all-purpose flour
- 1 teaspoon baking powder
- 1/2 teaspoon salt
- 1 cup crushed vanilla wafers (about 30 wafers)
For the Homemade Pastry Cream Filling
I really push for homemade here; it makes all the difference! If you use a boxed mix, you miss out on that real, rich texture. Remember to chill this really well!
- 1/2 cup milk
- 2 large egg yolks
- 1/4 cup granulated sugar
- 2 tablespoons cornstarch
- 1 teaspoon vanilla extract
For the Chocolate Ganache Topping
This comes together in just minutes, but the quality of the chocolate makes the final look shiny and decadent.
- 1 cup semi-sweet chocolate chips
- 1/2 cup heavy cream
Step-by-Step Guide to Making Vanilla Wafer Boston Cream Pie Cookies
This process flows wonderfully if you tackle one component at a time—bake the cookies first, chill the cream while they bake and cool, and then assemble. This recipe is designed to simplify what could be a very involved process, making these custard filled cookies a weeknight possibility!
Baking the Perfect Vanilla Wafer Cookie Base
We start by making a super sturdy cookie dough that can handle the thick filling. First, use your mixer to cream that softened butter with the sugar until it’s fluffy—we are building air pockets here! Beat in the eggs one at a time, followed by the vanilla. In a separate bowl, whisk your dry ingredients together: the flour, baking powder, and salt. Now, add the dry mixture slowly to the wet ingredients, mixing just until everything comes together. The secret? Gently fold in those crushed vanilla wafers; they are a non-negotiable part of the Boston Cream Pie flavor!
Once the dough is mixed, wrap it up tight and pop it into the fridge for at least 30 minutes. Trust me, chilling the dough is key to these not turning into flat puddles! After chilling, preheat your oven to 350°F (175°C). Roll the dough out to about 1/4 inch thickness and use a 2-inch round cutter. Lay them on parchment-lined sheets and bake them for 10 to 12 minutes. You are looking for edges that are only lightly golden—we want them soft, not crunchy!
Creating the Authentic Homemade Pastry Cream Filling
While those cookies are cooling completely—and they must be cool, or they’ll melt the filling—we make the pastry cream. In a saucepan, you need to whisk your egg yolks and sugar until pale. Then, whisk in the cornstarch. Now, gradually whisk in the milk. Cook this mixture over medium heat, stirring *constantly*. If you stop stirring, you’ll get lumps, and we don’t want that! Keep stirring until it bubbles vigorously and you see it thicken up substantially. Let it boil for one full minute to cook out that raw starch flavor. Off the heat, stir in your vanilla. Crucially, cover the surface directly with plastic wrap before chilling. This stops that dreaded skin from forming, which is essential for smooth filling.
Assembling Your Boston Cream Pie Cookies
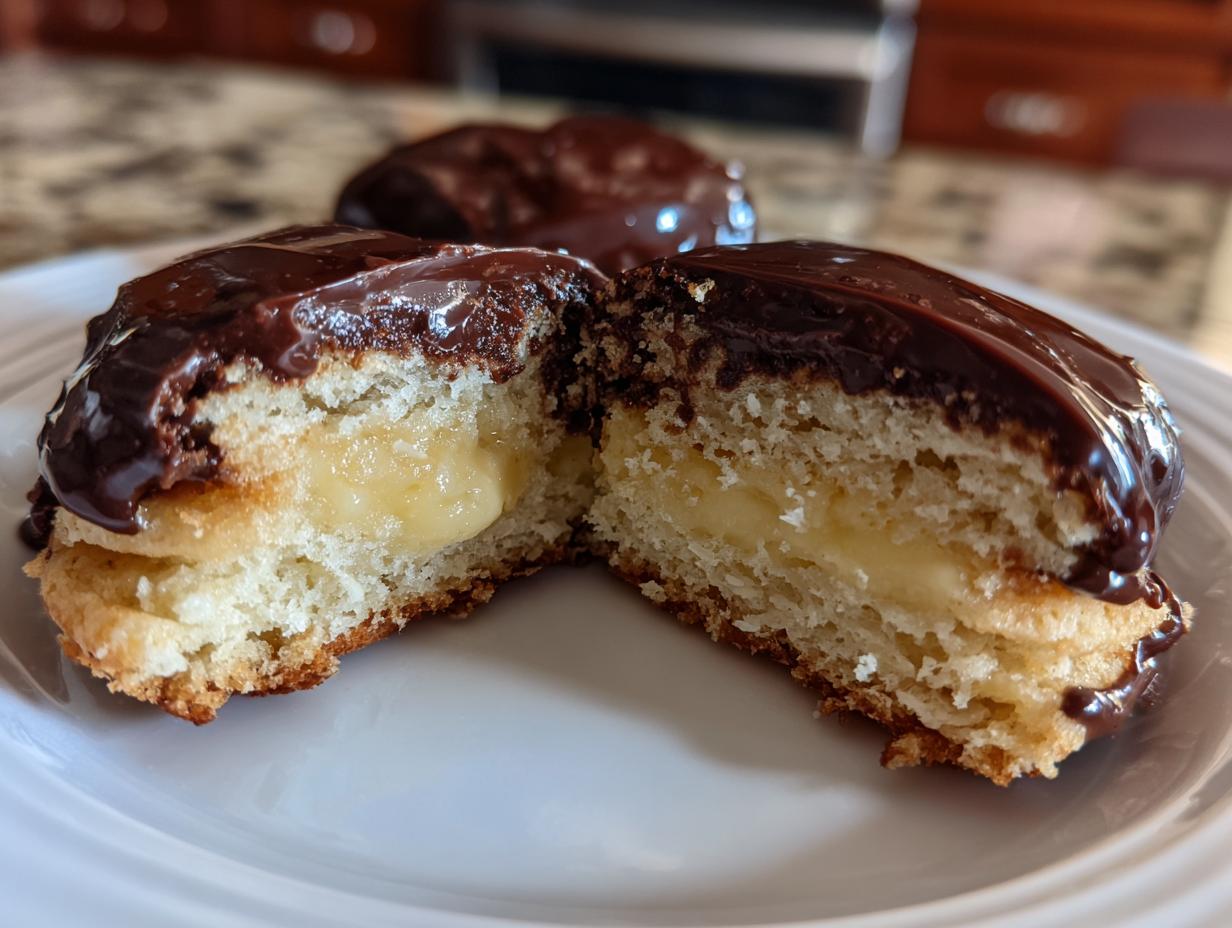
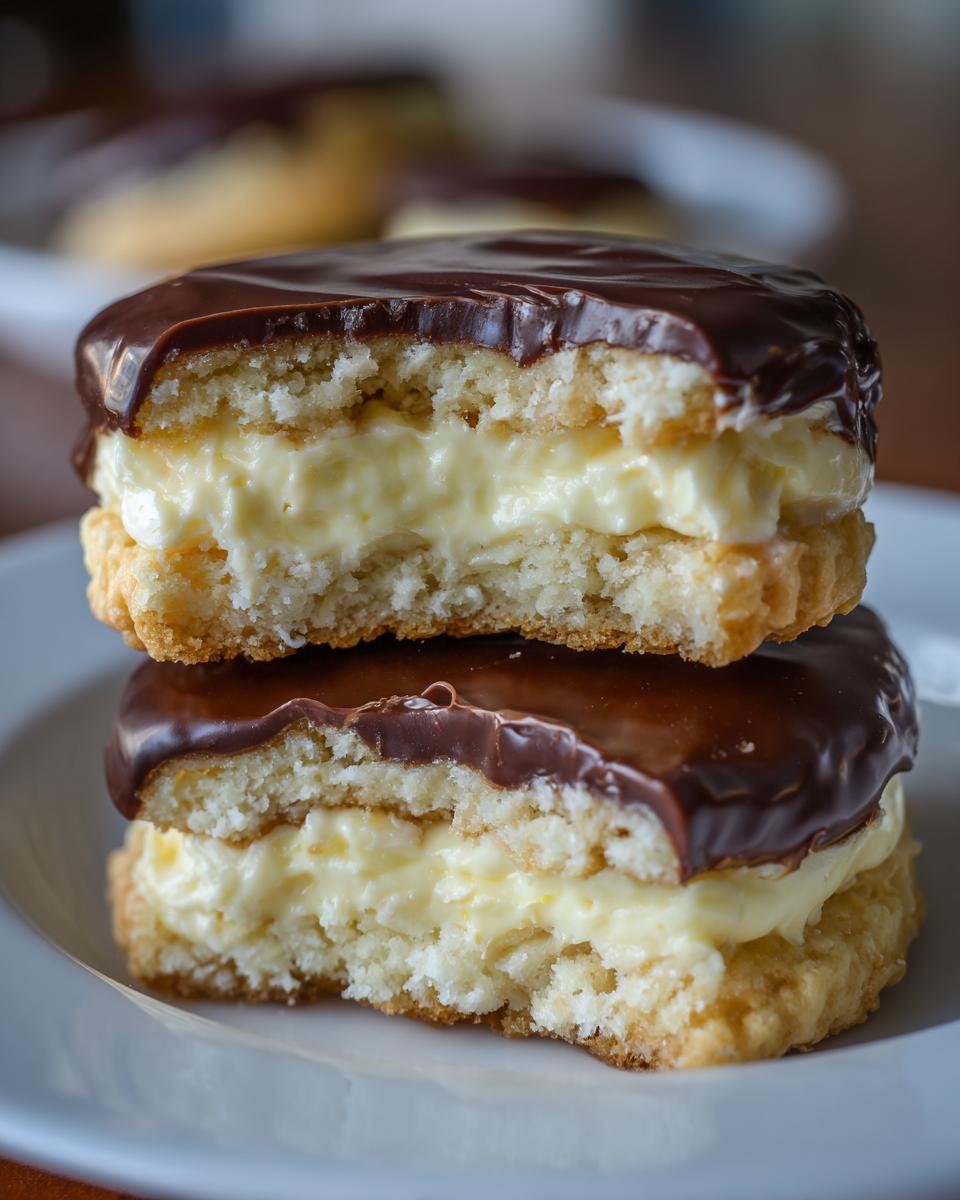
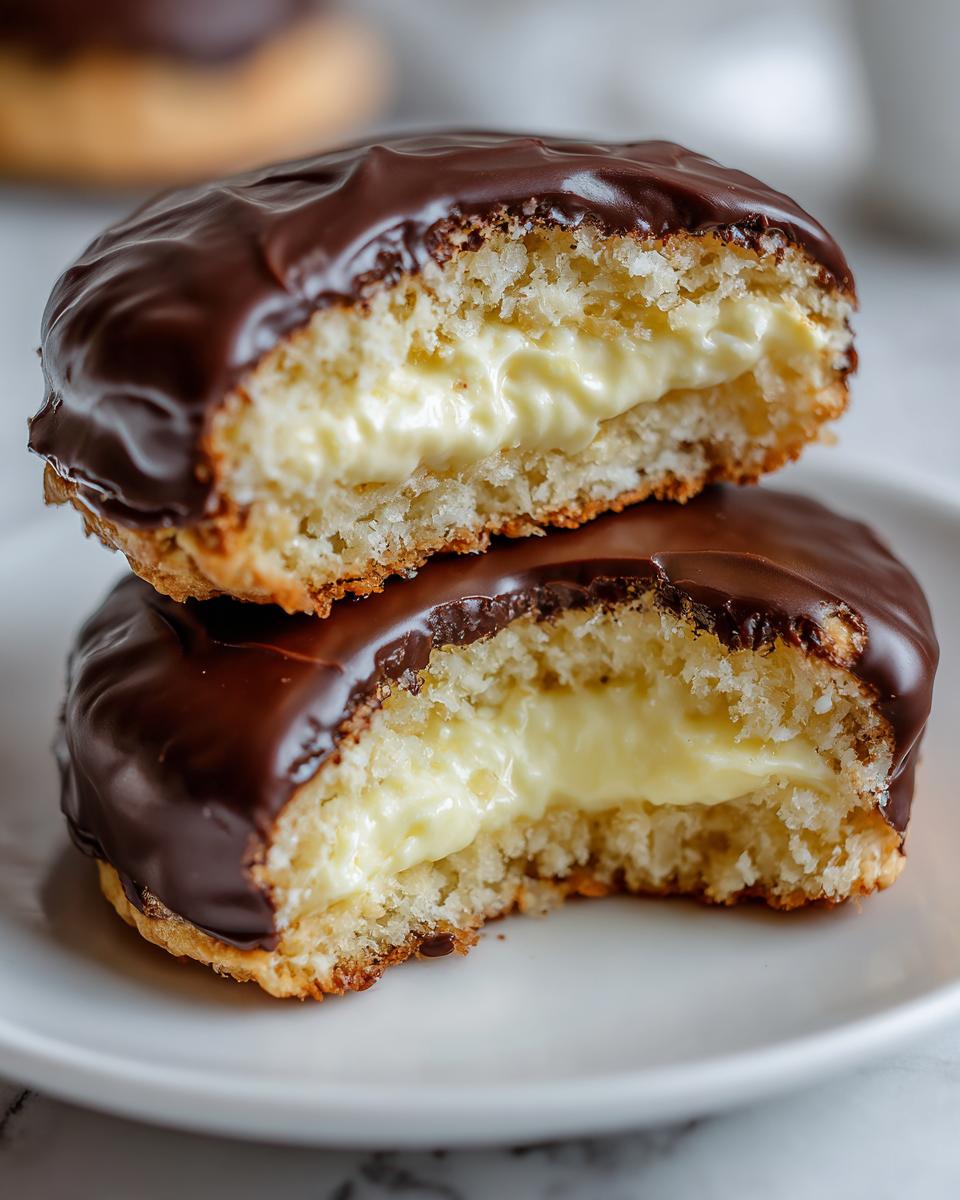
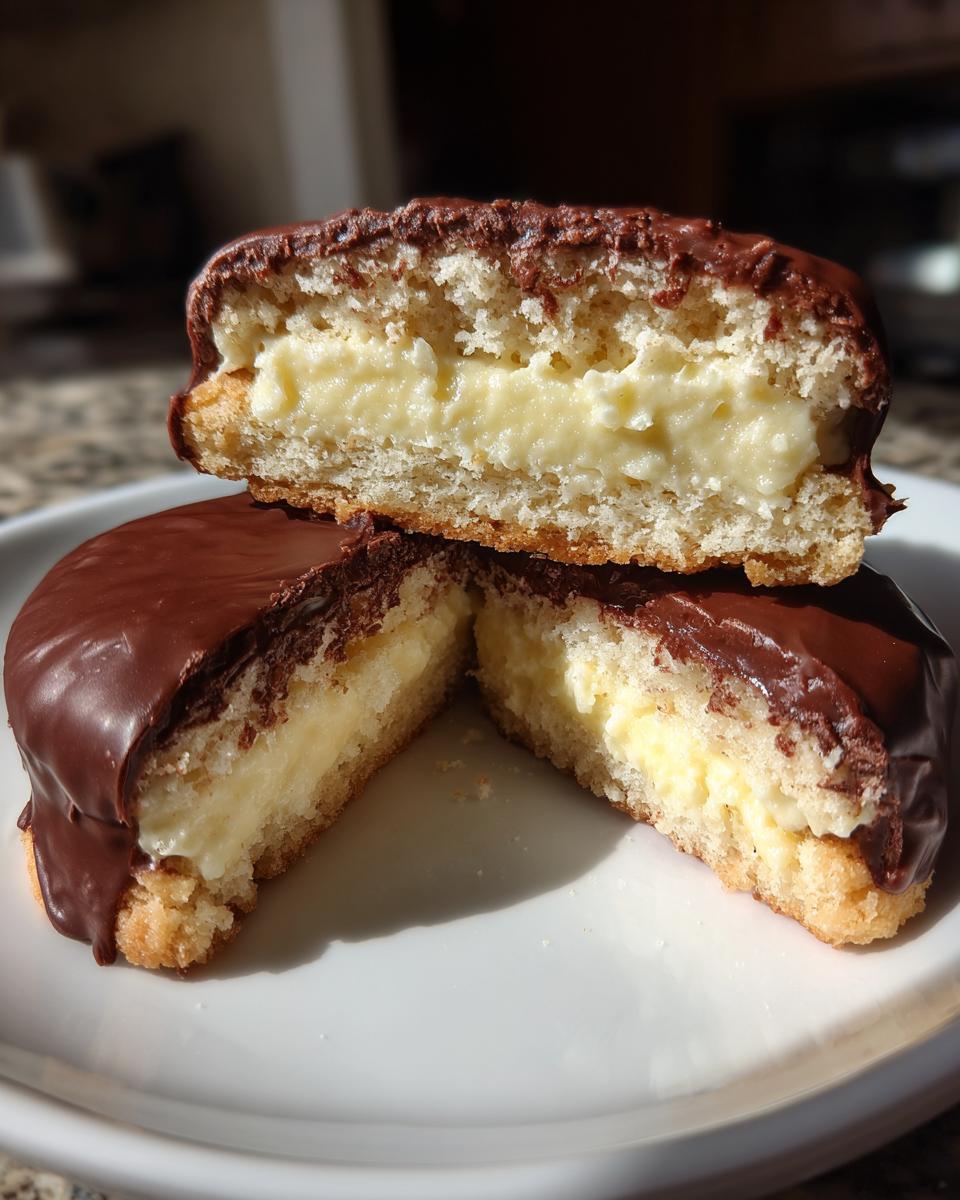
Now for the fun part where these turn into true copycat Boston Cream Pie flavors! Once your cookies are room temperature and your pastry cream is fully chilled (it should be thick enough to scoop easily), it’s time to match them up. Take one cookie and spread a nice, generous dollop of that wonderful pastry cream onto the flat side. Place a second cookie on top to create a sandwich. They should line up nicely.
Next, the chocolate glaze! Gently heat your heavy cream until it just simmers, then pour it over your chocolate chips. Let it sit for five minutes—don’t touch it! Whisk it until it’s smooth and glossy. Let it cool just slightly so it’s thick enough to coat but still pourable. Dip the top of EACH sandwich cookie into that beautiful ganache, letting the excess drip back into the bowl. Set them on a wire rack over parchment paper until the chocolate sets up. Perfection!
Tips for Perfect Vanilla Wafer Boston Cream Pie Cookies
Even with straightforward recipes, a few tricks can elevate your results from good to absolutely incredible. I always share these little secrets because they stopped me from having baking headaches early on. These tips will help you achieve the best Easy Boston Cream Pie Cookies possible!
- Uniform Circles Made Easy: If your cookies spread just a tiny bit, don’t panic! Once they are cool enough to handle—still slightly warm—use a sharp, small paring knife to gently trim around the edges while they are sitting flat on the counter. This gives you that sharp, professional bakery look before you fill them.
- Ganache Temperature is Everything: If your ganache is too hot when you dip the cookies, it will soak right into the cookie itself, leaving you with a messy bottom and a thin top coat. If it’s too cold, it will be too thick and clump up. Wait until it cools enough that dripping off the spoon leaves a clear trail before diving in.
- The Freezer Trick for Assembly: If you are having trouble fitting the pastry cream nicely, try chilling the filled but unglazed cookies in the freezer for about 10 minutes. This firms up the cream just enough so that the chocolate dipping process is much cleaner.
- Don’t Overmix the Dough: Seriously, once you add the flour, just mix until it *just* comes together. Overmixing develops gluten, meaning your cookie base will turn out tough instead of pleasantly tender.
Ingredient Notes and Substitutions for Your Vanilla Wafer Boston Cream Pie Cookies
Deciding where you can cut corners and where you absolutely must stick to the recipe is an important part of home baking! For these chocolate glazed sandwich cookies, some ingredients are flexible, but others hold the whole experience together.
On the Vanilla Wafers: I specify vanilla wafers because they have a specific, mild texture and taste that works better than graham crackers or shortbread crumbs here. For the most authentic flavor, use the classic Nabisco-style wafers. If you absolutely cannot find them, the closest substitute would be a homemade vanilla shortbread cookie snapped into crumbs, but the flavor won’t be quite as recognizable.
Pastry Cream Shortcut: I know the pastry cream looks intimidating because you have to stand there stirring. If you are truly pressed for time, you can substitute with high-quality vanilla pudding mix prepared according to the package directions. However, I use a note in the recipe about this replacement because the homemade version (using those yolks and cornstarch) offers a decidedly richer, less artificial taste that mimics the actual filling of a real Boston Cream Pie. It’s worth the 10 minutes of stirring, I promise!
Chocolate Choices: I prefer semi-sweet chocolate chips because they give you a nice sweet-to-bitter ratio that cuts through the richness of the cream. If you love dark chocolate, feel free to swap in bittersweet chips, but make sure you use high-quality ones since the topping is so prominent.
Storage and Keeping Your Vanilla Wafer Boston Cream Pie Cookies Fresh
Because these contain that wonderful homemade pastry cream filling, we treat them a bit differently than your average drop cookie. These are definitely best enjoyed the day they are made, but they hold up beautifully for a quick grab-and-go treat for a few days!
You must store these cookies in an airtight container in the refrigerator. They should last safely for about three to four days. If you leave them on the counter, that lovely custard filling will spoil faster, and you risk the chocolate glaze getting soft or sticky, especially if your kitchen is warm.
When you pull them out of the fridge, they will be quite firm, especially the glaze. Let them sit on the counter for about 15 to 20 minutes before serving. This allows the cookie base to soften up again and the cream center to come back to that perfect, luscious, melt-in-your-mouth texture we are aiming for. If you’re prepping them for a party, you can assemble the whole thing (cookies filled and dipped) and keep them chilled. They travel well this way!
Frequently Asked Questions About Boston Cream Pie Cookies Recipe
Can I skip crushing the vanilla wafers in the cookie dough?
You really shouldn’t skip this step! Those crushed wafers are key to the Copycat Boston Cream Pie Flavors experience. They provide a subtle, familiar vanilla taste and add just a bit of structure to the cookie base so it doesn’t crumble when sandwiched with the cream. Without them, you just have a generic vanilla cookie.
How do I prevent the pastry cream from being too runny in these cookies?
The two most important factors are cooking time and chilling time. You have to cook the cream until it bubbles and you hold that bubble for one full minute—this activates the cornstarch fully. After cooking, it needs several hours in the fridge until it is genuinely firm. If it’s still lukewarm or loose, it will squirt right out when you try to assemble your Chocolate Glazed Sandwich Cookies.
What is the best way to get a smooth, shiny chocolate glaze on these sandwich cookies?
The shininess comes from the heavy cream melting the chocolate properly and not overheating the mixture. Make sure you use quality chocolate. When you mix the cream and chips, let it sit untouched for five full minutes before whisking. Then, whisk slowly and gently from the center outward. Let that ganache cool down just slightly so that when you dip a spoon in, it leaves a clear line for a second before flowing back together. That slightly thickened state gives you that beautiful, thick coat.
Serving Suggestions for Your Decadent Chocolate Cream Cookies
These rich little beauties are powerful, so they pair wonderfully with beverages that can cut through the cream and chocolate. A steaming mug of coffee is my absolute top recommendation—the slight bitterness of the coffee is just perfect against the sweet vanilla.
They are also wonderful alongside something light and refreshing if you are serving them after a heavy meal. Try pairing them with a simple, icy glass of milk, or perhaps a delicate cup of Earl Grey tea. If you’ve made a wonderful chocolate cake for dessert, these cookies make a fantastic accompaniment for coffee hour afterward!
Share Your Vanilla Wafer Boston Cream Pie Cookies Creations
I genuinely love seeing your baking successes! Sharing these recipes is all about creating joy in your kitchen. When you make these Best Cookie Recipes with Vanilla Wafers, snap a photo!
Please leave a star rating for the recipe right below the instructions—it helps me know what recipes you’d like to see more of. And if you shared your gorgeous glazed sandwiches on social media, tag me so I can cheer you on! If you loved this trip into accessible baking, check out my About Page and browse some of my other favorite comfort food twists. Happy baking, friends!
- Why You Will Love These Vanilla Wafer Boston Cream Pie Cookies
- Essential Ingredients for Your Vanilla Wafer Boston Cream Pie Cookies
- Step-by-Step Guide to Making Vanilla Wafer Boston Cream Pie Cookies
- Tips for Perfect Vanilla Wafer Boston Cream Pie Cookies
- Ingredient Notes and Substitutions for Your Vanilla Wafer Boston Cream Pie Cookies
- Storage and Keeping Your Vanilla Wafer Boston Cream Pie Cookies Fresh
- Frequently Asked Questions About Boston Cream Pie Cookies Recipe
- Serving Suggestions for Your Decadent Chocolate Cream Cookies
- Share Your Vanilla Wafer Boston Cream Pie Cookies Creations
Why You Will Love These Vanilla Wafer Boston Cream Pie Cookies
I promise you, these aren’t just any sandwiched cookies. We are taking inspiration from one of America’s favorite desserts and shrinking it down into something wonderfully manageable. If you’re looking for that perfect blend of soft cookie, creamy filling, and chocolatey finish, you’ve found your winner. Here’s why these need to be on your baking sheet:
- Authentic Flavor Profile: We nail those signature notes—the soft vanilla of the cake base, the luscious homemade pastry cream, and that rich chocolate coating. It truly tastes like a mini pie!
- Smart Use of Vanilla Wafers: Crushing those crisp vanilla wafers right into the cookie dough adds a subtle depth of vanilla flavor and helps give the base just the right structure so it doesn’t crumble apart after filling.
- Accessible Baking: This recipe avoids complicated, fussy pastry techniques. You get a show-stopping dessert cookie without needing advanced skills. It’s wonderfully straightforward.
- Perfect Portion Control: They are perfectly handheld! You can enjoy the indulgence of a cream pie without worrying about leftovers or perfect pie slices.
Essential Ingredients for Your Vanilla Wafer Boston Cream Pie Cookies
When making something inspired by a true classic, the ingredients matter! We need quality components for the cookie, the creamy center, and the glossy topping. Don’t worry; you can find everything needed at your regular grocery store. I’ve broken down exactly what you need below.
For the Cookie Base Dough
- 1 cup (2 sticks) unsalted butter, softened
- 1 cup granulated sugar
- 2 large eggs
- 1 teaspoon vanilla extract
- 2 1/2 cups all-purpose flour
- 1 teaspoon baking powder
- 1/2 teaspoon salt
- 1 cup crushed vanilla wafers (about 30 wafers)
For the Homemade Pastry Cream Filling
I really push for homemade here; it makes all the difference! If you use a boxed mix, you miss out on that real, rich texture. Remember to chill this really well! If you’re curious about making other vanilla-forward treats, check out my recipe for vanilla cupcakes for the same rich flavor base.
- 1/2 cup milk
- 2 large egg yolks
- 1/4 cup granulated sugar
- 2 tablespoons cornstarch
- 1 teaspoon vanilla extract
For the Chocolate Ganache Topping
This comes together in just minutes, but the quality of the chocolate makes the final look shiny and decadent.
- 1 cup semi-sweet chocolate chips
- 1/2 cup heavy cream
Step-by-Step Guide to Making Vanilla Wafer Boston Cream Pie Cookies
This process flows wonderfully if you tackle one component at a time—bake the cookies first, chill the cream while they bake and cool, and then assemble. This recipe is designed to simplify what could be a very involved process, making these custard filled cookies a weeknight possibility! You’ll want to make sure you have a few bowls ready to go so everything moves along nicely.
Baking the Perfect Vanilla Wafer Cookie Base
We start by making a super sturdy cookie dough that can handle the thick filling. First, use your mixer to cream that softened butter with the sugar until it’s fluffy—we are building air pockets here! Beat in the eggs one at a time, followed by the vanilla. In a separate bowl, whisk your dry ingredients together: the flour, baking powder, and salt. Now, add the dry mixture slowly to the wet ingredients, mixing just until everything comes together. The secret? Gently fold in those crushed vanilla wafers; they are a non-negotiable part of the Boston Cream Pie flavor! A helpful note here is that if you want to check out some other great texture bases, my recipe for chocolate chip cookies has a similar creaming method.
Once the dough is mixed, wrap it up tight and pop it into the fridge for at least 30 minutes. Trust me, chilling the dough is key to these not turning into flat puddles! After chilling, preheat your oven to 350°F (175°C). Roll the dough out to about 1/4 inch thickness and use a 2-inch round cutter. Lay them on parchment-lined sheets and bake them for 10 to 12 minutes. You are looking for edges that are only lightly golden—we want them soft, not crunchy!
Creating the Authentic Homemade Pastry Cream Filling
While those cookies are cooling completely—and they must be cool, or they’ll melt the filling—we make the pastry cream. In a saucepan, you need to whisk your egg yolks and sugar until pale. Then, whisk in the cornstarch. Now, gradually whisk in the milk. Cook this mixture over medium heat, stirring *constantly*. If you stop stirring, you’ll get lumps, and we don’t want that! Keep stirring until it bubbles vigorously and you see it thicken up substantially. Let it boil for one full minute to cook out that raw starch flavor. Off the heat, stir in your vanilla. Crucially, cover the surface directly with plastic wrap before chilling. This stops that dreaded skin from forming, which is essential for smooth filling.
Assembling Your Boston Cream Pie Cookies
Now for the fun part where these turn into true vanilla wafer boston cream pie cookies! Once your cookies are room temperature and your pastry cream is fully chilled (it should be thick enough to scoop easily), it’s time to match them up. Take one cookie and spread a nice, generous dollop of that wonderful pastry cream onto the flat side. Place a second cookie on top to create a sandwich. They should line up nicely.
Next, the chocolate glaze! Gently heat your heavy cream until it just simmers, then pour it over your chocolate chips. Let it sit for five minutes—don’t touch it! Whisk it until it’s smooth and glossy. Let it cool just slightly so it’s thick enough to spread but still pourable. Dip the top of EACH sandwich cookie into that beautiful ganache, letting the excess drip back into the bowl. Set them on a wire rack over parchment paper to catch drips. Allow the chocolate to set before serving. They look absolutely stunning when they’re done!
Tips for Perfect Vanilla Wafer Boston Cream Pie Cookies
Even with straightforward recipes, a few tricks can elevate your results from good to absolutely incredible. I always share these little secrets because they stopped me from having baking headaches early on. Following these steps carefully will help you achieve the best Easy Boston Cream Pie Cookies possible without any guesswork!
- Uniform Circles Made Easy: If your cookies spread just a tiny bit during baking, don’t worry where they look organic! Once they are cool enough to handle—still slightly warm—use a sharp, small paring knife to gently trim around the edges while the cookie is sitting flat on the counter. This is a bakery trick that refines the shape before you fill them, making the final presentation of your sandwich cookies really sharp.
- Ganache Temperature is Everything! Speaking of technique, getting this right is key. If your ganache is too hot when you dip the cookies, it will soak right into the cookie base, making it soggy too fast. If it’s too cold, it will be thick and globby. Wait until it cools just enough so that when you lift the dipper out, the chocolate drips slowly and leaves a faint trail for a second before leveling out. This provides that perfect, shiny coating. If you look at how I structure the layers in my famous pound cake recipe, the same principle of slow structural support applies here!
- The Freezer Trick for Assembly: When you are trying to match up the tops and bottoms with that generous layer of rich pastry cream, things can get messy if the cream is too soft. Try chilling the filled but unglazed cookies—just the sandwiched part!—in the freezer for about 10 minutes. This firms up the cream just enough so that when you dip them into the chocolate, you get a clean, neat process.
- Don’t Overmix the Dough: This is the law of any good cookie recipe! Seriously, once you add the flour and crushed vanilla wafers, just mix until it *barely* comes together. Overmixing develops gluten, meaning your cookie base will turn out tough and chewy instead of pleasantly tender and cake-like, which ruins the pie feel.
- A Note on Baking Time: Since we are aiming for a tender cookie, not a crispy one, always err on the side of underbaking by one minute. They firm up significantly as they cool on the tray, and you want them soft enough to pair well with the creamy filling.
Ingredient Notes and Substitutions for Your Vanilla Wafer Boston Cream Pie Cookies
Deciding where you can cut corners and where you absolutely must stick to the recipe is an important part of home baking! For these chocolate glazed sandwich cookies, some ingredients are flexible, but others hold the whole experience together. I want you to feel confident that you’re getting that authentic flavor, even if you have to make a quick swap here or there.
On the Vanilla Wafers: I really pushed for those specific vanilla wafers because they have a unique, mild texture and taste that works so much better in this cookie dough than graham crackers or a standard shortbread crumb. When you’re aiming for that copycat Boston Cream Pie flavor, that distinct, light vanilla note is essential. For the most authentic experience, use the classic plain wafer—you know the kind I mean! If you absolutely can’t find them, a plain, unsweetened vanilla shortbread cookie crumbled very finely is your next best option. It will be close, but maybe a touch richer.
Pastry Cream Shortcut—Is it Worth It? I know that homemade pastry cream looks like the most time-consuming part, and I totally understand wanting a shortcut when you’re balancing a busy week. If you are truly pressed to the wire, you can substitute with a high-quality vanilla pudding mix prepared exactly according to the package directions, making sure it’s very thick. But here’s my heartfelt advice: that real, cooked custard filling using the egg yolks and cornstarch provides a decidedly richer, less artificial taste. It truly mimics the filling of a real Boston Cream Pie! It’s worth the 10 minutes of careful stirring over the heat, so please try the homemade first!
Which Chocolate to Use: For this recipe, I usually reach for semi-sweet chocolate chips. They have enough sugar to balance out the slight bitterness of the dark chocolate, which works beautifully against that sweet vanilla cream filling. If you love really dark desserts, feel free to swap in bittersweet chips, but I suggest adding just a tiny splash more heavy cream to keep the ganache smooth and prevent it from seizing up hard when it cools.
Storage and Keeping Your Vanilla Wafer Boston Cream Pie Cookies Fresh
Because these lovely cookies are layered with that amazing homemade pastry cream, they have special storage needs that are different from your standard chocolate chip or oatmeal cookie. We want that cream to stay fresh and safe! If you want that perfect melt in your mouth experience, we have to treat them right.
The short answer is: these need to be refrigerated. Don’t leave your beautiful vanilla wafer boston cream pie cookies sitting out on the counter, even if you think the chocolate glaze will protect them. Due to the fresh dairy and egg yolks in the filling, keeping them chilled is a must for food safety. Store them in a single layer, or place parchment paper between rows, inside a truly airtight container.
When stored correctly in the fridge, cookie sandwiches like these will keep beautifully for about three to four days. The cookie base holds up amazingly well against the moisture of the filling, which is one thing I designed this robust cookie dough for! If you want to see tips on keeping other cream-filled treats fresh, my recipe for cream cheese chocolate chip cookies has some similar storage advice.
Now, here’s a little heads-up about the chocolate glaze: if your kitchen tends to run warm, the ganache might seem a little softer than you’d like when you pull them from the fridge. That slight softness is okay! If you are serving them at a party and space them out on a platter, you might notice the glaze gets a little tacky after about an hour at room temperature. That’s just the beauty of real chocolate and heavy cream reacting to humidity.
My personal ritual? I pull them out of the refrigerator about 15 to 20 minutes before I plan to serve them. This little temperature adjustment is magic! It allows the pastry cream to soften slightly from rock-hard fridge temperature to that perfect luscious, creamy state, while the cookie base gets just a touch more tender for the very best bite. It transforms them instantly!
Frequently Asked Questions About Boston Cream Pie Cookies Recipe
It’s totally normal to have questions when you’re diving into a new recipe, especially one that marries a cookie with a pie! I’ve collected the questions I get most often from bakers trying this recipe for the first time, so you can approach these treats with total confidence. Remember, we are working toward nailing those copycat Boston Cream Pie flavors! If you’ve enjoyed this, you might also want to check out my rich recipe for fudge brownies next!
Can I skip crushing the vanilla wafers in the cookie dough?
Oh, please don’t skip that step! While you could technically make a plain vanilla cookie base, you would lose so much of what makes these spectacular. Those crushed wafers are essential because they mimic the texture of the cake layer found in the original pie. They break down slightly during baking but keep that signature vanilla note present in every bite. Skipping them means you end up with a lovely cookie, but it loses that key flavor identity we are aiming for!
How do I prevent the pastry cream from being too runny in these cookies?
Runny pastry cream is the enemy of a perfect sandwich cookie! This usually comes down to two things we address in the instructions, but they are worth repeating. First, you must cook it until it actively boils and you let that boil continue for a full, solid minute while stirring constantly. This is non-negotiable; it fully thickens the cornstarch. Second, you have to chill it completely—I mean rock solid—before you try to pipe or spread it. If your cream seems loose when you try to assemble your chocolate glazed sandwich cookies, just pop the bowl back in the fridge for an hour. Patience pays off here!
What is the best way to get a smooth, shiny chocolate glaze on these sandwich cookies?
The shine really comes down to the quality of your chocolate and the temperature of your ganache topping. Use good quality semi-sweet chocolate chips or finely chopped baking chocolate; cheap chocolate sometimes contains stabilizers that keep it dull. After you whisk the hot cream into the chips, let it sit undisturbed for five minutes—that gives the heat time to work its magic evenly. Whisk slowly until smooth. Then, let it rest again until that thick, pourable, slightly cooled consistency is reached. If you dip too soon, the chocolate will run off too thin, leaving you with less coverage. A little bit of cooling time ensures a thick, glossy, beautiful coating that sets up nicely!
Serving Suggestions for Your Decadent Chocolate Cream Cookies
These rich little beauties are powerful, so they pair wonderfully with beverages that can cut through the cream and chocolate. When I serve these after a meal, I like to keep the pairing simple so the cookie remains the star. You don’t want anything too sweet competing with that beautiful pastry cream!
A steaming mug of coffee is my absolute top recommendation—the slight bitterness of the coffee is just perfect against the sweet vanilla and the dark chocolate topping. If you’re serving these in the afternoon, a strong, hot cup of coffee makes these truly feel like a sophisticated treat.
If coffee isn’t your thing, they are also wonderful alongside something light and refreshing. Try pairing them with a simple, icy glass of cold milk, which always brings me back to childhood days. Alternatively, a delicate cup of Earl Grey tea offers those lovely citrus notes that wake everything up without overpowering the vanilla.
If you’ve also baked something larger, like my incredibly moist chocolate cake for dessert, these cookies make a fantastic accompaniment for the coffee hour afterward. They are perfect for guests who want just a bite or two more without committing to a full slice of cake. Enjoy every decadent bite!
Share Your Vanilla Wafer Boston Cream Pie Cookies Creations
I genuinely love seeing your baking successes! Sharing these recipes is all about creating joy in your kitchen, and seeing you master these delicious vanilla wafer boston cream pie cookies is the best reward for me. When you make them, please let me know how they turned out!
Your feedback is so helpful for me and for other bakers looking at the recipe. Please take a moment to leave a star rating for the recipe right below the instructions—five stars if you loved that cream and chocolate combo! I want to know what made these your favorite, so drop a comment sharing your experience. Did you add a little espresso powder to your ganache? Tell me all about it!
And if you loved these treats and shared photos of your shiny, glazed sandwiches on social media, tag me so I can cheer you on! It makes my day to see my recipes shining in your homes. If this trip into making classic desserts easy resonated with you, why not check out my About Page and browse some of my other favorite comfort food twists? I have so many reliable recipes waiting for you!
Happy Cooking, truly!
PrintBoston Cream Pie Sandwich Cookies with Vanilla Wafers

Make these easy sandwich cookies that capture the classic flavor of Boston Cream Pie using vanilla wafers for the base and a rich homemade pastry cream filling.
- Prep Time: 45 min
- Cook Time: 12 min
- Total Time: 57 min
- Yield: 18 cookies 1x
- Category: Dessert
- Method: Baking
- Cuisine: American
- Diet: Vegetarian
Ingredients
- 1 cup (2 sticks) unsalted butter, softened
- 1 cup granulated sugar
- 2 large eggs
- 1 teaspoon vanilla extract
- 2 1/2 cups all-purpose flour
- 1 teaspoon baking powder
- 1/2 teaspoon salt
- 1 cup crushed vanilla wafers (about 30 wafers)
- 1/2 cup milk, for pastry cream
- 2 large egg yolks, for pastry cream
- 1/4 cup granulated sugar, for pastry cream
- 2 tablespoons cornstarch, for pastry cream
- 1 teaspoon vanilla extract, for pastry cream
- 1 cup semi-sweet chocolate chips, for ganache
- 1/2 cup heavy cream, for ganache
Instructions
- Prepare the Cookie Base: In a large bowl, cream together the softened butter and 1 cup of sugar until light and fluffy. Beat in the eggs one at a time, then mix in 1 teaspoon of vanilla extract.
- Combine Dry Ingredients: In a separate bowl, whisk together the flour, baking powder, and salt. Gradually add the dry ingredients to the wet ingredients, mixing until just combined.
- Add Vanilla Wafers: Fold in the 1 cup of crushed vanilla wafers until evenly distributed in the dough.
- Chill the Dough: Wrap the dough in plastic wrap and chill in the refrigerator for at least 30 minutes. This prevents spreading.
- Shape and Bake: Preheat your oven to 350°F (175°C). Roll the dough out to about 1/4 inch thickness. Use a round cookie cutter (about 2 inches) to cut out circles. Place them on baking sheets lined with parchment paper.
- Bake the Cookies: Bake for 10 to 12 minutes, or until the edges are lightly golden. Let the cookies cool completely on the baking sheet before moving them.
- Make the Pastry Cream Filling: Whisk the egg yolks and 1/4 cup sugar together in a small saucepan. Whisk in the cornstarch. Gradually whisk in the milk. Cook over medium heat, stirring constantly, until the mixture thickens significantly and bubbles for one minute. Remove from heat and stir in 1 teaspoon of vanilla extract. Cover the surface directly with plastic wrap to prevent a skin from forming and chill completely.
- Prepare the Chocolate Ganache: Place the chocolate chips in a heatproof bowl. Heat the heavy cream in a small saucepan until it just begins to simmer. Pour the hot cream over the chocolate chips. Let stand for 5 minutes, then whisk until smooth and glossy. Let the ganache cool slightly until it is thick enough to spread but still pourable.
- Assemble the Cookies: Once the cookies and pastry cream are cool, spread a generous teaspoon of pastry cream onto the flat side of one cookie. Top with a second cookie to form a sandwich.
- Glaze the Cookies: Dip the top of each sandwich cookie into the slightly cooled chocolate ganache, allowing excess to drip off. Place the cookies on a wire rack set over parchment paper to catch drips. Allow the chocolate to set before serving.
Notes
- For a firmer filling, you can chill the assembled, glazed cookies for 30 minutes before serving.
- If you prefer a quicker filling, use a high-quality vanilla pudding mix prepared according to package directions, but the homemade pastry cream provides the authentic flavor.
- Use a small, sharp knife to gently trim the edges of the cookies after baking if you want perfectly uniform circles before filling.
Nutrition
- Serving Size: 1 cookie
- Calories: 280
- Sugar: 22
- Sodium: 110
- Fat: 16
- Saturated Fat: 10
- Unsaturated Fat: 6
- Trans Fat: 0
- Carbohydrates: 32
- Fiber: 1
- Protein: 3
- Cholesterol: 65