
Oh my goodness, you are in for such a treat today! If you’ve ever seen a dessert so rich, so layered, and so incredibly chocolatey that it looks like it should require a week of prep time, you’re probably looking at a classic **mud pie**. I’m Kate from Kings Cook, and I promise you: I specialize in taking those showstopping desserts and breaking them down so they are totally achievable for you right in your own kitchen.
This isn’t just any chocolate pie recipe; this is *the* decadent Mississippi Mud Pie everyone talks about. It has that beautiful, messy decadence Southerners are famous for, but I’ve tested and re-tested every layer to make sure it comes out perfect every single time. You won’t have to stress about it. We’re talking cookie crust, creamy filling, and fluffy topping—it’s truly the best! My goal is to give you reliable recipes, and this one is an absolute champion.
- Why This Mississippi Mud Pie Recipe is the Best Mud Pie Ever
- Gathering Ingredients for Your Decadent Mud Pie
- Step-by-Step Instructions for the Perfect Mud Pie
- Tips for Success with Your No Bake Mud Pie
- Make Ahead Dessert Pies: Storing Your Mud Pie
- Variations on the Classic Mud Pie
- Serving Suggestions for This Layered Chocolate Dessert
- Frequently Asked Questions About Making Mud Pie
- Estimated Nutritional Information for One Slice of Mud Pie
Why This Mississippi Mud Pie Recipe is the Best Mud Pie Ever
I know, I know, every recipe claims to be the best, but trust me when I say this Mississippi Mud Pie truly beats them all! It’s a showstopping chocolate pie that just happens to be shocking easy. People always ask me how I get that perfect texture without ever turning on my oven. It’s designed for the busy American cook who wants a truly decadent chocolate pie without the fuss.
Key Features of Our Mud Pie
- It’s completely no-bake! Literally zero oven time required, which is perfect for summer or busy holidays.
- We get that satisfyingly rich and fudgy chocolate flavor from simple instant pudding, making it incredibly consistent.
- It holds its shape beautifully, meaning those clean, gorgeous slices of layered chocolate dessert are guaranteed!
- It’s the ultimate make-ahead dessert, which is a lifesaver when you’re entertaining.
Gathering Ingredients for Your Decadent Mud Pie
Okay, you are ready for the fun part! The beauty of this Mississippi Mud Pie is that almost everything you need is standard pantry stuff. Quality matters here, though! If you want that rich, dessert-worthy experience, don’t skimp on using real butter for the crust, okay? We aren’t making paperweights here; we’re making the best **mud pie** ever!
Here’s the lineup for this gorgeous, layered chocolate dessert:
- 1 1/2 cups chocolate cookie crumbs (you’ll need about 30 dark chocolate sandwich cookies, crushed up!)
- 1/4 cup unsalted butter, melted
- 1 package (3.4 oz) instant chocolate pudding mix
- 2 cups cold milk (make sure it’s cold, that’s key for the pudding to set!)
- 1 cup heavy cream, divided
- 1/4 cup powdered sugar
- 1 teaspoon vanilla extract
- 1 cup frozen whipped topping, thawed (or you can make your own!)
- 2 chocolate candy bars, chopped (optional, but highly recommended for that ‘Wow!’ factor on top)
Ingredient Notes and Substitutions for the Mud Pie
If you want to really kick this up into the stratosphere of indulgence—I’m talking next-level fudgy chocolate pie status—you can skip the instant pudding in Step 2 and use a thin layer of your favorite baked, fudgy brownie instead. Just make sure it’s cooled completely before you put anything on top of it!
Also, about that topping: I used thawed whipped topping in the basic recipe because it’s easy and reliable. But if you have five extra minutes, whipping up your own heavy cream with a little extra powdered sugar really elevates the whole creamy chocolate dessert experience. It feels so much more special!
Step-by-Step Instructions for the Perfect Mud Pie
Alright, let’s get this chocolate show on the road! Making this **mud pie** is all about clean components building up to one glorious dessert. We’re going to work assembly-line style so nothing melts or loses its texture. Remember, patience during the chilling phase is the secret ingredient for a perfect slice!
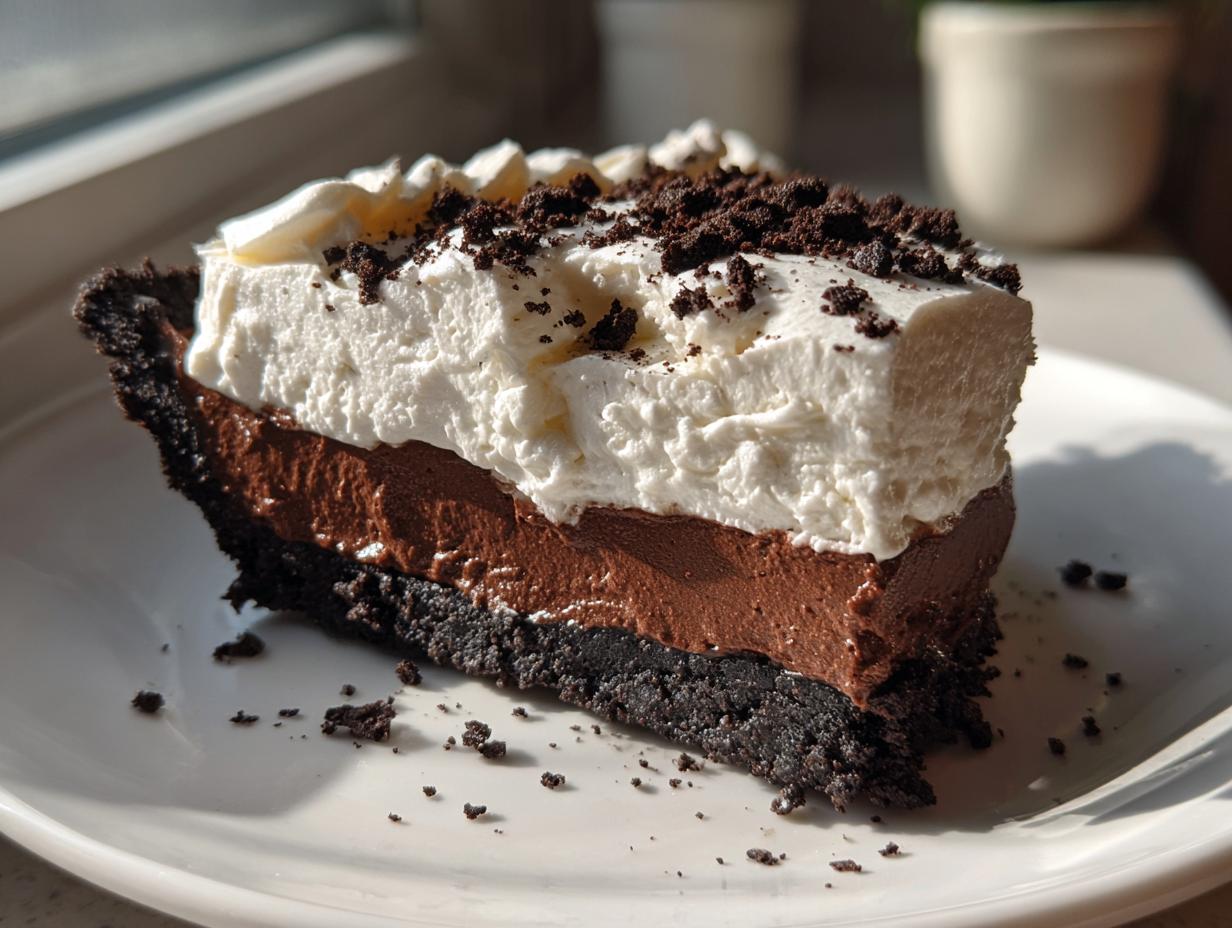
Preparing the Oreo Crust Dessert Base
First things first, that crust needs to be solid so our creamy filling doesn’t leak out. Put those chocolate cookie crumbs and the melted butter into a bowl and mix it up until it looks like wet sand—you should be able to squeeze it and it holds its shape. Now, press that mixture firmly into the bottom and right up the sides of your 9-inch pie plate. It needs a good, solid press! Pop that crust into the fridge for at least 15 minutes while we tackle the pudding layers. Don’t skip that chill!
Creating the Creamy Chocolate Dessert Layers
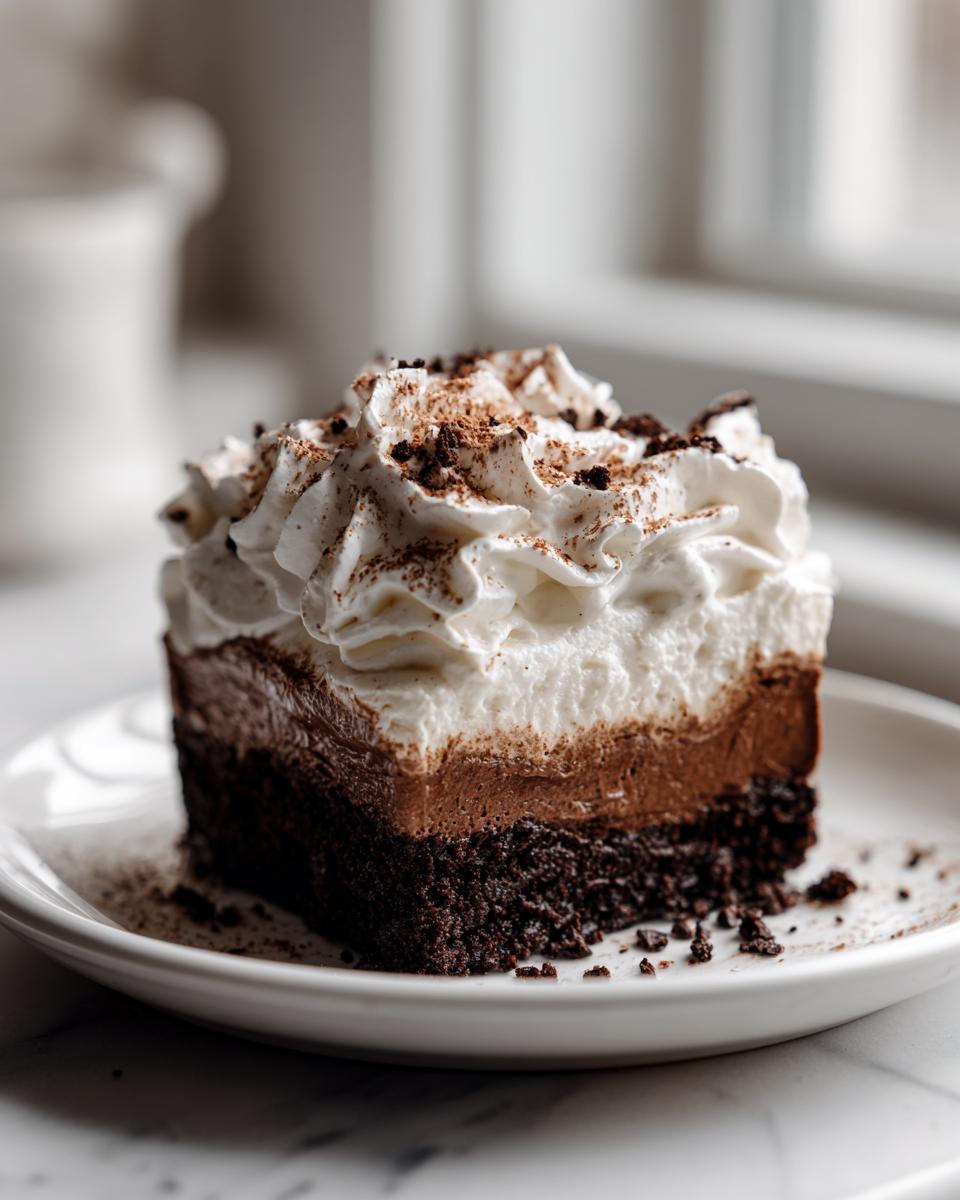
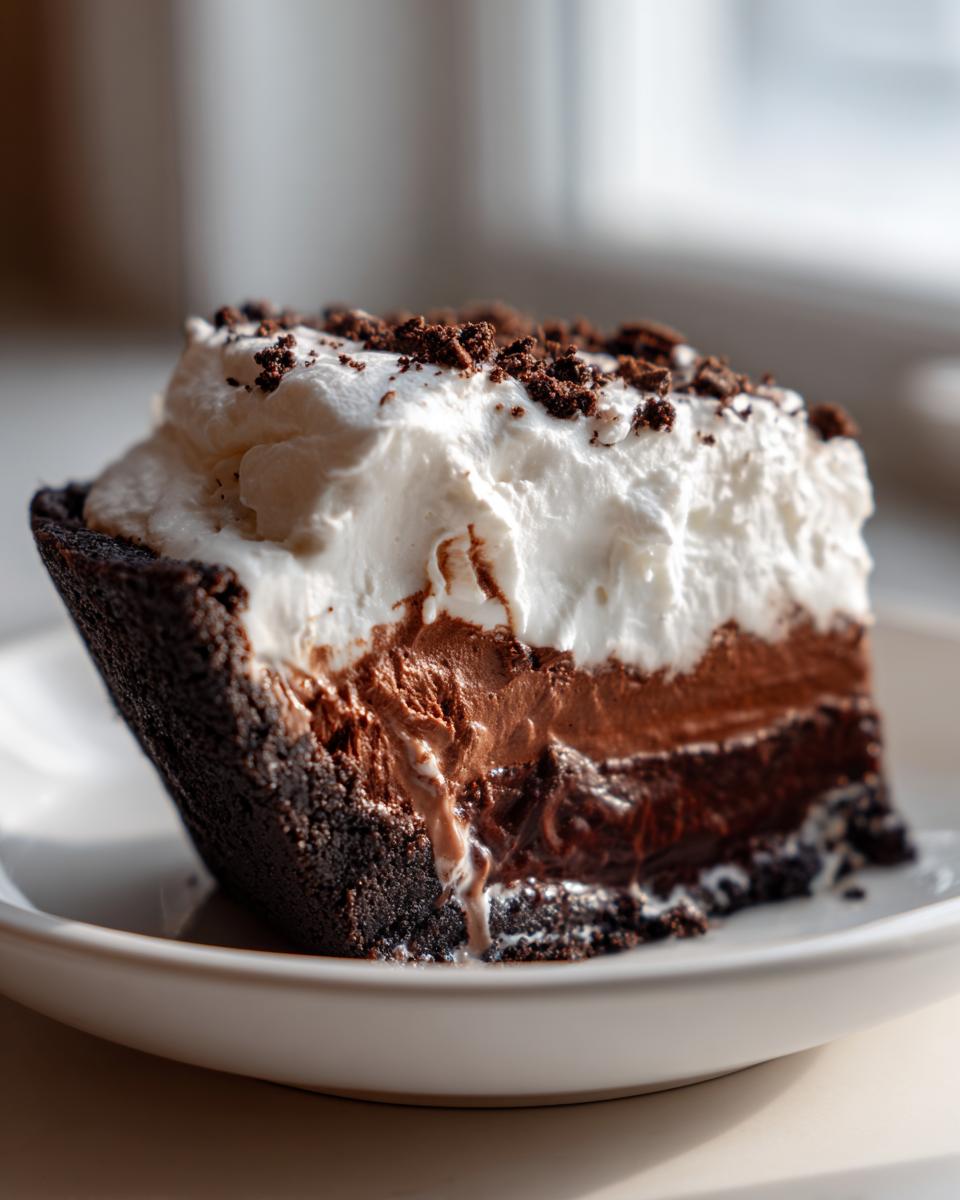
Next up is the easiest pudding layer you’ll ever make. Whisk your instant chocolate pudding mix with those 2 cups of cold milk for about two minutes. It thickens up fast, so let it sit for five minutes—don’t walk away, but give it a sec! While that sets up slightly, whip half a cup of your heavy cream together with the powdered sugar and vanilla until you get soft peaks. This is important: gently fold that sweet cream into the pudding layer. Don’t beat it! We want to keep the air in there for that light, creamy texture we love in our **mud pie** filling. Smooth this mixture right over that chilled crust.
Chilling and Serving Your Rich Gooey Pie
Now we build the fluffy mountain on top! Take the remaining half-cup of heavy cream and whip it until stiff peaks form—it should stand straight up when you lift the whisk. Spread that beautiful topping carefully over the pudding layer. This is where the waiting game starts; cover the pie loosely and stick it in the fridge for a minimum of four hours, but honestly, if you can leave it overnight, it sets up even better for clean, satisfying slices of this rich, gooey pie. Don’t decorate until you are ready to serve, or the topping might weep a little!
Tips for Success with Your No Bake Mud Pie
Even though this is a super easy, no bake mud pie, there are just a couple of little secrets I’ve learned over the years that make the difference between a good dessert and a spectacular one. We want this **mud pie** to look as amazing as it tastes, right?
My number one tip for keeping your whipped cream topping looking fresh and not sad and weepy is this: really chill everything! Make sure that pudding layer is set up firmly, and when you beat your heavy cream for the final topping, make sure your bowl and whisk attachments are cold. I sometimes even pop them in the freezer for ten minutes beforehand.
Also, once you add that final topping, cover it loosely with plastic wrap. Don’t let the wrap touch the cream itself! If you need to transport this beauty—maybe for a potluck or a family gathering—I highly suggest you don’t add the final decorative topping (like those chopped candy bars) until you get where you’re going. Moisture control is everything!
Remember that crust we chilled? If you want it rock solid, you can bake it for about 8 minutes after pressing it, just until it smells toasty, let it cool completely, and then proceed with the recipe. That little step isn’t strictly necessary for this recipe, but it gives you that extra firmness if you’re worried about those clean slices. To see how others have mastered the basic concept, check out this great example from The First Year Blog; they really emphasize structure, which I love!
Make Ahead Dessert Pies: Storing Your Mud Pie
One of the best things about this Mississippi Mud Pie is that it’s practically yelling, “Make me ahead of time!” It’s truly a lifesaver when you have a big dinner or a weekend potluck coming up. Since the layers need to firm up, chilling is non-negotiable, and good news—it actually tastes better the second day!
You can safely store your finished **mud pie** in the refrigerator for up to three full days. Seriously! The crust stays satisfyingly crumbly, and the pudding layer just gets richer. However, you need to be careful about odor transfer. Refrigerators have a way of making sweet things taste a little… bland or off-flavor. I learned this the hard way!
To keep that rich chocolate flavor pristine, you absolutely must cover it loosely. Don’t press plastic wrap directly onto that gorgeous whipped topping; it’ll stick and ruin your clean presentation. Instead, put a few toothpicks—maybe four around the edge of the pie dish—and then drape your plastic wrap over those little supports. This creates a tent, keeping the wrap off the creamy surface while still protecting the whole **mud pie** from stray smells. It’s a simple trick that keeps everything tasting exactly how it should!

If you’re looking for other fantastic desserts that you can prepare early so you aren’t scrambling on the day of the event, you should totally check out my roundup of best make-ahead dessert recipes. This kind of planning makes hosting so much less stressful!
Variations on the Classic Mud Pie
While I absolutely insist you try this classic layered preparation first—it’s the ultimate **mud pie**, period—I know you like to experiment, so let’s talk about the fun ways you can tweak this base recipe. Since everything here is smooth and creamy, it adapts really well to a few different fantastic options!
If you are looking for a Texas Mud Pie, that usually means bumping up the intensity of the base layer somehow. You could stick to our Oreo Crust Dessert base, but for the filling, instead of using just the instant pudding mixture, try folding in a cup of softened, good-quality dark chocolate chips right before spreading it into the crust. That gives you a richer, slightly denser filling that feels very Southern and decadent!
Now, for the variation that really shocks people: the Ice Cream Mud Pie Recipe! This is a fantastic summer swap. Here’s what you do: Skip Steps 2, 3, and 4 entirely. Once your chocolate cookie crust is chilled firm, spread about a quart of softened vanilla or coffee ice cream directly into it. You want it soft enough to spread easily but not soup! Then, freeze it until solid. You can layer that up with a thin layer of fudge sauce if you want, then top it with whipped cream. It’s a showstopper and still feels gooey, just cold gooey!
Speaking of fudgy, if you are a serious chocolate lover—and I know you are—instead of the pudding mix, you can utilize cooled, crumbled fudgy brownies as your second layer. I have a fantastic fudge brownies recipe that works perfectly here. Just press the cooled brownie layer right over the crust, and then top it with your whipped cream. It makes the entire thing unbelievably rich. Either way you go, you get an incredible chocolate highlight for your next dinner!
Serving Suggestions for This Layered Chocolate Dessert
This mud pie is so rich and decadent that sometimes you need just the right thing next to it to balance out all that glorious chocolate. It’s not really a pie that needs much, but a little something extra can really turn a slice into a full experience. My motto here is: when you have something this amazing, keep the accompaniments simple so the pie remains the star!
When I serve this showstopping chocolate pie, I usually go for something acidic or something that cleanses the palate slightly. Fresh raspberries—just a small handful scattered around the plate—are incredible next to that dark chocolate. The tartness cuts right through the richness of the pudding and cream layers. If raspberries aren’t around, a few lightly sugared strawberries work just as well!
For grown-ups, especially after a big meal, a strong cup of coffee is the perfect partner. The slight bitterness of a dark roast or an espresso shot is sensational with any truly fudgy chocolate pie. You can even make a little coffee-flavored whipped cream if you wanted to get fancy, but plain coffee works wonders.
If you prefer presentation over anything else, a super light dusting of high-quality unsweetened cocoa powder right before serving makes it look professional—like you pulled it straight from a fancy bakery case. A little sprinkle goes a long way! For pairing with drinks that aren’t coffee, make sure you look over my favorite cocktail recipes; a digestif wine works beautifully too!
Frequently Asked Questions About Making Mud Pie
I’m so glad you’re diving into this recipe! When I first started making this rich, gooey pie, I had a million questions too. Getting the layers right is key to making sure this **mud pie** turns out like the stunning, layered chocolate dessert everyone wants. Here are the most common things people ask me about getting the perfect result.
Can I use a graham cracker crust instead of Oreo Crust Dessert for this mud pie?
Yes, you absolutely can, but be prepared for a flavor change! The Oreo crust gives this **mud pie** a deep, dark chocolate background that really complements the creamy fillings. If you use a graham cracker crust, the texture will be slightly less crunchy, and the overall flavor will be a bit sweeter and less intense. It totally works if that’s what you have on hand, but for the true Mississippi Mud Pie Recipe experience, I always go for the chocolate cookies!
How long does the Mississippi Mud Pie Recipe need to chill?
This is the toughest part of the whole no bake mud pie process—waiting! You need to chill it for a minimum of four hours. That’s the absolute baseline to make sure that instant pudding layer has time to set up properly around the crust and that the whole thing will hold its shape when you slice it. That said, I really, really recommend letting this sit in the fridge overnight if you can manage it! Overnight chilling allows the flavors to meld together beautifully, ensuring you have the absolute best fudgy chocolate pie possible the next day.
Is this a true Mississippi Mud Pie Recipe or an ice cream version?
This specific recipe is definitely the classic, creamy, layered version that uses instant pudding mixed with stabilized whipped cream. It sets up firm but still incredibly smooth and creamy. If you were looking for an Ice Cream Mud Pie Recipe, that’s a completely different beast! Those usually involve using softened ice cream as one of the main layers, which means they need to be served almost immediately or kept deeply frozen. This one is perfect for serving straight from the fridge!
Estimated Nutritional Information for One Slice of Mud Pie
I always include this information because I believe in transparency! Knowing what you’re enjoying is part of mastering your kitchen, right? Please remember that since this **mud pie** recipe is built on deliciousness (hello, sugar and cream!), these numbers are just estimates.
These figures are calculated based on the recipe yielding 8 slices, using standard, un-doctored ingredients. If you decide to add that extra brownie layer or use super-rich dark cocoa, your totals will shift a little bit! But for this standard, creamy chocolate dessert, here is what you can generally expect:
- Serving Size: 1 slice
- Calories: 450
- Sugar: 35g
- Sodium: 320mg
- Fat: 28g
- Saturated Fat: 15g
- Unsaturated Fat: 13g
- Trans Fat: 0.5g
- Carbohydrates: 45g
- Fiber: 2g
- Protein: 5g
- Cholesterol: 45mg
It’s a rich dessert, no doubt about it, but every single delicious bite of this Mississippi Mud Pie is worth it, particularly when it’s homemade! For another fantastic take on layered chocolate pies, you might want to check out the delicious recipe found over at Bake and Savor!
PrintDecadent Mississippi Mud Pie Recipe

Make this rich, layered Mississippi Mud Pie featuring a chocolate cookie crust, fudgy filling, and creamy topping. This is a showstopping Southern dessert classic.
- Prep Time: 20 min
- Cook Time: 0 min
- Total Time: 4 hr 20 min
- Yield: 8 servings 1x
- Category: Dessert
- Method: No Bake
- Cuisine: American
- Diet: Vegetarian
Ingredients
- 1 1/2 cups chocolate cookie crumbs (about 30 cookies)
- 1/4 cup unsalted butter, melted
- 1 package (3.4 oz) instant chocolate pudding mix
- 2 cups cold milk
- 1 cup heavy cream, divided
- 1/4 cup powdered sugar
- 1 teaspoon vanilla extract
- 1 cup frozen whipped topping, thawed (or homemade whipped cream)
- 2 chocolate candy bars, chopped (optional, for topping)
Instructions
- Prepare the crust: Mix the chocolate cookie crumbs and melted butter until fully combined. Press the mixture firmly into the bottom and up the sides of a 9-inch pie plate. Chill the crust for at least 15 minutes while you prepare the filling.
- Make the pudding layer: In a medium bowl, whisk together the instant chocolate pudding mix and cold milk for 2 minutes until the mixture thickens. Let it stand for 5 minutes.
- Prepare the whipped layer base: In a separate bowl, beat 1/2 cup of the heavy cream with the powdered sugar and vanilla extract until soft peaks form. Gently fold this whipped cream mixture into the thickened chocolate pudding.
- Assemble the pie: Spread the chocolate pudding mixture evenly over the chilled cookie crust.
- Prepare the topping: In a clean bowl, whip the remaining 1/2 cup of heavy cream until stiff peaks form. Gently spread this whipped cream over the pudding layer.
- Chill: Cover the pie loosely with plastic wrap and refrigerate for at least 4 hours, or until firm. For best results, chill overnight.
- Serve: Before serving, top the pie with the thawed frozen whipped topping (if using), or the freshly whipped cream, and sprinkle with chopped chocolate candy bars or extra cookie crumbs. Slice and serve cold.
Notes
- You can substitute the instant pudding with a homemade chocolate mousse or fudgy brownie layer for a richer texture.
- This recipe works well as a make-ahead dessert, as it requires significant chilling time.
- If you prefer an ice cream mud pie, substitute the pudding layer with softened vanilla or coffee ice cream.
Nutrition
- Serving Size: 1 slice
- Calories: 450
- Sugar: 35g
- Sodium: 320mg
- Fat: 28g
- Saturated Fat: 15g
- Unsaturated Fat: 13g
- Trans Fat: 0.5g
- Carbohydrates: 45g
- Fiber: 2g
- Protein: 5g
- Cholesterol: 45mg