
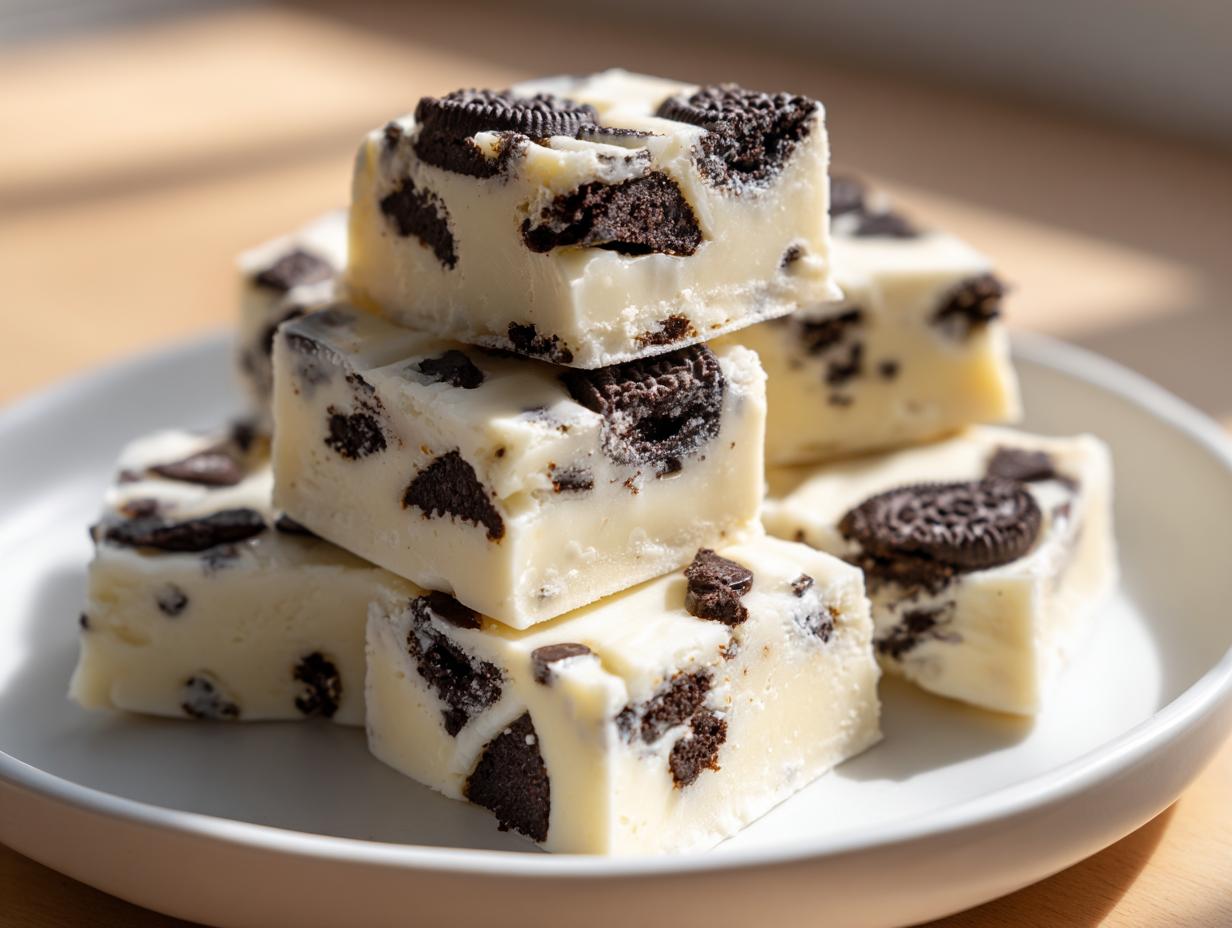
If you’re anything like me, sometimes you just need a serious chocolate-and-cream fix, and you need it *fast*. Forget complicated baking projects that use every bowl in the kitchen! That’s why I’m so thrilled to share my absolute favorite, foolproof recipe for the Easiest 3-Ingredient No-Bake Oreo Fudge. Seriously, this oreo fudge is pure magic wrapped up in sweetness.
When I create recipes for Kings Cook, my goal is always reliability. I test these things until they are completely foolproof, and this one is guaranteed to give you that rich, creamy texture you’re craving every single time. We’re talking about decadent homemade candy in minutes, no oven required!
- Why You Need This Easy Oreo Fudge Recipe
- Gathering Ingredients for Your Oreo Fudge
- Step-by-Step Instructions for Easy Oreo Fudge
- Tips for Achieving the Best Oreo Fudge Texture
- Serving Suggestions for Your Cookies and Cream Fudge
- Storage and Reheating Instructions for Homemade Candy
- Frequently Asked Questions About Oreo Fudge
- Nutritional Estimate for This Rich Chocolate Fudge
- Share Your Experience Making This Oreo Fudge
Why You Need This Easy Oreo Fudge Recipe
Listen, sometimes life is just too busy for fussy baking, but your sweet tooth is shouting for something amazing. That’s where this recipe steps in! I promise you, this list of benefits checks every box for a modern, low-effort treat. I’ve refined this down to ensure you get the best result possible with the least amount of Fuss.
- It’s the definition of Quick Fudge Recipe perfection—you will be done mixing in under ten minutes total!
- It’s super simple to package up, making it a dream for last-minute gifts or bake sales.
- It creates a super rich, satisfying texture that tastes way more complicated than it actually is.
Only Three Ingredients for Decadent Oreo Fudge
You read that right! Three! We’re using a classic shortcut that delivers incredible results every time. We rely on quality white chocolate and sweetened condensed milk to do all the heavy lifting. This keeps the ingredient list short, your grocery run easy, and the cleanup minimal. It’s the best method for truly Decadent Fudge.

No Oven Required: The Ultimate No Bake Fudge
The best part? We don’t turn on the oven once. This is true No Bake Fudge, which means it’s safe, fast, and ready for hot weather when you don’t want to heat up the kitchen. If you are looking for Simple Dessert Ideas that feel celebratory but require absolutely zero baking skill, this is your winner. Head over to my main dessert hub if you need more no-oven ideas!
Gathering Ingredients for Your Oreo Fudge
Okay, let’s talk about what you actually need to make this amazing White Chocolate Oreo Fudge. Since this is a 3-ingredient recipe, those ingredients have to pull their weight! That means we need to be clear about what we’re using. You only need three things, but getting the details right is what separates a good fudge from a great, Creamy Fudge.
Here is exactly what you’ll need for the whole 8×8 pan:
- 1 (14 ounce) can sweetened condensed milk
- 2 cups white chocolate chips
- 3 cups Oreo cookies, crushed
Ingredient Clarity for Perfect Oreo Fudge
Since we aren’t using butter or cocoa powder, the quality of these three items really matters. First up, make sure you’re using the standard 14-ounce can of sweetened condensed milk—not evaporated milk, those are totally different beasts! For the white chocolate chips, I always recommend using a reputable brand. Cheaper chips sometimes have more stabilizers, and that can make your fudge stiff instead of smooth.
And finally, the Oreos! You need three cups *crushed*. I usually pulse mine in the food processor for just a few quick zaps until they look like coarse sand with some bigger chunks mixed in—you want that satisfying crunch in every bite of your oreo fudge!
Step-by-Step Instructions for Easy Oreo Fudge
I love that this recipe lets us skip the stovetop candy-making and get straight to the fun part! Remember, since we’re dealing with melted white chocolate, which can be a little temperamental, precision during the melting stage is key. Don’t rush the chilling time either; patience here is what guarantees that perfect, clean, sliceable texture. We want this to be the easiest slice of oreo fudge you’ve ever managed to create! You can check out more tips on easy candy making on the site, but these steps are all you need for success.
Preparing Your Pan and Crushing Cookies
First things first: get your pan ready! You’ll need an 8×8 inch pan. Line it completely with parchment paper, but here’s the trick: leave a big overhang on two opposite sides. Those flaps are your handles later when you lift the whole block out for cutting. Lightly grease that parchment paper, just in case, though it usually isn’t strictly necessary.
Now, tackle those cookies. Measure out three cups of Oreos. If you’re using a food processor, pulse them until they look mostly crushed but still have some interesting, uneven chunks—we don’t want dust! If you’re going the old-fashioned route, toss them in a sturdy zip-top bag and pound them gently with a rolling pin. Stop when you hit that perfect chunky texture.
Melting Chocolate and Creating the Creamy Fudge Base
Take your two cups of white chocolate chips and put them in a nice, large microwave-safe bowl. This is where you need to be careful! Microwave in short bursts—start with 30 seconds. Pull it out, stir really well, even if it still looks mostly like chips. Put it back in for another 30 seconds, stir again. Repeat this process! My expert tip here, based on testing dozens of batches, is to stop heating when there are still a few small pieces left unmelted. The residual heat from the bowl will melt those last bits right out, leaving you with perfectly smooth chocolate. Overheating white chocolate is how you end up with seized, grainy stuff!
Once it’s silky smooth, pour in that can of sweetened condensed milk. Stir vigorously until everything is completely combined and you have a uniform, glossy base. This mix is what makes the fudge so unbelievably rich! Check out this great tip from a friend over at Savory Splash on handling these simple ingredients.
Folding in Cookies and Setting the Oreo Fudge
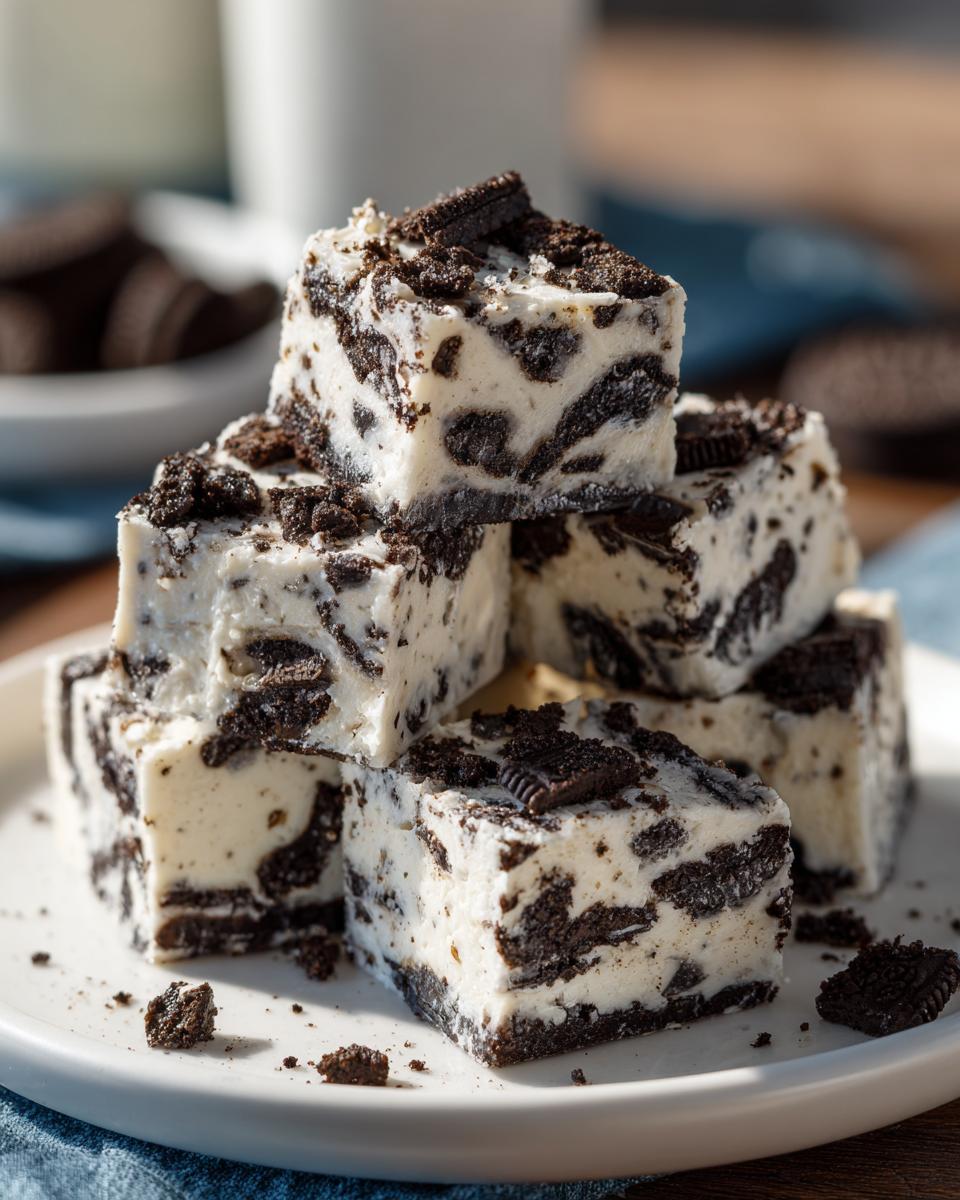
Time for the cookies! Gently fold your crushed Oreos into that creamy white chocolate mixture. Don’t stir like you’re whipping cream; use a rubber spatula and a light hand. We just want to distribute them evenly so that every slice gets a nice cookie crunch throughout. Once everything looks speckled and mixed, transfer the whole batch into your prepared pan. Use your spatula to smooth the top nicely.
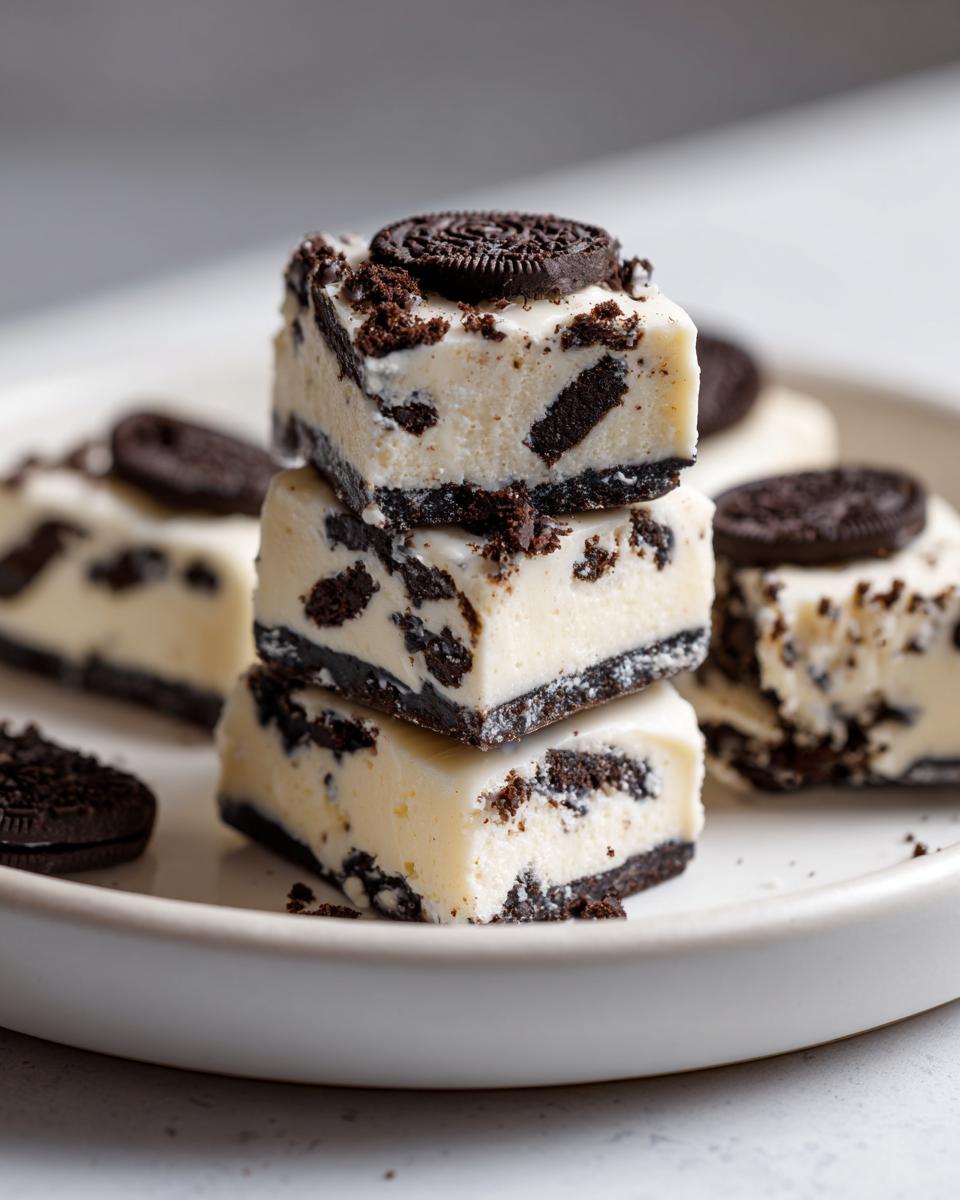
Now comes the hardest part: waiting! Pop that pan into the refrigerator. It needs a minimum of two to three hours to firm up properly. If you cut it too soon, it will just smear everywhere. For a little extra visual flair, you can quickly sprinkle any reserved cookie crumbs over the top right before it goes into the fridge. Trust me, a little patience here leads to the best fudge structure!
Tips for Achieving the Best Oreo Fudge Texture
Even though this is “easy” oreo fudge, you still want that perfect texture! I’ve definitely made mistakes testing this, which is how I learned the secrets to getting the Best Oreo Fudge. It’s all about controlling temperature and moisture. When you get it right, this Decadent Fudge is just divine—rich, smooth, and melts perfectly in your mouth without being greasy. You can see some great professional ideas over at Sugar Hero for other dessert inspiration!
Troubleshooting Common Oreo Fudge Issues
If your fudge comes out too soft, nine times out of ten, it just needed more time to chill. Don’t even try cutting it before those two hours are up! If your white chocolate seized and got grainy when you added the milk, that usually means a tiny bit of water or condensation got into the bowl while you were melting it. White chocolate hates water, so make sure your bowl and spatula are bone dry before you start that melting step!
Making Holiday Oreo Fudge Variations
If you’re prepping this for your holiday baking list, you can easily jazz it up after mastering the basic recipe. For an amazing seasonal twist, try adding about half a teaspoon of peppermint extract right when you stir in the condensed milk. You can also swap out half of those white chocolate chips for milk chocolate chips—it changes the flavor profile completely and just doubles down on the chocolate factor for a richer experience!
Serving Suggestions for Your Cookies and Cream Fudge
Once your beautiful Cookies and Cream Fudge has completely chilled—and I mean *completely* chilled, don’t cheat this step!—it’s time to cut it. Use a large, sharp knife coated with a bit of butter or oil for the cleanest slices. You want those squares to look perfect, especially if you are giving them away! These little bites are fantastic on their own, but they also pair wonderfully with a cold glass of milk for true comfort.

Because this fudge is so rich and fun, it’s a big hit as one of those easy Kid Friendly Sweets. I often stack them in little bakery boxes tied with ribbon for neighbors during the holidays. You can see more gift-worthy dessert ideas on my main recipes page!
Storage and Reheating Instructions for Homemade Candy
I know how hard it is to resist eating this entire batch of Homemade Candy in one sitting, but trust me on this: leftovers are worth it! Since this oreo fudge relies on white chocolate for its structure rather than cooked sugar, it’s happiest when it stays cool. You definitely don’t want to heat this up again!
The best way to store your fudge is in a single layer, or with parchment paper squares between layers, inside a truly airtight container. Keep it in the refrigerator. Since it’s so rich, keeping it wrapped tightly keeps that wonderful creamy texture locked in and prevents any outside flavors from creeping in. Properly stored, this fudge stays fantastic for about 10 to 14 days. If you try leaving it on the counter, it might get a little too soft, especially if your kitchen runs warm.
If, by some miracle, it gets a little too firm after a long time in the fridge, just let a square sit out on the counter for about 15 minutes before serving. That little bit of time brings back that perfect, melt-in-your-mouth experience. But honestly, skip the microwave entirely—we want that gorgeous texture, not melted goo!
Frequently Asked Questions About Oreo Fudge
I know you all have questions when you’re trying a new, super-fast recipe like this! Since I’ve tested this oreo fudge until I was sick of Oreos (which, honestly, is saying something!), I’ve gathered up the most common things folks ask me. I want to make sure your experience results in a perfect batch of No Bake Fudge, every single time.
Can I make this 3 Ingredient Fudge without white chocolate?
That’s a great question, and it points right to the heart of why this recipe works! In this specific situation, the white chocolate isn’t just for flavor; it’s the main binder. When it melts with the sweetened condensed milk, it creates that thick, structure-holding base that firms up perfectly in the fridge. If you substitute it out, you’re basically making a different recipe entirely, probably one that requires cooking on the stove. So, for this particular 3 Ingredient Fudge shortcut to work its magic, you really need that white chocolate!
What is the best way to crush the Oreos for the oreo fudge?
The best way really depends on how much mess you’re willing to make, ha! For the absolute best texture that keeps that satisfying chunky feel, a food processor is my top choice. You pulse it just a few times until you have a nice mix of fine crumbs and small, noticeable pieces. If you don’t have one, a heavy-duty zip-top bag and a rolling pin work perfectly fine—just make sure you seal that bag tightly! We don’t want cookie dust all over the counter.
How long does this No Bake Fudge last?
Because this fudge doesn’t have any cooked sugar syrup, it keeps its creamy texture best when kept chilled. If you store your No Bake Fudge in an airtight container in the refrigerator, it stays delicious and firm for about 10 to 14 days. If you managed to have any leftovers after that long, they are still safe to eat, but the texture might start to soften slightly. I’ve never had any last that long, though! It’s usually gone by day five around here.
Nutritional Estimate for This Rich Chocolate Fudge
I always get asked about the numbers, even when making something as wonderfully simple and indulgent as this Rich Chocolate Fudge. It’s important to remember that because we are using simplified ingredients and relying on the creaminess of white chocolate and condensed milk, these figures are estimates based on standard product sizes and what I use in my kitchen.
This data reflects a serving size of just one square of fudge, which is a pretty generous piece, considering how rich these are! If you happen to cut yours a bit smaller, these numbers will be lower, of course. Always treat these figures as a guideline, especially since brands can vary!
- Serving Size: 1 square
- Calories: 185
- Sugar: 22g
- Sodium: 110mg
- Fat: 9g
- Saturated Fat: 5g
- Trans Fat: 0g
- Carbohydrates: 24g
- Fiber: 0g
- Protein: 3g
- Cholesterol: 10mg
I always like to point out the high sugar content here, which is expected given the condensed milk and cookies! But look at that protein—that’s the cookies getting in the game! Enjoy this treat responsibly, knowing that you made it yourself with barely any effort. It’s worth every single calorie, trust me!
Share Your Experience Making This Oreo Fudge
Now that you’ve mastered what I truly believe is the easiest Oreo Fudge recipe out there, I absolutely need to hear about it! Don’t let this creamy, dreamy decadence be our little secret—let’s share the joy!
Did you make these for a family movie night? Were they the surprise star of your holiday candy bar? Or did you need a super fast fix for a sudden craving? Let me know in the comments below! I honestly read every single comment you leave.
If you snap a picture of your perfectly sliced squares, please tag me on social media! Seeing your beautiful Simple Dessert Ideas come to life in your own kitchen makes my day. And if you have any lingering questions or want to suggest a tiny tweak for the next batch, head over to my contact page! I love connecting with all of you wonderful cooks. Happy treating!
PrintEasiest 3-Ingredient No-Bake Oreo Fudge

Make rich, creamy Oreo Fudge with just three simple ingredients. This no-bake recipe is quick, requires no oven time, and delivers a decadent cookies and cream treat perfect for gifts or satisfying a sweet tooth.
- Prep Time: 10 min
- Cook Time: 0 min
- Total Time: 190 min
- Yield: 36 squares 1x
- Category: Dessert
- Method: No Bake
- Cuisine: American
- Diet: Vegetarian
Ingredients
- 1 (14 ounce) can sweetened condensed milk
- 2 cups white chocolate chips
- 3 cups Oreo cookies, crushed
Instructions
- Line an 8×8 inch baking pan with parchment paper, leaving an overhang on the sides for easy removal. Lightly grease the paper.
- Place the white chocolate chips in a microwave-safe bowl. Microwave in 30-second intervals, stirring well after each interval, until the chocolate is completely smooth. Do not overheat.
- Pour the sweetened condensed milk into the melted white chocolate. Stir until the mixture is fully combined and smooth.
- Gently fold in the crushed Oreo cookies until they are evenly distributed throughout the fudge base.
- Pour the fudge mixture into the prepared pan. Spread it evenly using a spatula.
- Refrigerate the fudge for at least 2 to 3 hours, or until firm enough to slice.
- Use the parchment paper overhang to lift the fudge from the pan. Place it on a cutting board and cut into 1-inch squares.
Notes
- For an extra festive touch, you can reserve about 1/2 cup of crushed Oreos and sprinkle them over the top of the fudge before chilling.
- If you prefer a slightly darker fudge, substitute half of the white chocolate chips with milk chocolate chips.
- This shortcut fudge tastes best when stored in an airtight container in the refrigerator.
Nutrition
- Serving Size: 1 square
- Calories: 185
- Sugar: 22
- Sodium: 110
- Fat: 9
- Saturated Fat: 5
- Unsaturated Fat: 4
- Trans Fat: 0
- Carbohydrates: 24
- Fiber: 0
- Protein: 3
- Cholesterol: 10