
Oh, pulling out the ingredients for these cookies always instantly brings me back to Christmas when I was a kid! There’s just something so magical about that combination of peanut butter, soft cookie, and that perfect little top of chocolate melting slightly. If you’re looking for truly reliable holiday baking that never disappoints, you’ve found the jackpot. Here at Kings Cook, my commitment is strict: every recipe has to work flawlessly, every single time. That’s why I’m so excited to share what I truly believe is the **Best Ever kiss cookies** recipe (you know them as Peanut Butter Blossoms). For more of my tried-and-true favorites, be sure to check out my guide to the best peanut butter cookies.
- Why This is the Best Ever kiss cookies Recipe (The Classic Peanut Butter Blossoms)
- Gather Your Ingredients for Classic kiss cookies
- Step-by-Step Instructions for Perfect kiss cookies
- Tips for Making the Best Ever kiss cookies
- Variations on Classic Hershey Kiss Cookies
- Storage and Make-Ahead Tips for Your kiss cookies
- Serving Suggestions for Holiday Baking Staples
- Frequently Asked Questions About kiss cookies
- Estimated Nutrition for Homemade Candy Kiss Cookies
- Share Your Homemade kiss cookies Creations
Why This is the Best Ever kiss cookies Recipe (The Classic Peanut Butter Blossoms)
I’ve tinkered with a lot of cookie recipes over the years, but these classic Peanut Butter Blossoms—the original **kiss cookies**—are non-negotiable. Why are they the best? Because they nail that perfect texture trifecta you always want in a holiday cookie. They are unbelievably soft and chewy, not stiff or crumbly. Plus, they develop that gorgeous, sugary crackle on top while baking, which is just beautiful.
The recipe works so well because it avoids the hassle of chilling the dough. I know your time is precious, so I tested this rigorously to be sure it’s a genuine No Chill Cookie Dough. When you need a batch of delicious cookies fast, this classic recipe is what you turn to time and time again. For more fantastic, dependable recipes, take a peek at my collection of best dessert recipes.
Quick and Easy Dessert Timeframe
Seriously, these are some of the fastest cookies I’ve ever made! You can have them mixed, rolled, and baked in under 40 minutes total, start to finish. The prep takes about 15 minutes, and they are only in the oven for about 10 minutes. That’s why they are such great Simple Drop Cookies. If you need a batch of homemade candy kiss cookies ready for a last-minute party, these are your heroes!
Gather Your Ingredients for Classic kiss cookies
Getting the ingredients ready for these cookies is half the fun, especially when you realize how straightforward they are. Trust me, using quality ingredients really makes the flavor pop in this recipe. You’ll notice I strictly call for softened butter—not melted, okay? That’s key for that beautiful texture we talked about. Make sure you have your light brown sugar packed tightly into the measuring cup, and grab those Hershey Kisses because they need to be unwrapped and waiting!
We are aiming for about 30 perfect cookies from this batch, so measure everything carefully. If you’ve got your list ready, let’s look at those little details that make a huge difference.
Ingredient Notes and Substitutions for kiss cookies
The peanut butter should absolutely be creamy here; crunchy bits disrupt how the dough forms around the chocolate center. Also, while the recipe calls for standard milk chocolate Kisses, don’t hesitate to mix it up! If you want a fun color, use the Hershey’s Hugs, or maybe try dark chocolate Kisses if you prefer a richer flavor contrast. Just make sure they are unwrapped before the cookies leave the oven—fumbling with foil when the cookies are hot is stressful and not necessary!
Step-by-Step Instructions for Perfect kiss cookies
Alright, let’s get to the fun part! This is where we turn simple pantry staples into those amazing, nostalgic treats. Remember, precision matters, but don’t stress! If you follow these steps closely, you’ll have those beautiful crackled **kiss cookies** every single time. We’re aiming for that soft and chewy texture, and the timing is everything, especially at the very end.
Mixing the kiss cookies Dough
First things first, your oven needs to be at 375 degrees F, and get that parchment paper ready on your baking sheets. Now, focus on the creaming step. We’re beating that softened butter with both sugars until it looks genuinely fluffy—pale yellow and airy. Don’t rush this part; this is building the structure for our Soft and Chewy Cookies! Once that’s light, beat in the eggs one at a time, followed by your vanilla and that creamy peanut butter. In another bowl, just whisk the dry things together: flour, baking soda, and salt. When you add the dry mix to the wet mix, you have to do it gradually and mix only on low speed until *just* combined. Seriously, the second you see no more flour streaks, stop mixing! Overmixing here is the quickest way to tough cookies, and we want happy, tender bites.
Baking and Adding the Chocolate Kiss
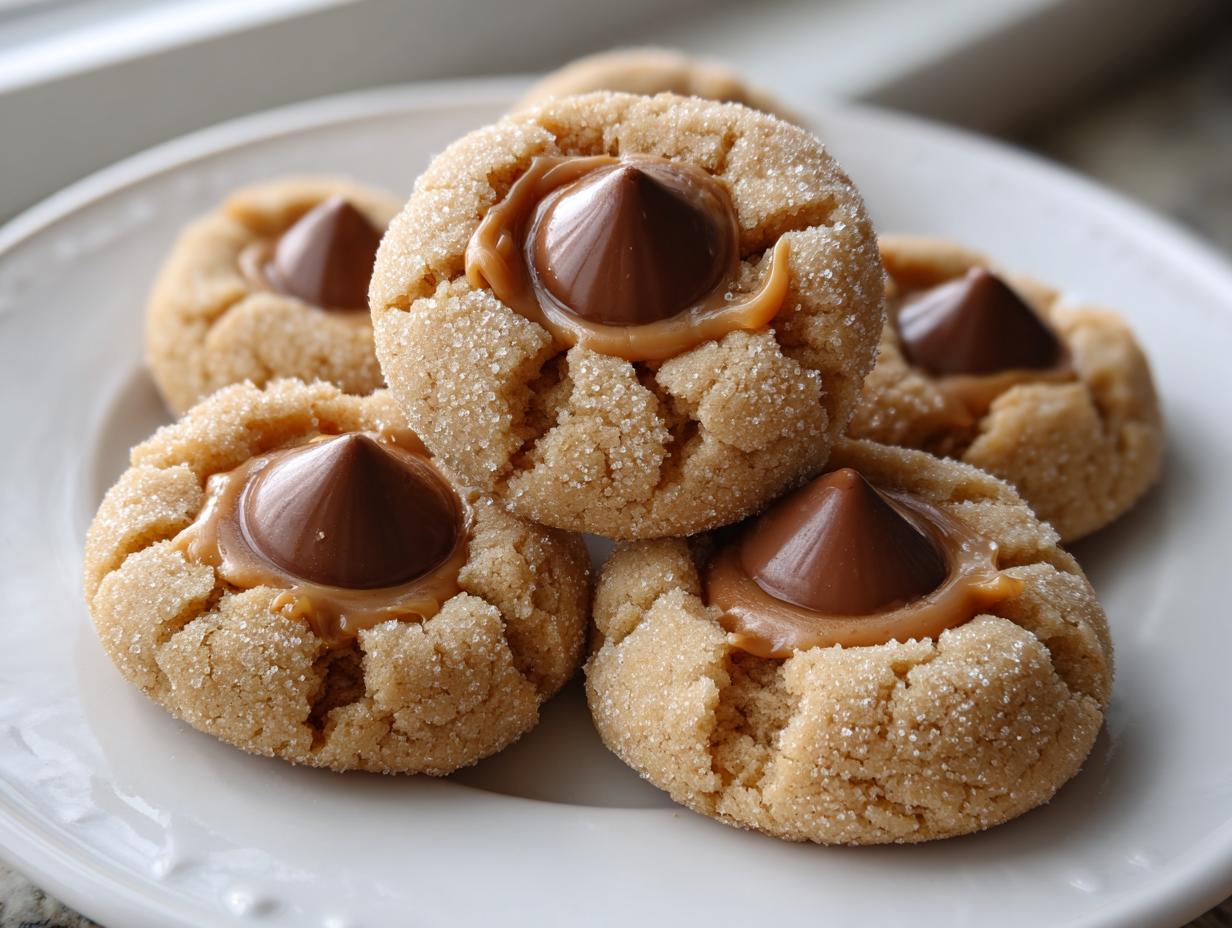
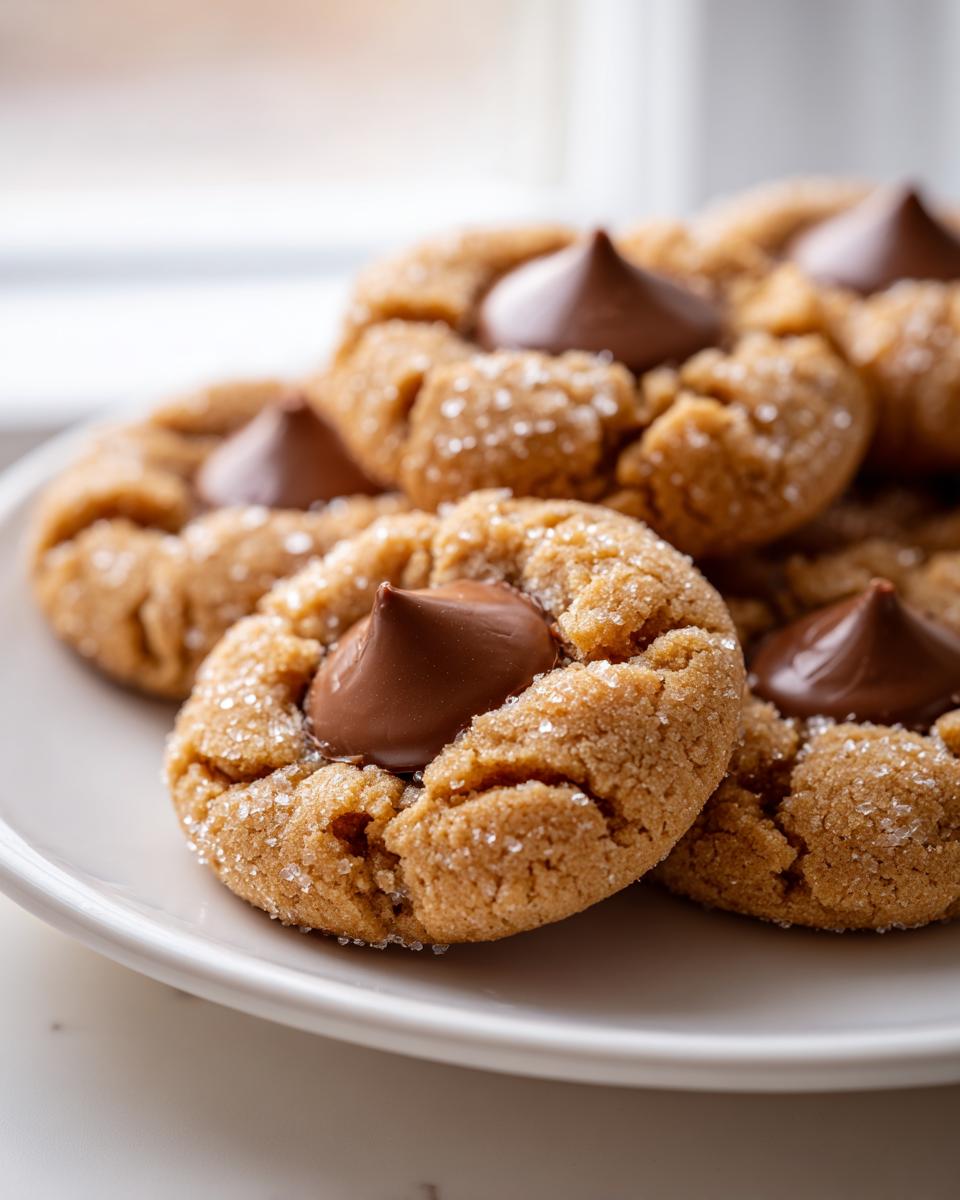
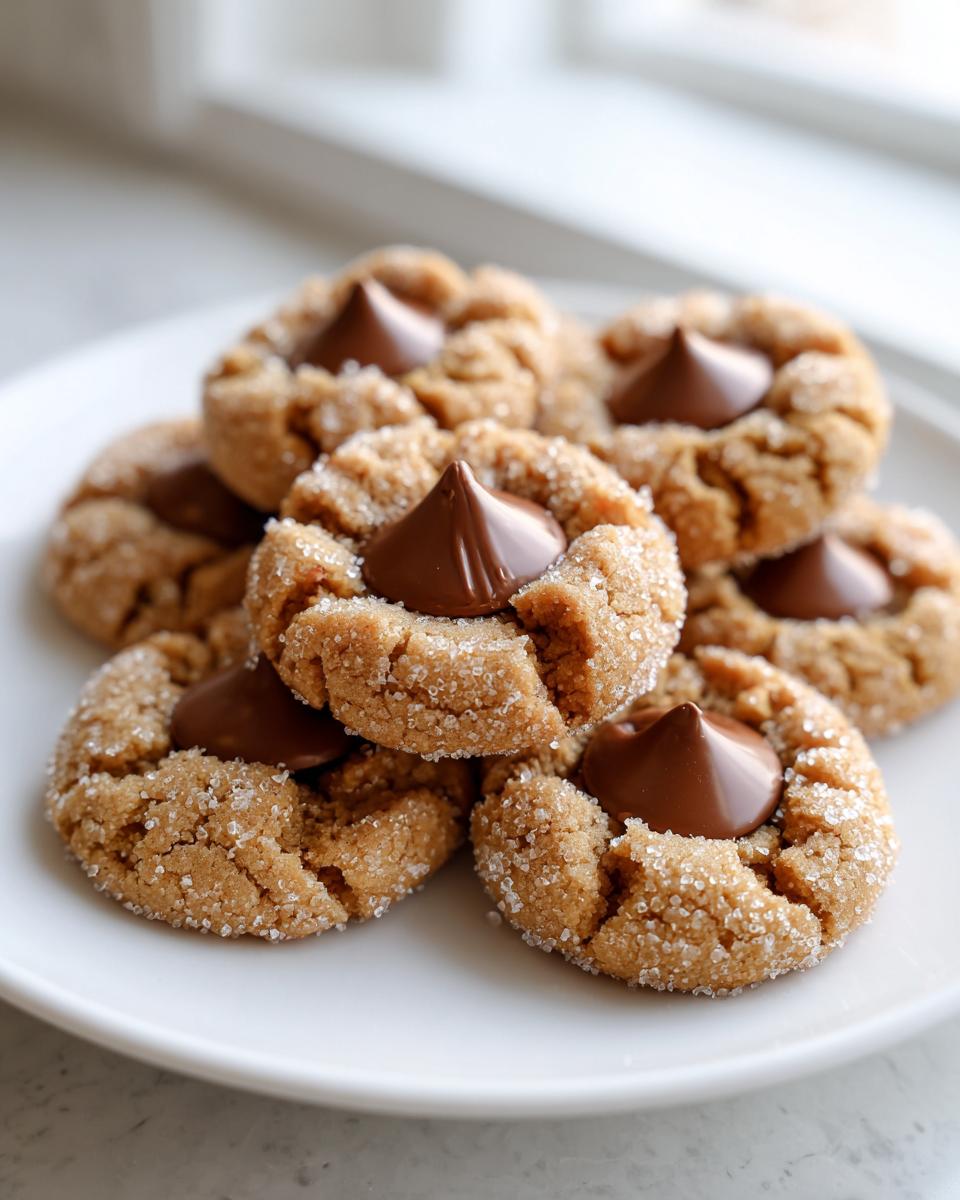
Once your dough is mixed, take about a tablespoon of dough and roll it into a nice, smooth ball. Then, you’re going to roll that ball in a little extra granulated sugar until it’s fully coated. This sugar coating helps create that signature crackle finish as the cookie bakes. Place these sugar-coated balls about two inches apart on your prepared sheets.
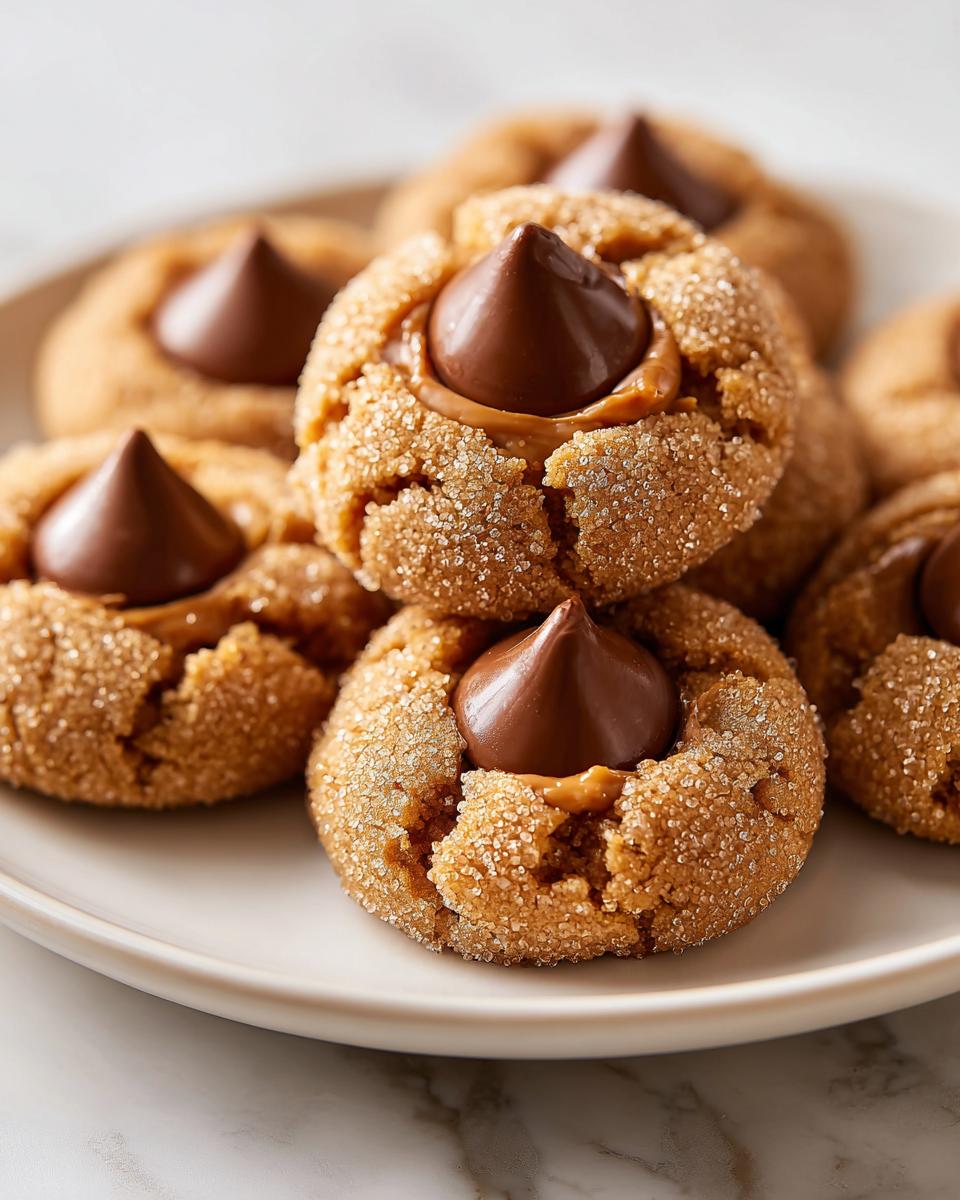
Bake them for 8 to 10 minutes. You want the edges set, but the centers should still look a tiny bit soft when you pull them out. This is my personal rule for getting that fantastic crackle: the second the tray comes out of the oven, you gently press one unwrapped Hershey Kiss right into the center of each hot cookie! If you wait even five minutes, the cookie dough tightens up, and you might end up cracking the whole thing when you press. Pressing it immediately softens the chocolate just enough so it settles in perfectly. Let them sit on that hot pan for five minutes before moving them onto a cooling rack, and that’s it!
For more reliable baking tips, especially when dealing with chocolate, I always reference my tips for amazing chocolate chip cookies.
Tips for Making the Best Ever kiss cookies
I want you to have success right out of the gate, so let’s talk through a couple of little bumps that can happen when making these classic delicious **kiss cookies**. Even though I promise this recipe is a No Chill Cookie Dough—meaning you don’t *have* to chill it—sometimes the kitchen gets hot, and things can go sideways fast, especially with rich peanut butter dough!
If you find your dough balls are squishing out wide instead of staying nice and tall when you roll them, the dough is likely too warm. Don’t panic! Just pop the scooped dough balls onto the baking sheet and stick the whole tray into the fridge for about 15 minutes. Chilling them briefly firms them up just enough so they keep their shape during that initial bake. Once they are cooled down, you’re ready to roll them in the extra granulated sugar.
Getting That Perfect Sugar Coating
That beautiful, powdery, crackled look on top doesn’t just happen by accident. It comes from the sugar coating. I recommend using two bowls for this: one with your dough balls, and a second, wider bowl filled generously with extra granulated sugar. Roll the dough ball firmly in the sugar so it’s completely covered before placing it on the sheet. This sugar shell is what locks in the softness inside and gives you that gorgeous contrast against the dark chocolate Kiss.

Remember, since we skipped the long chill time, you are good to go straight from the mixer to the oven, which is why I love this recipe so much for fast baking days! For more great tips on keeping your peanut butter treats perfectly soft, check out my other article on peanut butter cookie recipes.
Variations on Classic Hershey Kiss Cookies
While I absolutely stand by the Peanut Butter Blossom version—it’s a classic for a reason!—I know sometimes you want to try something different or maybe you have someone who isn’t a huge peanut butter fan. That’s the joy of these cookies: the Kiss centerpiece is so versatile. It works with almost any simple drop cookie base you already love.
My goal here at Kings Cook is to help you feel confident trying new things, so think of this as a template for fun variations! You can easily swap out that peanut butter dough for different flavors, and you still get that satisfying chocolate top. If you love working with cutout shapes, you might want to check out my guide for sugar cookies for decorating, as that same dough base works beautifully for the Kiss style too.
If you’re looking for even more inspiration on how to mix up the base recipe, I saw a fun roundup online that gives you tons of ideas. You might enjoy seeing what other bakers are doing when they make Hershey Kiss Cookies!
Switching to a Sugar Cookie Base
A phenomenal swap is using a tender, buttery sugar cookie dough. You roll the dough just like we did for the Peanut Butter Blossoms—into a ball and then into granulated sugar. You bake it until it’s just set, and then press that Kiss right in. Because the sugar cookie dough itself is less robust than the peanut butter version, be extra gentle when pressing that chocolate in. These tend to be more delicate once cooled, so they make a lovely, pale contrast to the dark chocolate top.
Trying Red Velvet Kiss Cookies
Do you need something stunning for Valentine’s Day or Christmas? Red Velvet Kiss Cookies are totally gorgeous. You just need to make your favorite Red Velvet cookie dough base (it’s usually just a standard recipe with a little cocoa powder and lots of red food coloring) and proceed exactly as written in the main instructions. The bright red color peeking out around that melted chocolate Kiss looks incredibly professional, but trust me, the steps are just as easy as the peanut butter version we just made!
Chocolate and Snickerdoodle Twists
For the serious chocolate lovers out there, using a fudgy chocolate cookie base is divine. You skip the sugar roll, though! For those, you just bake the dark dough balls and immediately press the Kiss in. If you’re a fan of warm flavors that aren’t peanut butter, try a slightly modified Snickerdoodle Kiss Cookie dough. You’d roll the dough in cinnamon-sugar before baking instead of pure white sugar. It gives you that wonderful crackle without the peanut butter flavor—a fun little holiday baking staple!
Storage and Make-Ahead Tips for Your kiss cookies
One thing I love about these **kiss cookies** is that they travel really well and smell amazing for days afterward! Longevity planning is important, especially when you’re baking for a big crowd or trying to get ahead before a busy holiday. The great news is that these are fantastic for making ahead; that’s why they are a perennial favorite for holiday baking staples!
If you are planning ahead, I highly recommend preparing the dough balls completely—rolling them in the sugar and everything—and then freezing them! Keep those prepped dough balls on a baking sheet until they are frozen solid, then transfer them to a sealed bag. You can bake them right from frozen; you just need to add about 3 to 4 minutes extra to the baking time. Remember to check them carefully because frozen dough can sometimes melt slightly before it sets.
Now, what about storage once they are done? The key is keeping them away from too much air exposure so that beautiful peanut butter cookie stays soft. Store your finished **kiss cookies** in a good airtight container at room temperature. Don’t try to refrigerate homemade candy kiss cookies, because the cold air can actually make the peanut butter cookie part dry out faster! You should easily get about five days of wonderfully soft and chewy cookies this way.
If you need a huge batch of treats ready for the season, these simple drop cookies won’t let you down. You can always find more ways to plan your baking schedule by looking through my tips on easy holiday cookies.
Serving Suggestions for Holiday Baking Staples
Okay, so the cookies are cooling, and the house smells amazing—now what do we serve them with? These Peanut Butter Blossoms are rich, sweet, and have that wonderful salty undertone from the peanut butter, so they pair beautifully with simple, classic companions. When I serve these at gatherings, presentation matters almost as much as taste, though taste is always number one, obviously!
The absolute classic pairing, the one that takes me right back to my grandmother’s kitchen, is a big, cold glass of whole milk. You just can’t beat the cooling creaminess against the rich chocolate and peanut butter crumbs. It’s simple, it’s comforting, and it’s kid-approved every single time. For less messy occasions, I always set out a pot of freshly brewed coffee.
The slight bitterness of good coffee—especially a dark roast—really cuts through the sweetness of the chocolate Kiss wrapper and balances the sugars in the cookie dough. If you’re hosting a larger crowd and want to offer more than just standard drinks, I have some fun ideas in my guide to drink and cocktail recipes that would sit nicely next to these simple drop cookies.
Simple Treat Pairings
Since these are already quite decadent with the chocolate center, you don’t need to pair them with anything too heavy. Think about what will balance the flavor profile. If you’ve made a big platter of rich cookies, balance it out with something bright. Fresh fruit, like strawberries or a crisp apple slice, offers a nice, palate-cleansing difference.
Or, if you’re serving these as part of a larger dessert spread, make sure you have an unsweetened item available. A bowl of slightly salted, roasted nuts works wonders. It highlights the peanut flavor in the cookie without adding more sugar to the mix. It’s all about creating contrast so that every bite of the cookie tastes as good as the first!
Frequently Asked Questions About kiss cookies
Sometimes you just need a quick answer to keep that dough moving, right? I totally get it! I’ve compiled the most common questions I get about these wonderful **kiss cookies** below. Getting these little details right means your cookies will come out perfect every time.
Why did my chocolate Kiss sink into the cookie instead of sitting nicely on top?
This is the oldest trick in the book, so pay attention! If your Kiss sinks down and gets covered by the cookie dough, it means you baked the cookie too long, or you let the cookie cool too much before pressing it in. The cookie needs to be piping hot when that chocolate hits it. The residual heat softens the bottom of the Kiss just enough so it gently wedges into the center crackle without shattering the surface. If your cookie is completely cool, the chocolate won’t melt at all, and you risk cracking the whole thing when you push it!
Can I use crunchy peanut butter instead of creamy in this Peanut Butter Blossoms recipe?
You absolutely *can*, but I always advise against it if you’re chasing that perfect texture! The crunchy peanut butter adds little pockets and disrupts the smooth texture of the dough we worked so hard to cream together. For the *Best Ever kiss cookies* that are perfectly soft and chewy, stick to creamy peanut butter. The goal is a uniform dough that bakes evenly around the chocolate. If you use crunchy, you might end up with a slightly drier cookie!
Can I freeze the dough for these kiss cookies?
Yes, and this is a huge time-saver, especially around the holidays! As I mentioned before, you can roll the dough balls, coat them in sugar, and freeze them solid. This is the ultimate ‘no chill cookie dough’ hack turned into a ‘make-ahead’ powerhouse. Once they are frozen, transfer them to a zip-top bag and keep them frozen for up to three months. When you’re ready to bake, just toss them directly onto your lined baking sheet and add about three extra minutes to the baking time.
My cookies spread way too much! What went wrong?
Spreading is usually caused by two culprits: your butter was too soft—almost melted—or you didn’t use enough flour or your dry ingredients weren’t properly measured. When you cream the butter and sugar, if the butter is greasy, it melts too fast in the oven, causing the cookie to flatten out before the structure can set. Make sure your butter leaves a slight dent when pressed but isn’t shiny or oily looking. A quick 15-minute chill of the dough balls before baking can save a batch that’s gotten too warm, too!
If you’re getting ready now, remember all great cooks review their supplies, so take a look at my guide for great appetizers and snacks to round out your spread!
Estimated Nutrition for Homemade Candy Kiss Cookies
I always include this information because I truly believe in feeding our families the best, and knowing what’s in our food is part of that. However, I have to give you the standard disclaimer that I’m Kate, not a registered dietitian! So, all of these numbers below are just estimates based on the ingredients listed in my recipe.
When you’re baking these **homemade candy kiss cookies**, remember that your exact peanut butter brand or the size of your eggs can slightly shift the final count. But this gives you a really solid baseline, especially if you’re trying to track things for your family meals.
Based on one cookie serving size, here is what we are looking at:
- Calories: About 160
- Sugar: 13 grams
- Fat: 9 grams total (with 4 grams being saturated fat)
- Carbohydrates: 18 grams
- Protein: 3 grams
- Sodium: 105 milligrams
The Trans Fat is zero, which I’m always happy to see! This breakdown shows you why these cookies are such a wonderful treat—they have a great balance of fat and carbs to keep you satisfied without being overwhelmingly heavy. They really are the perfect simple drop cookies!
Share Your Homemade kiss cookies Creations
Now, this is my favorite part! Seeing you all bring these recipes into your homes is exactly why I started Kings Cook—to help you feel that real, genuine pride in what you create. I truly hope these **kiss cookies** made your kitchen smell wonderful and brought a smile to everyone’s face, whether you were baking for a big holiday party or just needed a super Quick and Easy Dessert for the family.
If you tried this Classic Peanut Butter Blossoms recipe, please let me know how it went in the comments below! Did you get that perfect crackle? Did the chocolate Kiss settle just right? I want all the details!
And hey, if you adored how easy and reliable this recipe was, take a moment to give it a 5-star rating right up top on the recipe card. That helps other home cooks who are nervous about baking find a recipe that actually works. Your feedback is what helps me keep testing and sharing the best, most dependable recipes out there!
If you’re looking to dive deeper into the philosophy behind making your kitchen feel more confident and capable, you can always read more about my mission over on my About Page. Happy baking, friends. I can’t wait to hear about your delicious results!
PrintClassic Peanut Butter Blossoms (The Best Kiss Cookies)

Make the classic Peanut Butter Blossoms, the quintessential kiss cookie. These soft and chewy peanut butter cookies have a signature crackled top and are finished with a milk chocolate Hershey Kiss. This recipe is simple and perfect for holiday baking or any time you need a quick and easy dessert.
- Prep Time: 15 min
- Cook Time: 10 min
- Total Time: 25 min
- Yield: 30 cookies 1x
- Category: Dessert
- Method: Baking
- Cuisine: American
- Diet: Vegetarian
Ingredients
- 1 cup unsalted butter, softened
- 3/4 cup granulated sugar, plus extra for rolling
- 3/4 cup packed light brown sugar
- 2 large eggs
- 1 teaspoon vanilla extract
- 3/4 cup creamy peanut butter
- 2 1/4 cups all-purpose flour
- 1 teaspoon baking soda
- 1/2 teaspoon salt
- 1 bag (12 ounces) milk chocolate Hershey Kisses, unwrapped
Instructions
- Preheat your oven to 375 degrees F. Line baking sheets with parchment paper.
- In a large bowl, cream together the softened butter, granulated sugar, and brown sugar until light and fluffy.
- Beat in the eggs one at a time, then mix in the vanilla extract and peanut butter until combined.
- In a separate medium bowl, whisk together the flour, baking soda, and salt. Gradually add the dry ingredients to the wet ingredients, mixing on low speed until just combined. Do not overmix.
- Place about 1 tablespoon of dough into your hands and roll it into a smooth ball. Roll the dough ball in the extra granulated sugar until coated.
- Place the sugared dough balls about 2 inches apart on the prepared baking sheets.
- Bake for 8 to 10 minutes, or until the edges are set but the centers are still slightly soft.
- Immediately after removing the cookies from the oven, gently press one unwrapped Hershey Kiss into the center of each warm cookie. The heat will soften the chocolate slightly.
- Let the cookies cool on the baking sheet for 5 minutes before transferring them to a wire rack to cool completely.
Notes
- For the best results and the classic crackled look, press the Kiss into the cookie immediately after it comes out of the oven.
- If your dough seems too soft, chill it for 15 minutes before rolling into balls. This recipe does not require chilling for the dough.
- You can substitute milk chocolate Kisses with Hershey’s Hugs or dark chocolate Kisses for variation.
- Store these homemade candy kiss cookies in an airtight container at room temperature for up to 5 days.
Nutrition
- Serving Size: 1 cookie
- Calories: 160
- Sugar: 13
- Sodium: 105
- Fat: 9
- Saturated Fat: 4
- Unsaturated Fat: 5
- Trans Fat: 0
- Carbohydrates: 18
- Fiber: 1
- Protein: 3
- Cholesterol: 25