

Oh, when the air starts getting crisp and you just want that cozy, nostalgic feeling wrapping around you, what’s better than a warm, sweet fruit dessert? For me, nothing beats the smell of cinnamon and brown sugar wafting from the oven. That’s why I’m sharing what I genuinely believe is the ultimate, can’t-mess-it-up recipe for **baked apples**—specifically, my Classic Cinnamon and Brown Sugar Stuffed Apples. Growing up, food was always my family’s language of love, and these simple, beautiful recipes are the ones that truly connect us to those comforting memories. Trust me, this easy baked apples recipe is going to be your new go-to. It brings that wonderful taste of home right to your table!
- Why You Will Love This Classic Cinnamon and Brown Sugar Stuffed Baked Apples Recipe
- Gathering Ingredients for Perfect Baked Apples
- Step-by-Step Instructions for Easy Baked Apples Recipe
- Tips for Success with Stuffed Baked Apples
- Serving Suggestions for Warm Apple Dessert
- Storage and Reheating Instructions for Leftover Baked Apples
- Frequently Asked Questions About Baked Apples
- Estimated Nutritional Data for Classic Baked Apples
- Share Your Holiday Baked Apples Creations
Why You Will Love This Classic Cinnamon and Brown Sugar Stuffed Baked Apples Recipe
I know you have a million fall recipes floating around, but honestly, these baked apples just hit different. They are pure comfort in a cute, edible package. If you’re looking for something that delivers big flavor without demanding all your time, this is it!
- It’s truly an easy baked apples recipe! Seriously, the prep takes maybe 15 minutes tops, and then the oven does all the heavy lifting. No complicated steps here, I promise.
- You get that perfect texture—the apples turn incredibly tender spiced apples inside, while that oat topping gets bubbly and golden brown. It’s like an apple crisp built right inside the fruit!
- This is the quintessential fall apple dessert. The scent alone will make your whole house smell like the coziest autumn evening imaginable.
- Perfect for holidays or just a Tuesday night! They work beautifully as a decadent dessert or even as a slightly healthier, warm side dish alongside pork chops. I’ve even made a double batch when friends drop by unexpectedly.
- If you love our apple cinnamon muffins, you’ll adore this flavor profile—it’s that warm spice blend we all crave. You can find that recipe here: apple cinnamon muffins recipe.
Gathering Ingredients for Perfect Baked Apples
Okay, let’s talk supplies! The beauty of this recipe is that it uses simple items you probably already have in your pantry or fruit bowl. When we’re aiming for comfort food, we don’t want to run all over town for specialty items. Here is exactly what you need to gather for four perfect servings of these brown sugar baked apples.
- You’ll need 4 large baking apples. Think firm ones that hold their shape! I always lean toward Honeycrisp or maybe a sturdy Granny Smith if I know I want a little tartness to bite through the sweetness.
- For our filling, grab 1/2 cup of rolled oats—no instant stuff here, we need that structure!
- We need 1/4 cup of packed brown sugar. That molasses quality is key to that deep, warm flavor.
- Grab 2 tablespoons of all-purpose flour to help bind the filling.
- Measure out 1 teaspoon of ground cinnamon and just 1/4 teaspoon of ground nutmeg. These are the stars of the spice show!
- You absolutely must use 1/4 cup (that’s four tablespoons) of cold unsalted butter, and make sure you cut it into tiny little pieces before you start mixing. Seriously, tiny!
- We only need 2 tablespoons of water for the bottom of the pan—this helps steam the apples gently so they get soft without burning the sugar underneath.
- Finally, keep 1/4 cup of plain granulated sugar handy, just for sprinkling over the top before they go into the oven.
Ingredient Notes and Substitutions for Your Baked Apples
Getting the right apple makes a huge difference in whether you end up with a mushy mess or those perfectly tender spiced apples we are aiming for. If you use a very soft apple like a Red Delicious, it might collapse before the filling is done, so try to stick to firmer types!
When it comes to the liquid at the bottom of the pan, that water sounds boring, right? But if you want to add a little extra richness—especially if you’re serving this as a special holiday treat—my note says you can swap that water out for maple syrup. Using maple syrup in the base of the pan adds this incredible, buttery caramel layer as it bakes. It’s divine!
Also, a quick tip on the butter for the topping: Make sure it’s COLD. If it gets warm while you’re cutting it into the oats and sugar, your filling will become greasy instead of crumbly. Keep those ingredients cold so the butter melts slowly in the oven, creating that lovely crisp texture we love. This little bit of technique really helps turn this into something special!
Step-by-Step Instructions for Easy Baked Apples Recipe
Now for the fun part! You’ve got your apples ready, and you’ve gathered all those beautiful spices. Don’t be intimidated by the steps; I’ve broken this down so clearly that anyone—and I mean ANYONE—can pull off these perfect stuffed baked apples. We’re aiming for tender, warm comfort, and we’ll get there in under an hour total!
- First thing’s first, get your oven warmed up! We need that environment just right, so preheat to 375 degrees Fahrenheit. While that’s heating, lightly grease an 8×8 inch baking dish. You want them to slide right out later, so don’t skip the grease step!
- Next up, the apples themselves. Give them a good wash. Now, you need to core them carefully. Use a small spoon or a melon baller—I prefer a small spoon myself, you have more control! You’re digging out the seeds and the hard center core, but you must stop before you cut all the way through the bottom. We need that base firmly in place to hold all that wonderful filling!
- Place the hollowed-out apples right into that prepared baking dish. They should stand up nicely.
- We are going to pour in just 2 tablespoons of water into the very bottom of the dish, all around the apples. This is a critical trick! It creates steam while baking, ensuring the apples soften evenly without scorching our beautiful sugary filling. If you want to see another great approach to these easy baked apples recipes, check out this link!
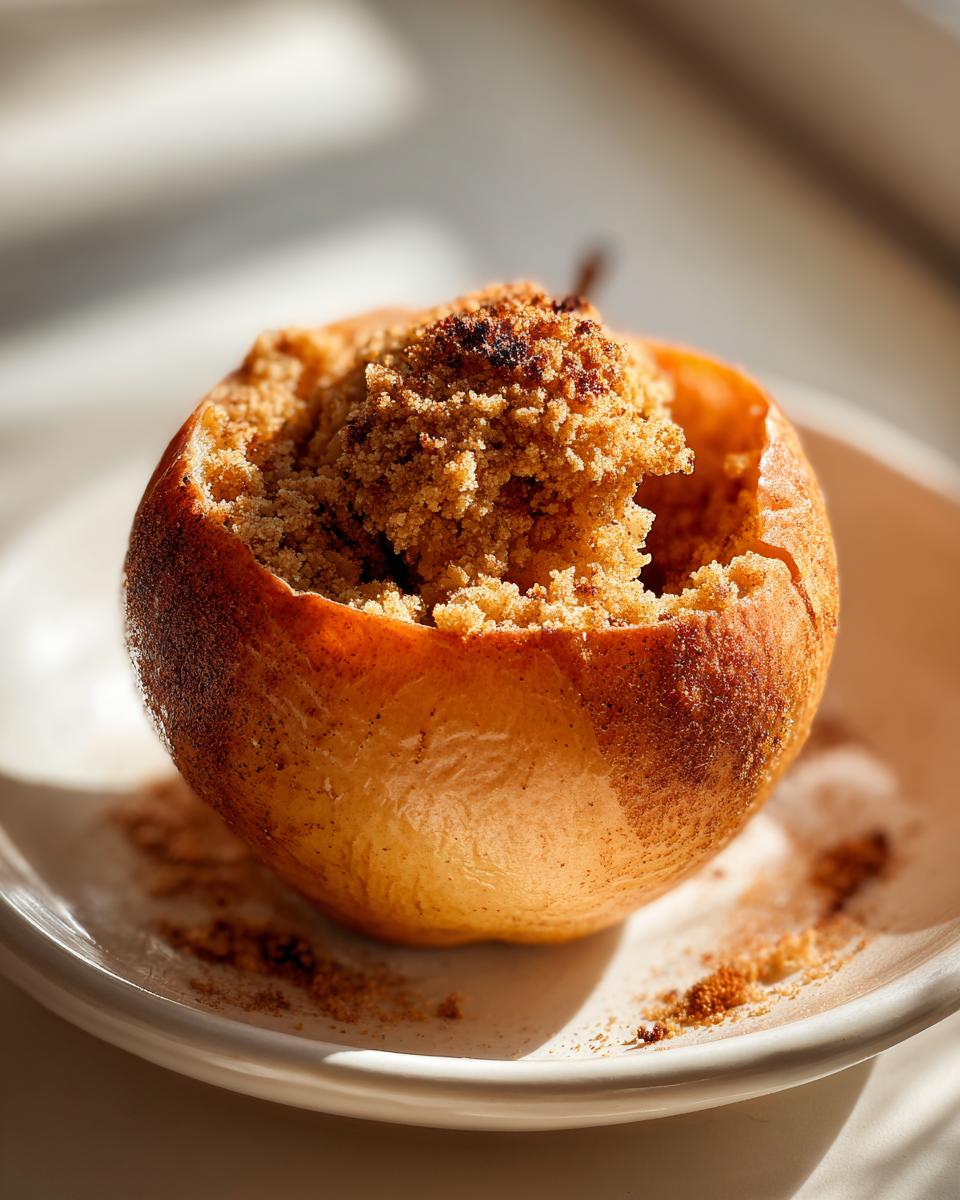
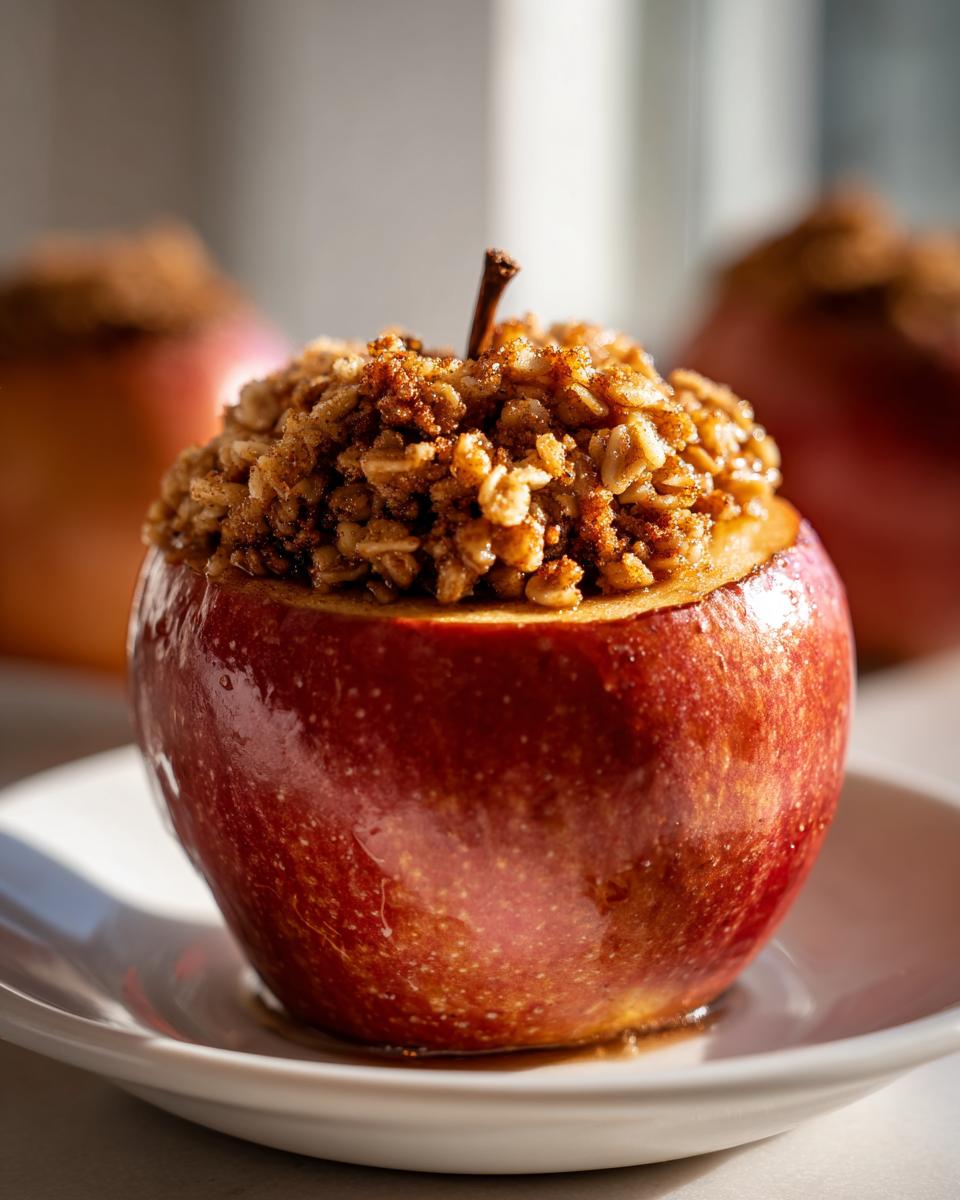
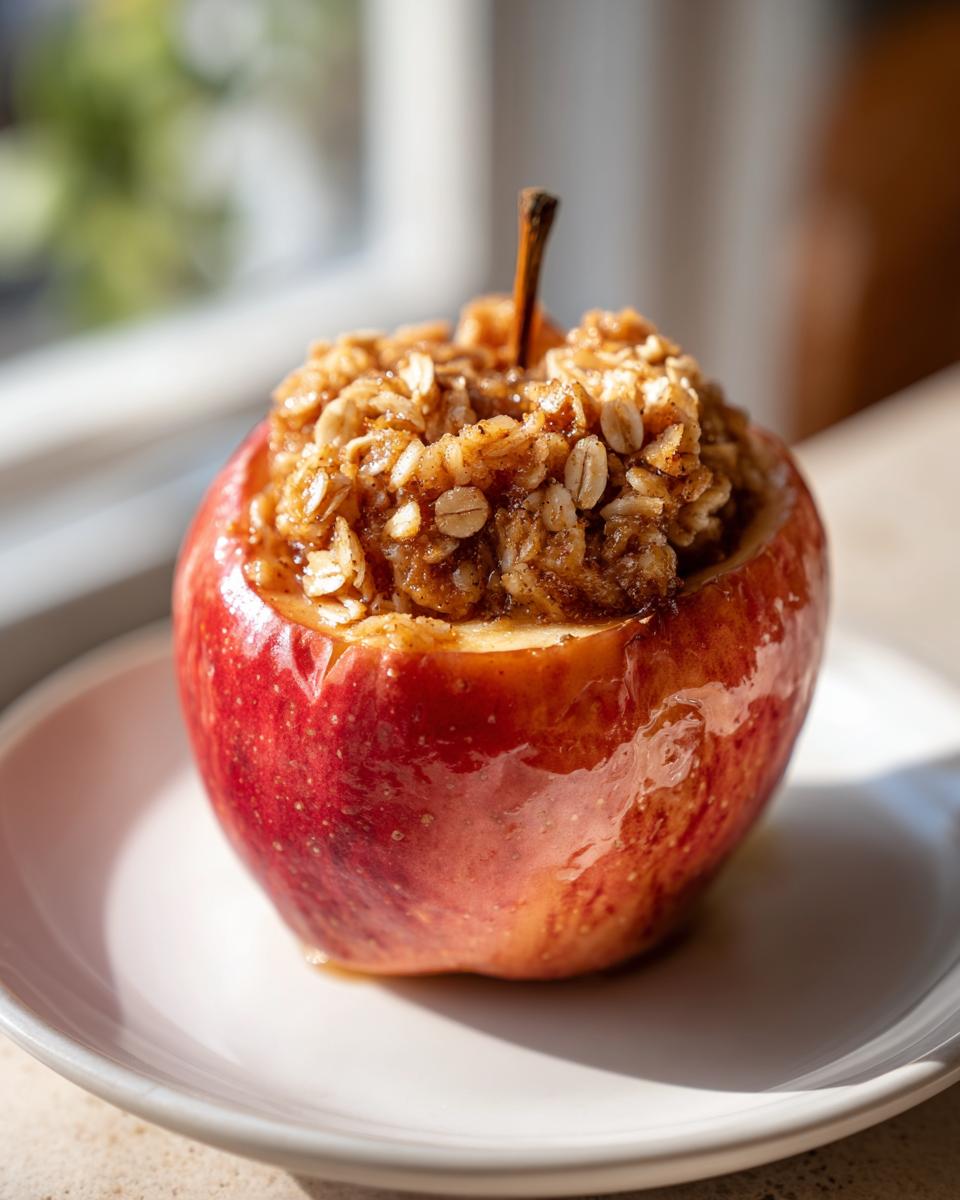
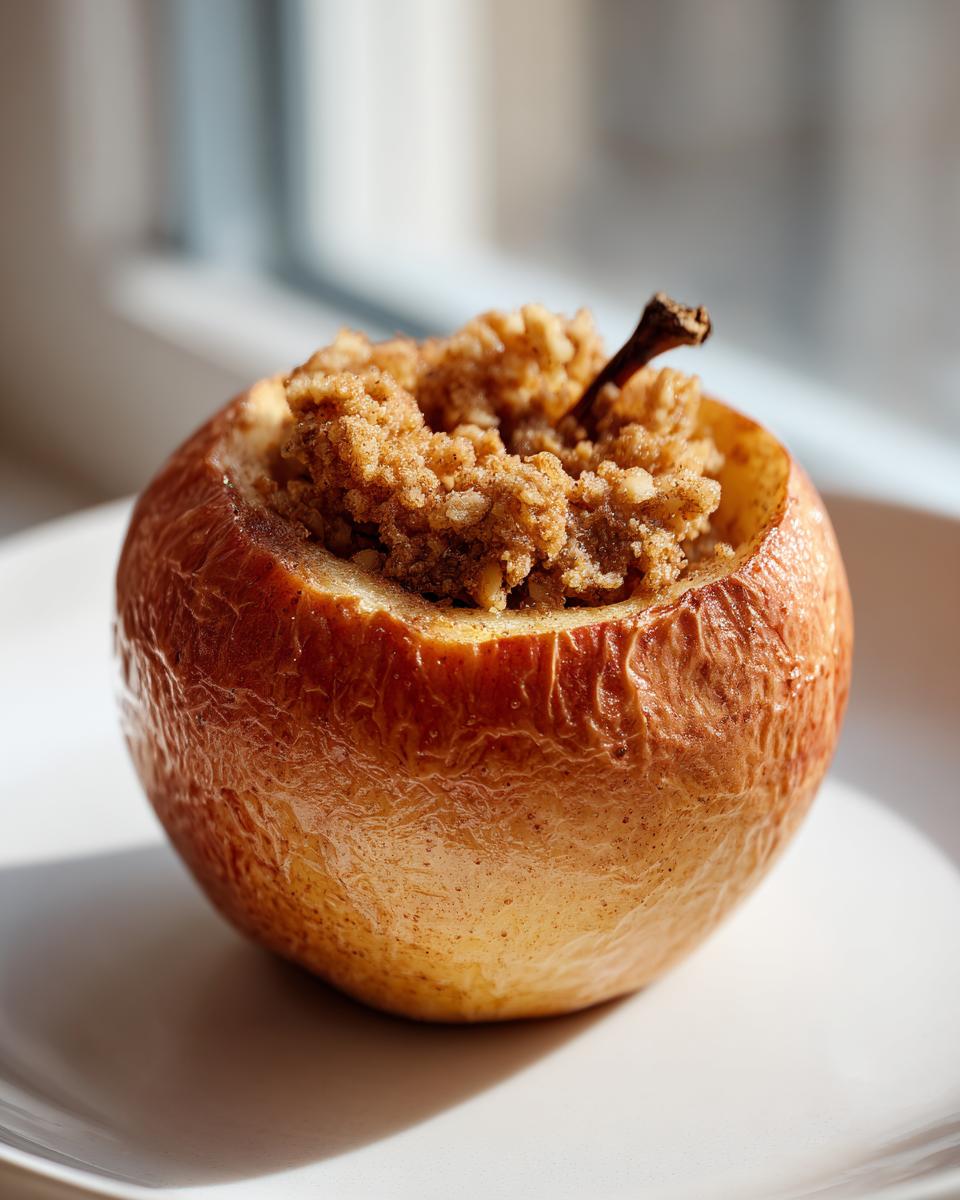
- Once they are sitting nicely in their water bath, gently stuff the center cavity of each apple evenly with the oat mixture we just made. Get it in there, but don’t force it too tight, or the apple skin might burst unevenly.
- The final flourish before they hit the heat: sprinkle the tops of your stuffed apples with the reserved granulated sugar. That contrast of white sugar crystalizing on the brown sugar filling is just gorgeous.
- Slide them into the oven and bake them for 35 to 45 minutes. You’ll know they are ready when you can easily pierce the apple flesh with a fork and the topping is bubbly and golden brown.
- Be careful pulling the hot dish out! Let them rest for just a few minutes—maybe while you grab the ice cream—before serving them warm.
Preparing the Apple and Oatmeal Crisp Style Baked Apples Filling
This is where the magic for our apple and oatmeal bake topping happens! Grab a medium bowl. You are going to dump in your rolled oats, brown sugar, flour, cinnamon, and nutmeg. Give that a quick whisk around so everything is evenly distributed. Now, grab that cold butter that you cut into teensy pebbles.
The trick here is keeping that butter cold! Use your fingertips, or if your hands are warm, use a pastry blender. You need to work that cold butter into the dry ingredients until the whole mixture looks like coarse crumbs. Think sandy, slightly clumpy texture. That cold butter melts slowly in the oven, creating that wonderful crisp texture on top of the soft apple. If your butter melts before it gets fully mixed in, stop, stick the bowl in the fridge for five minutes, and then finish mixing!
Baking Your Tender Spiced Apples to Perfection
Once those apples are stuffed, it’s time to carefully place them into the baking dish where that small amount of water is waiting at the bottom. Remember, that water is your steaming agent, keeping things from turning into a sticky mess! After placing them in the oven at 375°F, don’t go too far! You’re watching for those visual cues—the topping should be deeply golden, and when you carefully probe the apple with a fork, it should slump just a little bit. That means you have achieved the perfect tender spiced apples!
This recipe is so streamlined, and you can see how even the coring and the addition of that water bath make the difference between an *okay* baked apple and one that tastes like holiday perfection. If you want to check out a slightly different, but equally lovely, fruit option, I have my full apple crisp recipe here, but honestly, for simplicity, nothing beats baking them right in their skin!
Tips for Success with Stuffed Baked Apples
I want you to have the absolute best results when you make these, so let’s cover a few little secrets I’ve learned over the years making this recipe. Having an amazing fall apple dessert isn’t just about the ingredients; it’s about knowing how the fruit behaves in the heat!
First, let’s talk about coring depth. I mentioned taking care not to cut through the bottom, but I want to stress why that’s important. If you carve too deep, your amazing brown sugar and oatmeal filling—the star of the show—will melt right out into the bottom of the pan during baking. You want to leave at least a half-inch, maybe even a full inch, of solid apple flesh intact at the base. This acts like a little edible boat holding all that sweet, spiced goodness in place.
When it comes to preventing collapse, the apple choice really matters, as I noted before. But sometimes, even firm apples can get a little squishy if they bake too long. Start checking for tenderness closer to the 35-minute mark. Remember, you want them tender, but still holding their shape for that lovely presentation you see online. If you’re using slightly flatter baking dishes, try wedging the apples next to each other very snugly. They support each other as they bake, which really helps them stand up proud and tall.
And a quick thought on texture for our cinnamon baked apples: If you want the *absolute* softest apple flesh, peel them before you core them. Leaving the skin on gives the apple structure so it doesn’t turn to complete mush, but peeling ensures that every single bite of apple is spoon-tender. I usually leave the skin on for that classic look, but if you’re serving little kids or someone who prefers zero chew to the apple itself, peeling is the way to go. For more classic fall baking, you absolutely have to check out my famous apple pie recipe!
Finally, regarding the filling itself: Don’t overpack it! If you tightly pack the oat mixture into the cavity, the apple skin doesn’t have room to puff up gently around the edge. Loosely pack it in there; the filling will settle and spread slightly as the apple softens, which is perfect. If you have a little extra filling—it happens!—don’t waste it! Just sprinkle that extra crumb mixture right over the top of the apples around the edges. Extra crunch never hurt anybody. You can see exactly how beautifully these turn out over at Live Well Bake Often, just before you serve them with a scoop of vanilla ice cream on top!
Serving Suggestions for Warm Apple Dessert
There is nothing quite as rewarding as pulling these golden, bubbling baked apples out of the oven. They smell incredible, they’re soft, and they’re just begging for something creamy and cool to balance out that warm, spiced filling. Serving them properly elevates this simple fruit dish right into a top-tier comfort food apple recipe!
If you’re serving these for dessert, you have to go all in. My family expects the full experience when I make these beauties. Forget saving calories here; this is about pure, cozy satisfaction!
- Vanilla Ice Cream is Non-Negotiable: Seriously, make this happen. The contrast between the piping hot, intensely spiced apple and the slice of cold vanilla ice cream melting slowly down the sides? That’s heaven on a plate. It’s a classic pairing for a reason, and it’s the first thing my kids dive for.
- Caramel Drizzle FTW: If you have some store-bought caramel sauce (or, if you’re feeling ambitious, made your own—you know I have a great chocolate chip cookie recipe that you could skip for caramel sauce in a pinch!), a generous drizzle over the top is amazing. It pulls out the brown sugar notes perfectly.
- Homemade Whipped Cream: If you want something a little lighter than ice cream but still rich, a big dollop of freshly whipped cream is wonderful. It doesn’t need sugar, since the apples are so sweet, but a tiny pinch of cinnamon sprinkled on top of the cream makes it look extra professional!
- On Oatmeal: Okay, sometimes I don’t want a full dessert, but I still crave that flavor. If you halve the sugar in the filling mixture and skip the extra granulated sugar on top, these make the most luxurious addition to your morning oatmeal. It turns a boring bowl into a fantastic, healthy start to the day. Think of it as having leftovers for breakfast! Just scoop some of the soft apple and filling over a bowl of hot oats.
Whatever you choose to pair them with, make sure you serve them right away while everything is still steaming hot. That warmth is what makes this such a comforting treat!
Storage and Reheating Instructions for Leftover Baked Apples
I know, I know, these are so delicious that there are rarely any leftovers! But when you inevitably make a double batch because company showed up unexpectedly—or maybe you just love them that much—you need to know how to store them properly. Keeping your baked apples tasting fresh for a couple of days is super easy, but you do have to treat them with a little care so that the topping doesn’t get soggy.
If you are lucky enough to have any of these gorgeous mounds left over, let the apples cool completely to room temperature first. Don’t try to put them away warm! Once cool, transfer them to an airtight container. You can store them in the refrigerator for about three to four days. I’ve kept them slightly longer, nestled safely near the back of the fridge, but they are definitely at their peak quality in the first 72 hours. They are far superior to anything store-bought, and keeping them fresh is simple!
Now, when it comes to reheating—this is where we need to be gentle to preserve that crumbly topping! You have two main options, depending on how much time you have and how crunchy you want that topping to be.
Reheating in the Oven for Best Texture
If you want your stuffed baked apples to taste almost exactly like they just came out of the oven, the oven is your best friend. Preheat your oven to about 325°F—we don’t need super high heat, just gentle warming.
Place the leftover apples (you can put them back into a small, oven-safe dish, or even just place them on a small, parchment-lined baking sheet if you’re only reheating one or two). Heat them for about 10 to 15 minutes, just until they are warmed through and the spice aroma starts floating up again. This method keeps the oat topping nicely crisp and the apple interior perfectly soft. It’s worth those extra few minutes, trust me!
Quick Microwave Reheating (Use with Caution!)
Look, sometimes you just need a quick apple dessert fix, right? If you’re staring down a 30-second craving, the microwave works, but you need to manage your expectations. The microwave is fantastic at warming the apple flesh quickly, but it will soften that beautiful crisp topping right away—it’ll steam it, making it soft, almost like a cooked fruit compote.
If you decide to go the microwave route, use short bursts—maybe 30 seconds at a time—and check frequently. You only want to heat it up; you don’t want it boiling hot. If you are reheating them to serve over cold ice cream, this is a perfectly acceptable route!
If you want to explore another fantastic recipe that keeps well, my moist zucchini bread is amazing for making ahead of time, and it freezes wonderfully too! But for these baked apples, keep them covered in the fridge, and treat them gently when reheating!
Frequently Asked Questions About Baked Apples
I know sometimes you just have one tiny lingering question after reading through a whole recipe, and that’s totally fine! I’ve gathered up the ones I hear most often—especially when people are trying to fit these delicious, warm treats into their busy schedules or dietary plans. I hope this helps you feel totally ready to conquer this warm apple dessert!
What is the best type of apple for baked apples?
This is such a great question, because the apple choice truly dictates the final texture! For my recipe, where we are baking them whole and aiming for tender fruit that doesn’t completely dissolve, you want firm, slightly tart apples. My absolute favorites are Honeycrisp because they keep their shape beautifully and have just the right amount of sweet-tart snap. Granny Smith is also a fantastic choice if you prefer a tangier result that cuts through the rich brown sugar filling. Avoid super soft apples like McIntosh if you want your apples to stand up in the dish!
Can I make these ahead of time?
You absolutely can prepare them ahead of time, which makes them a dream for hosting! This is one of those wonderful holiday baked apples that lets you do groundwork early. You can assemble the apples entirely—core them, stuff them, place them snugly in the prepared baking dish, cover the dish tightly with plastic wrap, and stick them in the fridge for up to 24 hours. When you’re ready to serve, just pull them out, and bake them a little longer than the recipe calls for, maybe adding 5 or 10 extra minutes, since they will be starting cold. Just remember to add the water to the bottom of the dish before baking!
How do I make these a healthy baked apples side dish?
Oh, I love that you’re thinking about adapting this for a healthy baked apples side dish! We can easily tone down the sugar factor without losing all the beautiful spice. To make them lighter, I suggest drastically cutting back on the brown sugar in the filling and completely skipping the extra granulated sugar sprinkle on top. Then, when filling them, instead of the full oat mixture, try mixing oats with just a teaspoon of cinnamon and using a splash of high-quality apple juice or even a little yogurt underneath the topping instead of butter. They won’t be as decadent, but they will still be wonderfully soft and spiced—a perfect pairing for roasted chicken or pork! If you ever need dessert inspiration that isn’t fruit-based, check out my easy pumpkin bread recipe for a similar cozy vibe.
Why is my filling mushy instead of crumbly?
If your filling didn’t get that nice crisp texture, chances are the butter got too warm before it hit the oven. Remember how I stressed using COLD butter cut into tiny pieces? If the butter warms up during cutting, it mixes in like an oil rather than staying in solid little pieces. Those cold pieces are what create the steam pockets that turn into a crisp, crunchy topping! Next time, if you feel your dough getting warm while mixing the oats and sugar, pop that bowl in the freezer for five minutes before you stuff the apples. You can see great examples of the crumb texture we are aiming for over at baked cinnamon apples!
Do I have to use oats in the filling?
While the oats bring that lovely crunch reminiscent of an apple crisp, they aren’t strictly necessary if you have an allergy or just don’t have them! If you skip the oats, you’ll just have a pure cinnamon sugar filling, which is still delicious! You will need to slightly increase the flour (maybe to 1/3 cup) to absorb some liquid and help the butter bind everything together, otherwise, it will just melt away. Then, make sure you dot the top with a few extra tiny pieces of cold butter to help generate a nice crust!
Estimated Nutritional Data for Classic Baked Apples
I always believe in transparency when it comes to what we’re feeding our families! Because we’re using real, whole ingredients like full brown sugar and butter, these baked apples definitely lean toward being a rich and comforting treat rather than a diet food. But knowledge is power, right? Here is the estimated nutritional breakdown based on the ingredients specified in this recipe.
Keep in mind that these numbers are just estimates. If you substitute the butter for coconut oil, or use a lighter sweetener, your final count will change! But overall, this gives us a good idea of what we are working with for a single serving (one full apple).
- Serving Size: 1 apple
- Calories: 320
- Sugar: 45g (That’s where the glorious flavor comes from!)
- Fat: 14g
- Saturated Fat: 8g
- Carbohydrates: 52g
- Fiber: 6g (Thanks to those healthy oats and the apple itself!)
- Protein: 3g
- Cholesterol: 30mg
- Sodium: 5mg
See? Some great fiber content there, which is wonderful! Even though this is a sweet, warm apple dessert, it’s still homemade with wholesome ingredients. I wouldn’t sweat the sugar too much when it tastes this much like fall holidays!
Share Your Holiday Baked Apples Creations
Baking is always better when you share the joy, isn’t it? I pour my heart into making sure every recipe here at Kings Cook is clear, reliable, and tastes like something made with love. Now that you’ve made these incredible holiday baked apples, I truly want to hear all about them!
Did you manage to keep them intact while coring? Did you choose vanilla ice cream or go for that decadent caramel drizzle? Don’t be shy! Your feedback helps me, and it helps other home cooks feel confident stepping into the kitchen to try this recipe next.
- Drop a Star Rating: Right down below where you see the recipe card, there’s a spot for you to leave a rating. One star says “It was okay,” but five stars says “Kate, this is the best simple apple recipe I’ve ever made!” Tell me what you thought!
- Share Photos on Social Media: Snap a picture of those gorgeous, glistening, stuffed apples! Tag me on your favorite platform—I absolutely love seeing how my recipes look in *your* kitchens. It reminds me why I started this blog in the first place: to help people feel successful just like my friend did with Thanksgiving dinner years ago!
- Tell Me What Worked: Did you try swapping the water for maple syrup? Did you find a great pairing? Drop a comment telling me if you tried the apple crisp style baked apples combination or stuck to the classic filling. Every little note helps build our community!
If you’re looking for more ways to connect with me or learn more about our kitchen philosophy, you can always click over to my About Page. Thank you so much for trusting me with your dinner table. Happy cooking!
PrintClassic Cinnamon and Brown Sugar Stuffed Baked Apples

Make these simple baked apples stuffed with a sweet cinnamon and oat filling. This easy recipe delivers tender, spiced apples perfect for a fall dessert or a warm side dish.
- Prep Time: 15 min
- Cook Time: 40 min
- Total Time: 55 min
- Yield: 4 servings 1x
- Category: Dessert
- Method: Baking
- Cuisine: American
- Diet: Vegetarian
Ingredients
- 4 large baking apples (like Honeycrisp or Granny Smith)
- 1/2 cup rolled oats
- 1/4 cup packed brown sugar
- 2 tablespoons all-purpose flour
- 1 teaspoon ground cinnamon
- 1/4 teaspoon ground nutmeg
- 1/4 cup (4 tablespoons) cold unsalted butter, cut into small pieces
- 2 tablespoons water
- 1/4 cup granulated sugar for sprinkling
Instructions
- Preheat your oven to 375 degrees Fahrenheit. Lightly grease an 8×8 inch baking dish.
- Wash the apples. Use a small spoon or melon baller to carefully core the apples, removing the seeds and center core, leaving about a half-inch of apple flesh at the bottom to hold the filling. Do not cut all the way through the bottom.
- In a medium bowl, combine the rolled oats, brown sugar, flour, cinnamon, and nutmeg. Mix well.
- Cut the cold butter into the dry mixture using your fingers or a pastry blender until the mixture resembles coarse crumbs.
- Stuff the center cavity of each apple evenly with the oat mixture. Pack it in gently.
- Place the stuffed apples into the prepared baking dish.
- Pour 2 tablespoons of water into the bottom of the baking dish around the apples.
- Sprinkle the tops of the stuffed apples with the reserved granulated sugar.
- Bake for 35 to 45 minutes, or until the apples are tender when pierced with a fork and the topping is golden brown.
- Carefully remove the dish from the oven. Let the baked apples cool slightly before serving warm.
Notes
- For a richer flavor, substitute maple syrup for the water in the bottom of the pan.
- If you prefer a softer apple, peel the apples before coring them.
- Serve these warm apple desserts with a scoop of vanilla ice cream or a drizzle of caramel sauce.
Nutrition
- Serving Size: 1 apple
- Calories: 320
- Sugar: 45
- Sodium: 5
- Fat: 14
- Saturated Fat: 8
- Unsaturated Fat: 6
- Trans Fat: 0
- Carbohydrates: 52
- Fiber: 6
- Protein: 3
- Cholesterol: 30