
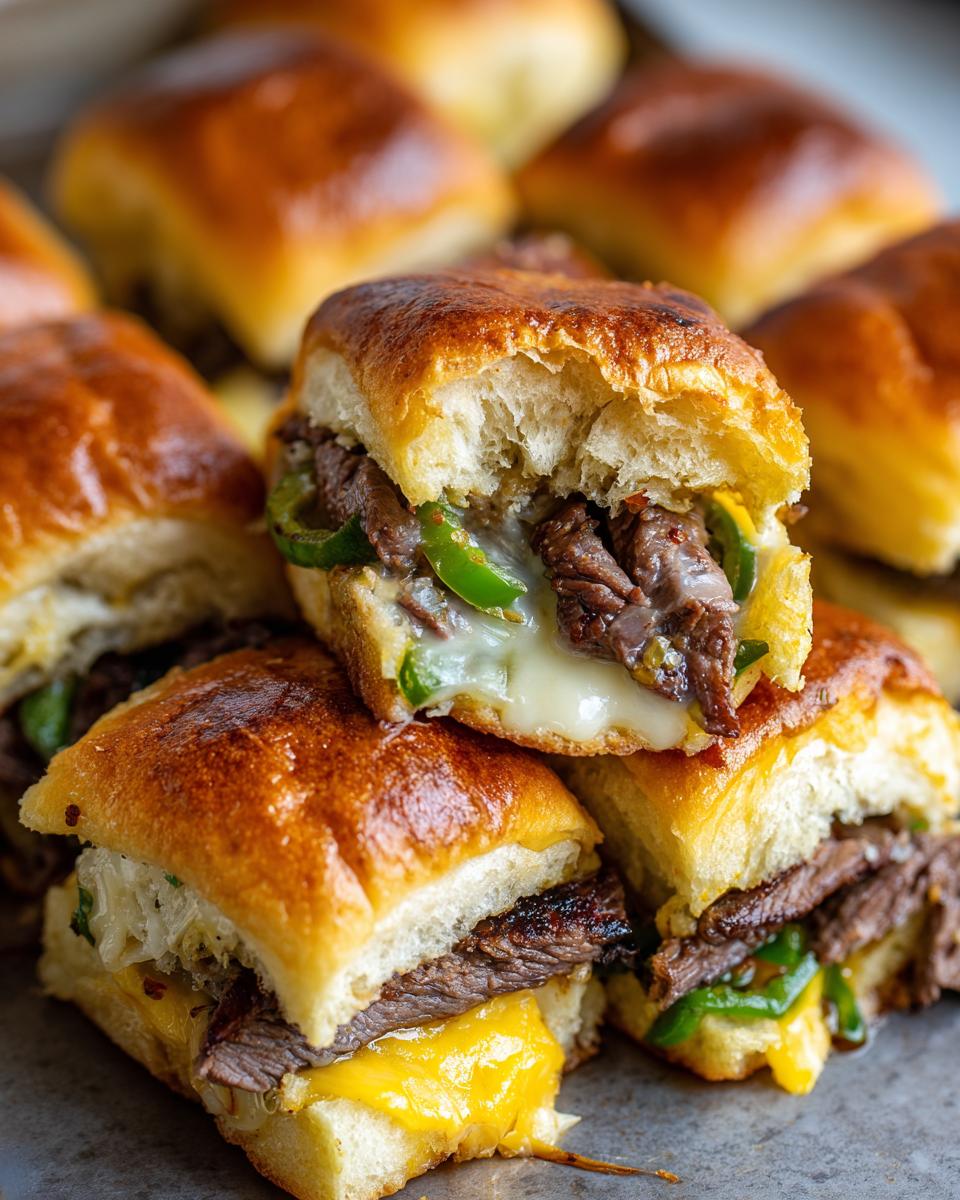
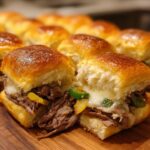
Okay, picture this: it’s game day, or maybe you’ve got a bunch of friends coming over, and you want something ridiculously tasty but, like, *easy* to manage. Forget stressing about individual sandwiches; we’re talking about the ultimate crowd-pleaser: Philly cheesesteak sliders! Seriously, these pull-apart little pockets of joy are a total game-changer. My whole thing here at Kings Cook is taking those recipes that seem a little fancy and making them totally doable, just like when I used to help my friends who thought they couldn’t cook a thing. These sliders are proof that you can whip up something amazing without breaking a sweat or needing a culinary degree. They’re perfect for sharing, and everyone always goes nuts for them!
- Why You'll Love These Philly Cheesesteak Sliders
- Ingredients for Perfect Philly Cheesesteak Sliders
- How to Make Philly Cheesesteak Sliders: Step-by-Step
- Tips to Keep Your Philly Cheesesteak Sliders from Getting Soggy
- Best Cheese for Cheesesteak Sliders: Provolone vs. Wiz
- Make-Ahead and Game Day Tips for Philly Cheesesteak Sliders
- Serving Suggestions and Variations
- Frequently Asked Questions about Philly Cheesesteak Sliders
- Estimated Nutritional Information
- Share Your Slider Creations!
Why You’ll Love These Philly Cheesesteak Sliders
Seriously, these sliders are going to be your new go-to for any get-together. Here’s why:
- So Easy to Whip Up: You can practically assemble these with one hand tied behind your back. Prep is a breeze!
- Total Crowd Pleaser: Everyone loves a good cheesesteak, and these mini versions are just irresistible for parties or game days.
- Flavor Explosion: You get all that classic Philly cheesesteak goodness – tender beef, savory veggies, and ooey-gooey cheese – in every single bite.
- Perfect for Sharing: They’re built for parties! Just pull apart and pass them around. Super convenient and always a hit.
Ingredients for Perfect Philly Cheesesteak Sliders
Alright, let’s chat about what you’ll need to make these amazing little sliders. Trust me, the ingredient list is super straightforward, which is a big part of why I love them so much! You’ll want to grab:
- 12 slider buns (those soft, dinner roll kind work best!)
- About a pound of ribeye steak, sliced super thin. Pro tip: partially freezing it makes slicing way easier!
- 1 medium yellow onion, sliced pretty thin so it cooks down nicely
- 1 green bell pepper, also sliced thin
- 2 tablespoons of unsalted butter (for sautéing the veggies)
- 1 tablespoon of olive oil (works great with the butter!)
- Salt and freshly ground black pepper – to your taste, of course!
- 8 slices of provolone cheese, or if you’re feeling fancy, about a cup of your favorite cheese sauce (like a mild cheddar or a classic Cheez Whiz!)
- 1/4 cup of melted butter for brushing the tops of the buns – this makes them golden and delicious!
How to Make Philly Cheesesteak Sliders: Step-by-Step
Okay, let’s get down to business! Making these Philly cheesesteak sliders is honestly a thrill, and once you do it once, you’ll be making them all the time. It’s all about getting that perfect mix of tender beef and gooey cheese baked right into those soft buns. Here’s the lowdown on how to make them happen:
Preparing the Filling for Your Philly Cheesesteak Sliders
First things first, we gotta get that amazing filling ready. Grab a big skillet, melt your butter and olive oil over medium-high heat. Toss in your thinly sliced onions and green peppers. You want to cook ‘em until they’re nice and soft, about 5 to 7 minutes. Give them a little salt and pepper while they’re cooking. Once they’re good to go, scoop them out onto a plate. Now, into that SAME skillet, throw in your thinly sliced ribeye. Break it up with your spoon as it cooks until it’s nicely browned. Season that beef too! Make sure to drain off any extra grease – this is super important for avoiding soggy sliders later, trust me.
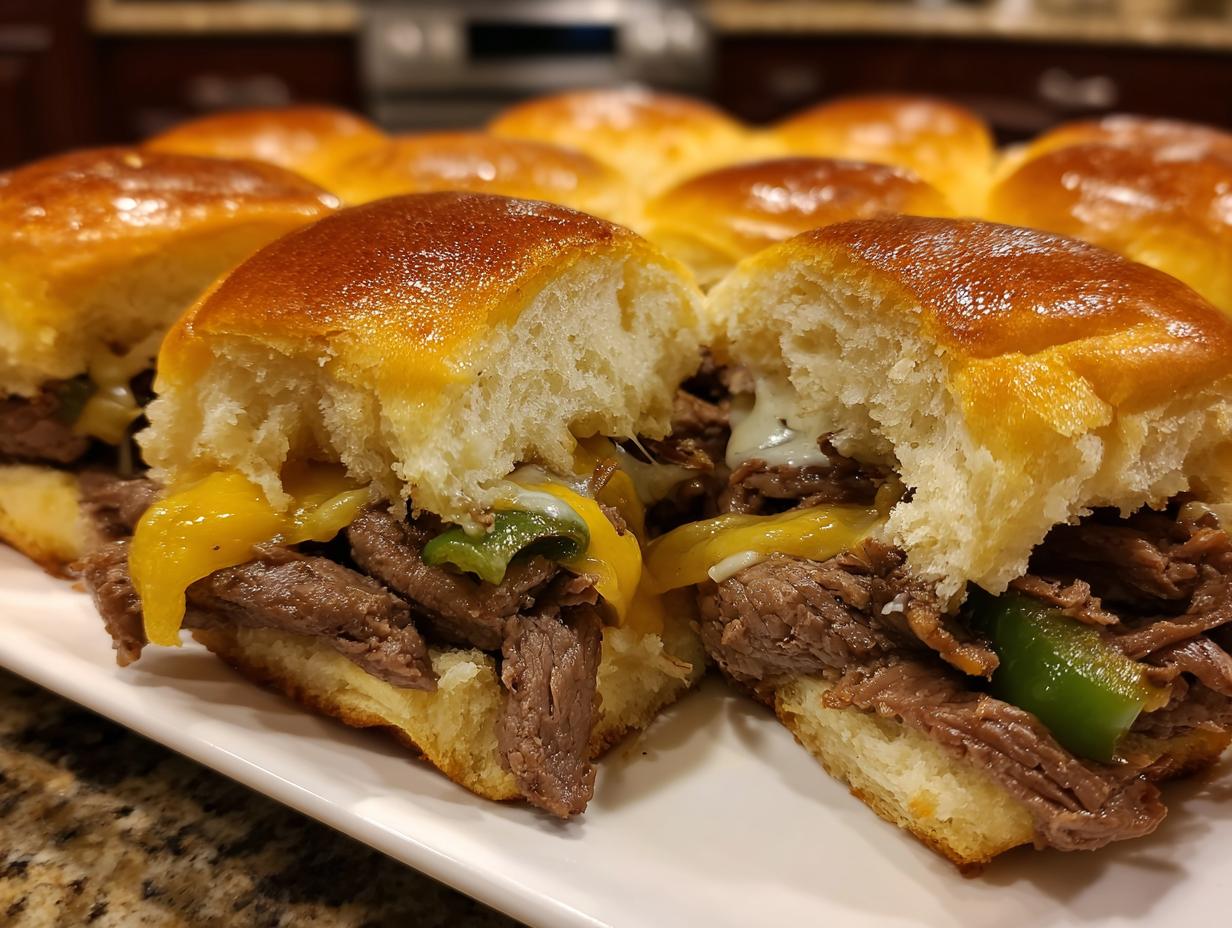
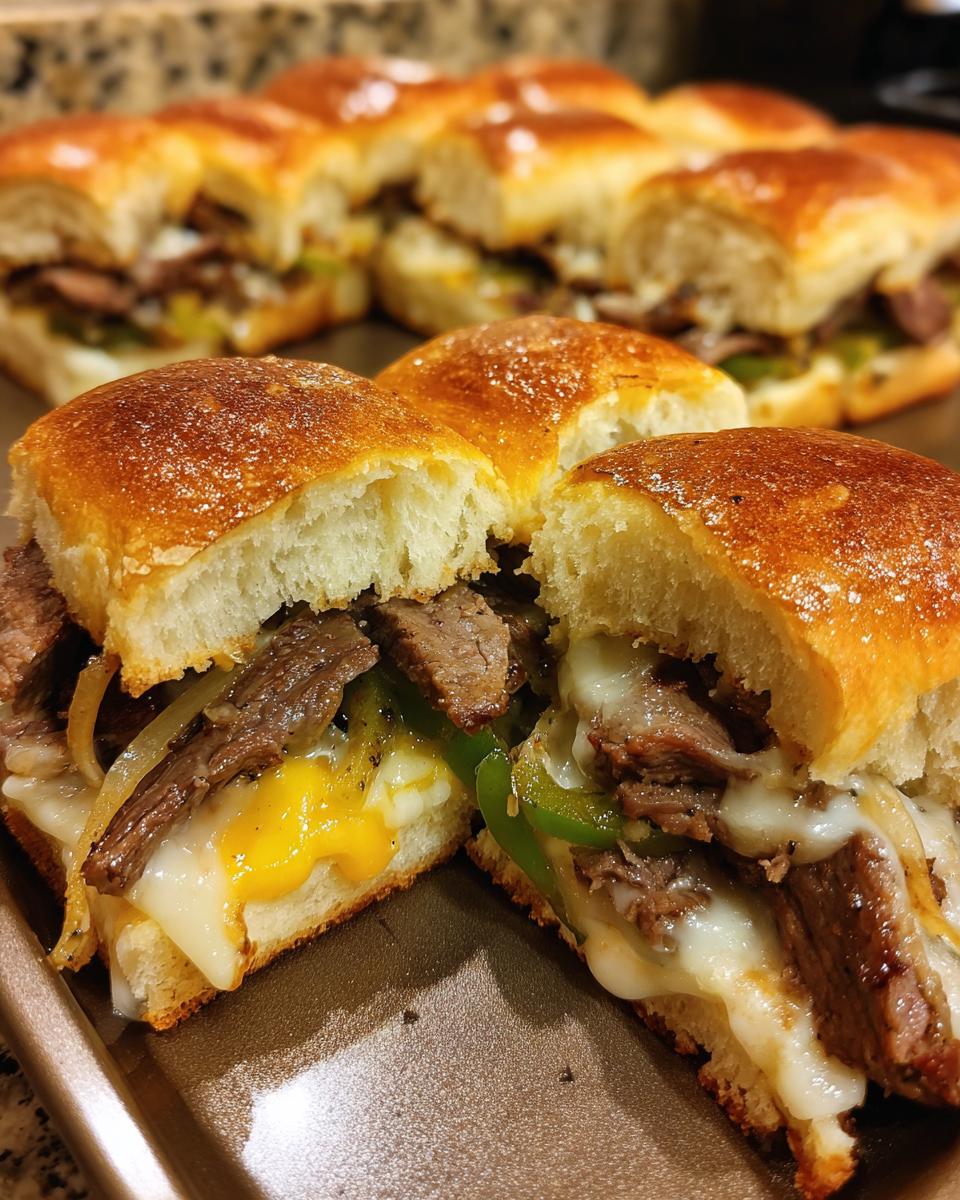
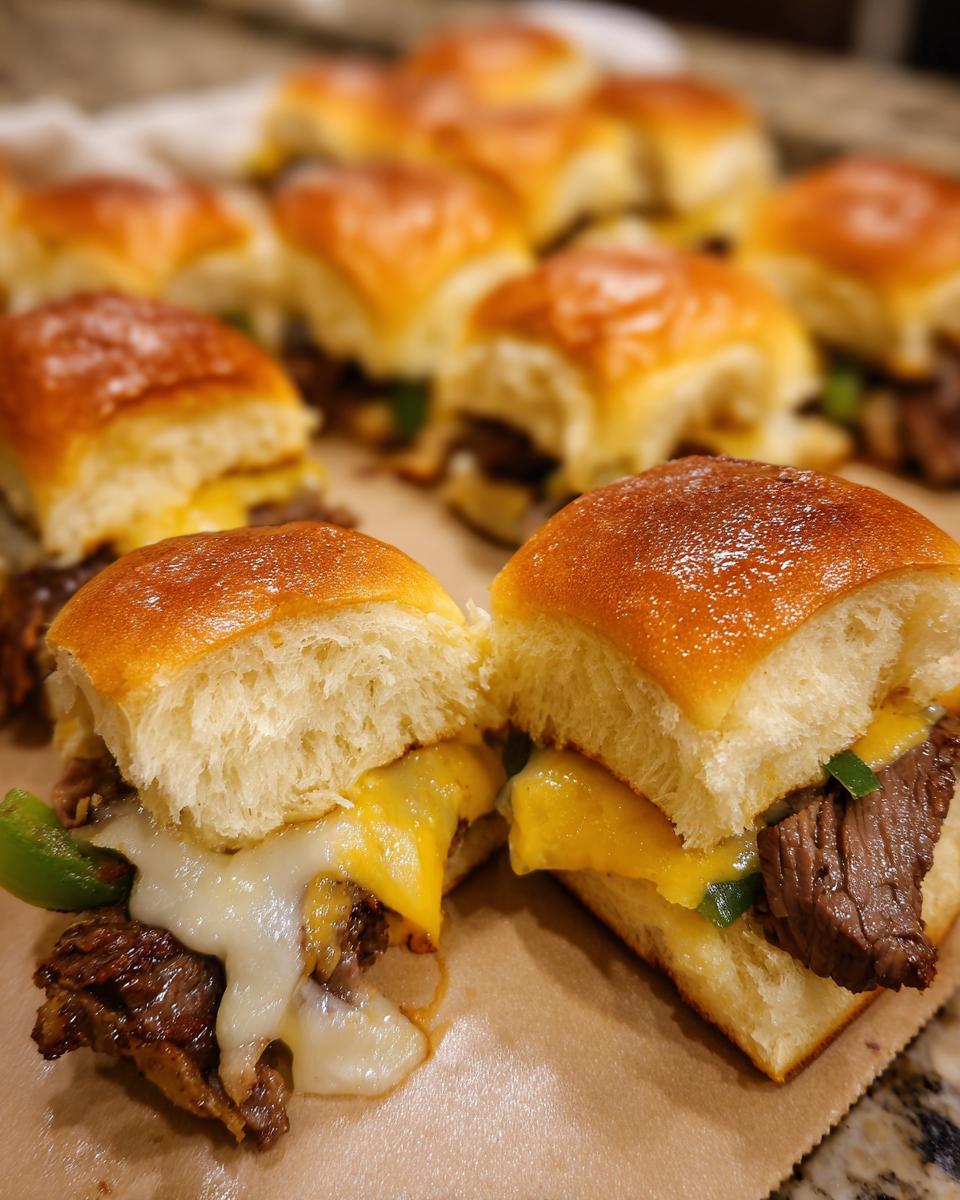
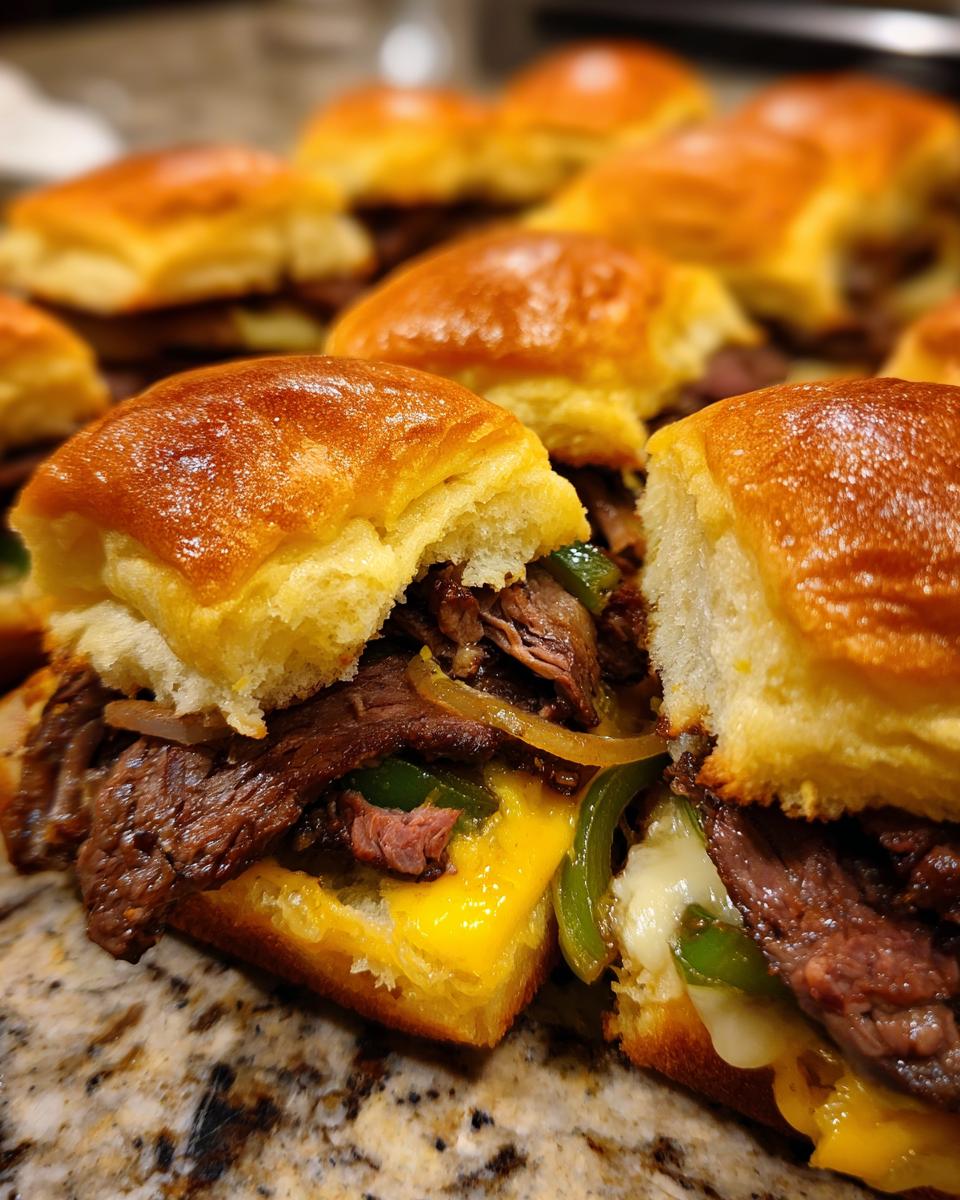
Assembling and Baking the Pull-Apart Cheesesteak Buns
Alright, this is where the magic really happens! Carefully slice your slider buns in half horizontally, but keep them connected as a whole sheet – that’s key for the pull-apart action. Place the bottom halves of these buns onto a baking sheet. Spoon that delicious steak and veggie mixture evenly all over the bottom buns. Now, lay those slices of provolone cheese right on top, or drizzle your cheese sauce if you’re using that. Then, gently place the top halves of the buns over the cheese. Brush the very tops of those buns generously with the melted butter. This gives them that gorgeous golden color and flaky texture. Cover the whole baking sheet tightly with aluminum foil. Pop it into your preheated oven at 350°F (175°C) for about 15 to 20 minutes. You’ll know they’re ready when the cheese is all melty and the buns are heated through. For an extra touch of crisp on the bottom, carefully remove the foil for the last 5 minutes of baking. It makes all the difference!
Tips to Keep Your Philly Cheesesteak Sliders from Getting Soggy
Oh, the dreaded soggy slider bottom! It’s the absolute WORST when you’re trying to make something amazing for a party, right? But don’t you worry, I’ve got your back. The biggest secret for keeping these Philly cheesesteak sliders from getting mushy is all about managing moisture. First, make sure you drain off *all* the extra grease from the steak and veggie mixture after you cook it. Like, really get it out. Also, try not to overstuff those little buns! A good amount is great, but a mountain might just turn into a soggy mess. The foil is your friend during the initial bake – it traps the steam to melt the cheese and heat everything through. But then, for that crucial crispiness on the bottom? Pull that foil off for the last 5 minutes. It lets the air circulate and gives you that perfect, slightly toasted bottom. It’s these little things that make all the difference, believe me!
Best Cheese for Cheesesteak Sliders: Provolone vs. Wiz
Okay, this is a REALLY important question when you’re making Philly cheesesteak sliders, and honestly, it comes down to personal preference! You’ve got your classic provolone slices, which give you that slightly sharp, salty flavor and melt into these beautiful, stretchy strings. It’s what many folks think of when they picture a traditional cheesesteak. Then, there’s the creamy, dreamy cheese sauce – often called ‘Wiz’ – which is just unbelievably comforting and coats everything in a smooth, gooey layer. If you’re going for that super authentic, melty-gooey experience, either one is fantastic! My advice? Try both and see which gooey goodness you love the most!
Make-Ahead and Game Day Tips for Philly Cheesesteak Sliders
Okay, so you know how sometimes you just need to get ahead of the game, especially when you’re hosting? These Philly cheesesteak sliders are PERFECT for that. You can basically assemble the whole thing, filling and all, right in the baking pan. Just cover it super tight with plastic wrap, and then wrap it again with aluminum foil. Pop it in the fridge for up to 24 hours. When it’s party time, just preheat your oven, maybe give it an extra 10-15 minutes of baking time because it’s cold, and then pull off that foil for the last 5 minutes to get that nice crisp. Game day requires zero last-minute fuss!
For serving, imagine a big platter, maybe with some extra napkins and a little bowl of ketchup or mustard. You could even call it a ‘Philly Cheesesteak Slider Board’! It looks so impressive, and guests can just grab and go. If they need to stay warm for a bit longer, just keep them covered on a warming tray or, if your oven has a ‘warm’ setting, that works too. Honestly, they are so good, they probably won’t last long enough to need warming!
Serving Suggestions and Variations
These Philly cheesesteak sliders are so darn good, they honestly shine all on their own. But, if you want to make it a whole spread, I love serving them with some classic, easy sides. A big bowl of crispy potato chips is always a huge hit, or maybe a simple green salad with a bright vinaigrette to cut through all that richness.
Feeling a little adventurous with your sliders? I totally get it! You can switch things up so easily. Toss in some sliced mushrooms with the onions and peppers – they add this fantastic earthy flavor. Or, try different types of peppers, like a jalapeño for a little kick, or even some roasted red peppers for a sweeter note. And of course, cheese! While provolone and cheese sauce are amazing, don’t be afraid to try a sharp cheddar or even a sprinkle of Monterey Jack. Anything gooey and melty works!
Frequently Asked Questions about Philly Cheesesteak Sliders
Got questions about whipping up these amazing Philly cheesesteak sliders? I’ve got answers! It’s totally normal to wonder about a few things when you’re making a new party favorite.
Can I use a different kind of bread for these sliders?
You sure can! While those soft slider buns are my go-to because they pull apart so nicely, you can totally use other soft rolls if that’s what you have. Just make sure they’re not too crusty, or they might fall apart when you try to pull them. The key is a soft roll that can soak up all that delicious steak and cheese goodness!
What oven temperature and time should I use for these party sliders?
For these party sliders, you’ll want to preheat your oven to 350°F (175°C). Bake them covered with foil for about 15-20 minutes. That’s usually enough time for everything to get nice and hot and for the cheese to get perfectly melty. If you want those bottoms a little crispier, just pop the foil off for the last 5 minutes – it’s a little trick that makes a big difference!
How do I adjust the recipe if I’m making a double batch for a crowd?
No problem at all! If you’re making a bigger batch for a real crowd, you’ll probably need to use two baking sheets. Just divide your ingredients evenly between them. Keep an eye on them, as ovens can be a bit different, but the general timing should stay pretty much the same. They’ll probably disappear even faster when you make extra!
What’s the best way to prep these sliders ahead of time?
This is my favorite party trick! You can totally assemble the sliders (steak, onions, peppers, cheese) in your baking pan, cover it super tightly with plastic wrap and then foil, and pop it in the fridge for up to 24 hours. When you’re ready to serve, just bake them covered for about 25-30 minutes, then remove the foil for the last 5 minutes to crisp them up. Super easy make-ahead cheesesteak sliders!
Estimated Nutritional Information
Just a heads-up, these numbers are estimates since everyone’s pantry is a little different! This is based on the ingredients listed, and you know, a bit of kitchen wizardry. We’re looking at roughly:
- Calories: Around 350 per slider
- Fat: About 18g
- Protein: Roughly 18g
- Carbohydrates: Around 30g
Remember, these can totally change depending on the buns you pick or if you go with cheese sauce instead of provolone. So, basically, deliciousness with a reasonable estimate!
Share Your Slider Creations!
Alright, now that you’ve hopefully got some amazing Philly cheesesteak sliders fresh out of the oven, I’d LOVE to hear all about it! Did you change anything up? How did your crowd like them? Drop a comment below and let me know, or even better, rate the recipe! If you took any pictures – and I bet they’re gorgeous – tag me on social media! You can usually find me by [mention your social handle here, or link to your contact page if that makes more sense, like this: reaching out]. Seeing your creations totally makes my day!
PrintPhilly Cheesesteak Sliders
Easy pull-apart Philly cheesesteak sliders perfect for parties and game days. These sliders feature tender beef, sautéed onions and peppers, and melted cheese baked in soft rolls.
- Prep Time: 20 min
- Cook Time: 25 min
- Total Time: 45 min
- Yield: 12 sliders 1x
- Category: Appetizer
- Method: Baking
- Cuisine: American
- Diet: Vegetarian
Ingredients
- 12 slider buns
- 1 lb thinly sliced ribeye steak
- 1 medium yellow onion, thinly sliced
- 1 green bell pepper, thinly sliced
- 2 tbsp butter
- 1 tbsp olive oil
- Salt and black pepper to taste
- 8 slices provolone cheese or 1 cup cheese sauce
- 1/4 cup melted butter for brushing
Instructions
- Preheat your oven to 350°F (175°C).
- Slice the slider buns horizontally but keep them connected.
- In a large skillet, melt 2 tbsp butter with olive oil over medium-high heat.
- Add the sliced onions and bell peppers. Cook until softened, about 5-7 minutes. Season with salt and pepper. Remove from skillet and set aside.
- Add the thinly sliced ribeye steak to the same skillet. Cook until browned, breaking it apart with a spoon. Season with salt and pepper.
- Drain any excess grease from the steak.
- Return the onions and peppers to the skillet with the steak. Stir to combine.
- Place the bottom halves of the slider buns on a baking sheet.
- Spoon the steak and vegetable mixture evenly over the bottom buns.
- Top the mixture with provolone cheese slices or drizzle with cheese sauce.
- Place the top halves of the slider buns over the cheese.
- Brush the tops of the buns generously with melted butter.
- Cover the baking sheet tightly with aluminum foil.
- Bake for 15-20 minutes, or until the cheese is melted and the buns are heated through.
- For crispier bottoms, remove the foil for the last 5 minutes of baking.
- Slice between the buns to serve individual sliders.
Notes
- To make ahead, assemble the sliders and cover tightly with plastic wrap, then foil. Refrigerate for up to 24 hours. Bake covered for 25-30 minutes, then uncover for the last 5 minutes.
- If using cheese sauce, warm it slightly before drizzling over the filling for easier spreading.
- For a game day slider board, arrange the baked sliders on a platter with dipping sauces like ketchup or mustard.
- Consider a meal planning service for easy weeknight dinners.
Nutrition
- Serving Size: 1 slider
- Calories: 350
- Sugar: 5g
- Sodium: 600mg
- Fat: 18g
- Saturated Fat: 7g
- Unsaturated Fat: 11g
- Trans Fat: 0g
- Carbohydrates: 30g
- Fiber: 2g
- Protein: 18g
- Cholesterol: 60mg