
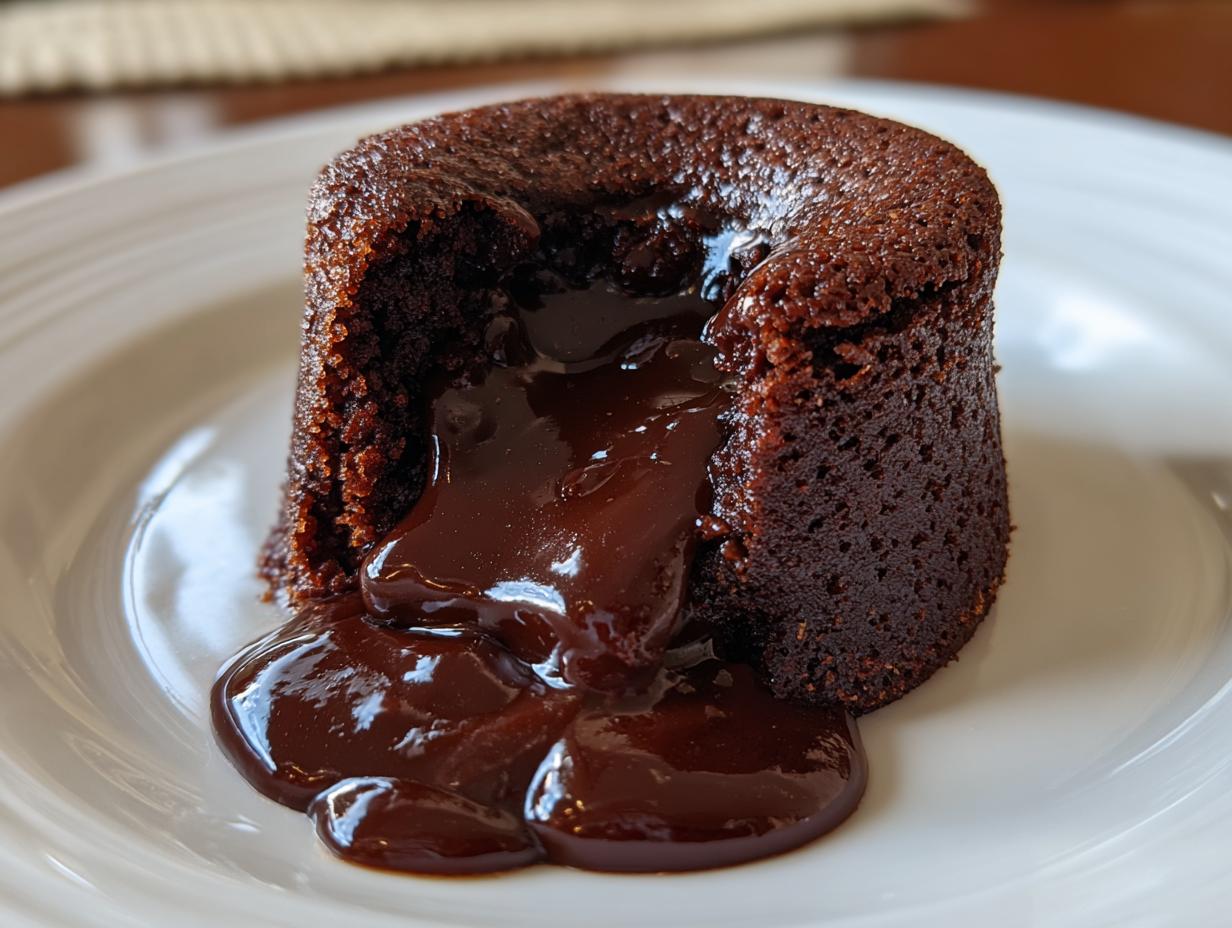
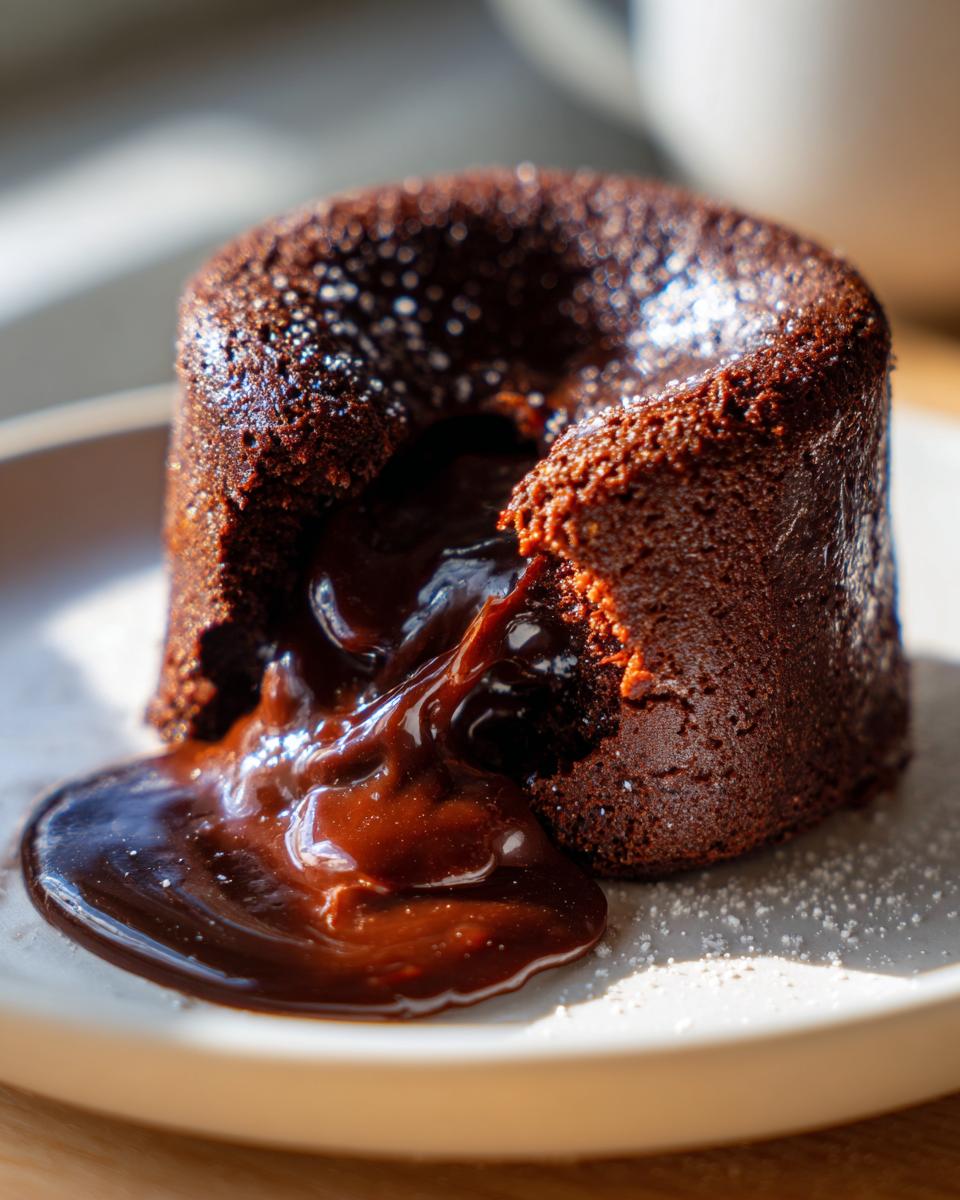
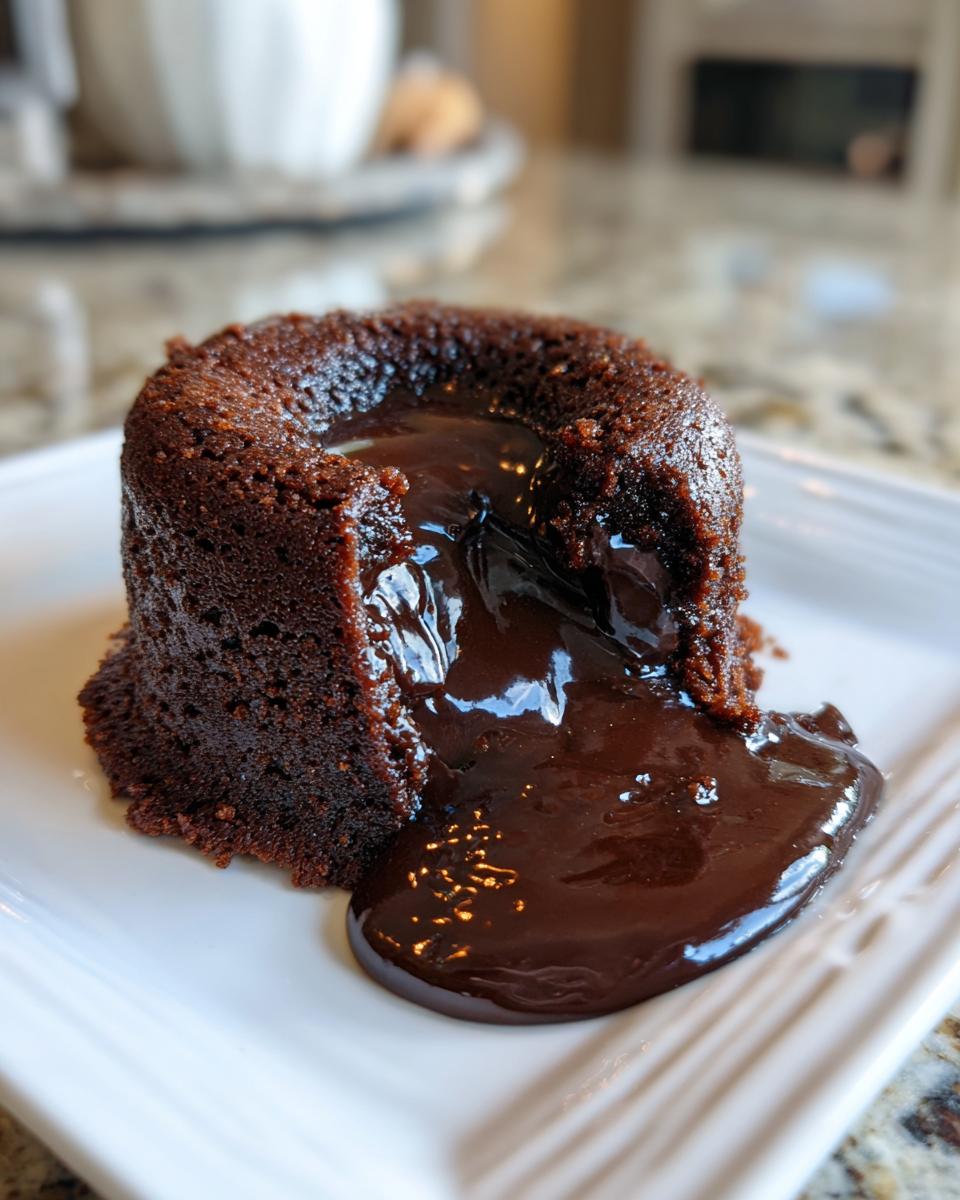
Oh my goodness, are you ready to create something truly magical? Listen, when you need a show-stopping, intensely chocolatey dessert that tastes like it came straight from a fancy bistro but takes mere minutes to assemble, you need a lava cake. Forget those intimidating desserts that require you to be a pastry chef! I’ve tested this recipe—and I mean *tested* it—dozens of times, whether I’m serving it for a cozy night in or a bigger celebration. Trust me when I say this is the foolproof method that guarantees that signature, glorious, molten chocolate center every single time. It’s pure chocolate indulgence, and I can’t wait for you to try it!
- Why This is the Best Easy Lava Cake Recipe You Will Ever Make
- Ingredients for Your Foolproof Chocolate Lava Cake
- Essential Equipment for Baking Lava Cakes
- Step-by-Step Instructions: How to Make Lava Cake
- Tips for Success When Making Your Chocolate Lava Cake
- Variations on the Classic Lava Cake: Nutella and Dark Chocolate Options
- Serving Suggestions for Your Impressive Dessert Recipe
- Make-Ahead and Storage for Your Individual Chocolate Cakes
- Frequently Asked Questions About Making Lava Cake
Why This is the Best Easy Lava Cake Recipe You Will Ever Make
I get it—you want amazing results without spending half your evening in the kitchen. That’s exactly what this recipe delivers! It’s my go-to quick chocolate dessert because it’s so streamlined yet comes out looking incredibly elegant. Once you master the timing, you’ll never look back.
- It sets fast! We’re talking near-instant gratification when that chocolate flows.
- It’s truly foolproof; I built in redundancies so you don’t stress.
- You get that incredible textural contrast of crisp edges and a rich, gooey center cake.
If you’re looking to wow someone, whether it’s a partner or just yourself after a long week, this is the one. You can read a bit more about making sure every recipe I share is reliable over at my About Page!
Achieving the Perfect Molten Chocolate Lava Cake Center
The magic of the molten chocolate cake always comes down to heat control and timing. We bake these hot and fast, which sets the outside portion of the batter quickly while leaving the center liquid. Preparation of the ramekin is crucial here—don’t skip that cocoa dusting! It creates a slight barrier and helps the cake release cleanly so your gorgeous molten center doesn’t stick to the sides when you flip it out. It’s all about precision with the oven, not fussy mixing!
Ingredients for Your Foolproof Chocolate Lava Cake
Okay, let’s talk about what you need! The beauty of this recipe is that the ingredient list is super short, which is why using high-quality items really matters here. We aren’t hiding anything with tons of flour or filler. When you only have a few things working together, they all need to shine.
You’ll need:
- 4 ounces bittersweet chocolate, chopped
- 4 ounces unsalted butter
- 2 large eggs
- 2 large egg yolks
- 1/4 cup granulated sugar
- 2 tablespoons all-purpose flour
- Pinch of salt
- Butter and cocoa powder for preparing ramekins (this is non-negotiable prep!)
Ingredient Notes and Substitutions for Your Lava Cake
Since there are so few ingredients, please don’t skimp on the chocolate! I recommend using a good quality bittersweet chocolate—around 60% to 70% cacao works best to give you that deep, rich flavor that defines a true lava cake. If you only have unsweetened chocolate, you can use that, but be sure to bump up your sugar slightly. And listen, use real unsalted butter! Margarine or spreads just won’t give you the right richness and texture we need for that perfect melt inside.
Essential Equipment for Baking Lava Cakes
You don’t need a whole arsenal of fancy gadgets for this dessert, thankfully! The most important items are the vessels you bake them in. You absolutely need four 6-ounce ramekins. These little ceramic cups are perfect for creating those tall, crisp edges.
Besides that, grab a couple of sturdy mixing bowls—one for melting the chocolate and butter, and one for whisking your eggs. And, of course, a small saucepan if you plan to melt your chocolate over a gentle simmer. That’s it! Keep your tools simple.
Step-by-Step Instructions: How to Make Lava Cake
Alright, time to put things in motion! This process moves quickly once you get going, so have everything measured out before you start melting that good chocolate. Remember, we are baking these at a fairly high temperature—425°F (220°C)—so make sure that oven is hot and ready for action before you even start mixing.
Follow these steps closely, and you are guaranteed a wonderful result:
- First thing, preheat your oven to 425°F (220°C). Butter those four little ramekins *generously*.
- Next, dust the inside of each buttered ramekin with cocoa powder. Tap out any excess. Pop them onto a baking sheet—this makes moving them way easier.
- Combine your chopped chocolate and butter in a bowl over simmering water until it’s completely smooth. Take it off the heat so it can cool just a hair.
- In a separate bowl, whisk your whole eggs, the two extra yolks, and the sugar until they get light and a bit fluffy—that takes about two minutes of honest whisking.
- Gently pour that slightly cooled chocolate mixture into the egg base. Whisk just until they come together.
- Now, sift in your flour and that pinch of salt. You want to fold this in gently with a spatula. Honestly, just mix until you don’t see white streaks anymore. Don’t overdo it!
- Divide that beautiful lava cake batter evenly among your prepared ramekins.
- Bake right between 12 and 14 minutes. The edges should look firm, but the center better still jiggle a bit, okay?
- Let them sit for exactly one minute, then run a knife around the edge and flip them out onto your plates. Serve right away! If you need more decadent chocolate ideas, check out my fudge brownie recipe, too!

Prepping Ramekins for a Clean Lava Cake Release
This step is absolute gospel when we are baking individual chocolate cakes. You need to use soft butter everywhere—don’t miss a single corner! Then, we use cocoa powder instead of flour for dusting. Why cocoa? Because it keeps the outside of your cake deep brown, just how we like it, instead of leaving white flour splotches. Plus, that buttery, cocoa-dusted base creates the perfect slightly crisp shell to contrast that liquid middle.
Baking Timing: The Secret to a Gooey Lava Cake Center
I cannot stress this enough: time is the enemy of a good, runny lava cake! Set your timer for 12 minutes, and be ready. You are looking for the outer edges to look baked—they’ll look set and maybe slightly pulled away from the ramekin edge. If you wait until the center looks baked, you’ve waited too long and you’ll end up with a lovely little chocolate cupcake instead of that desired flow. Trust the wobble! You want it jiggly in the middle.
Tips for Success When Making Your Chocolate Lava Cake
Even with a foolproof recipe, a few little tricks can save you if things go slightly sideways! The biggest thing I want you to remember is to never, ever be tempted to overbake your cakes. If you’re nervous about timing, pull one out at 12 minutes and sacrifice it to science—I mean, tasting! If it’s too liquid, bake the rest for one minute longer. If you find your cake sinks dramatically after pulling it out, that usually means it needed just one more minute in the oven.
Also, this lava cake is incredibly forgiving when it comes to prep! I often make the batter a day ahead and keep it covered in the fridge. It makes serving dessert after a nice dinner so much less stressful. Just remember to add two or three extra minutes to the bake time since you’re starting from cold. If you want to see how other folks have had great success with their molten desserts, you can check out this recipe inspiration here: My Foolproof Chocolate Lava Cake. Making delicious desserts, even something fancy like amazing chocolate chip cookies can be easy when you follow these tips!
Variations on the Classic Lava Cake: Nutella and Dark Chocolate Options
Now, I love our classic bittersweet version, but sometimes you just need a little detour, right? The structure of this recipe is so sturdy that it handles add-ins beautifully. If you’re craving that hazelnut magic, turning this into a Nutella lava cake is shockingly easy. Just replace half of the bittersweet chocolate (about 2 ounces) with an equal amount of your favorite creamy Nutella. Fold it in gently with the butter mixture!
If you’re more of a baker who likes deep, intense chocolate flavor—maybe for an intense chocolate indulgence—then swap out the 4 ounces of bittersweet chocolate for 4 ounces of 75% or 80% dark chocolate. You want that bitterness to really sing! It makes the cake slightly less sweet but oh-so-dramatic.

These slight tweaks keep the baking time the same, thankfully! It’s a wonderful way to keep things exciting. If you want to see a gorgeous example of the Nutella version, check out this inspiration: Nutella lava cake. And if you want another fantastic chocolate treat, my fudge brownies are legendary!
Serving Suggestions for Your Impressive Dessert Recipe
Once you’ve successfully flipped out that perfectly baked beauty, half the battle is won! Now, we dress it up for the occasion. This is definitely my favorite chocolate dessert for date night because it looks so elegant but took virtually no effort to make. I usually dust mine lightly with powdered sugar using a fine-mesh sieve—it catches the light beautifully.
But honestly, you can’t go wrong with a scoop of vanilla bean ice cream melting right down the side. Fresh raspberries or strawberries cut through the richness so nicely, too. For real decadence, use whipped cream and garnish with a little shaved dark chocolate. It’s a showstopper!
If you’re looking for another easy, impressive treat, don’t pass up my classic chocolate chip cookie recipe!
Make-Ahead and Storage for Your Individual Chocolate Cakes
One of the best things about making individual chocolate cakes like this one is how flexible they are for make-ahead prep. Life gets busy, right? You can actually mix up the batter, divide it perfectly into those prepared ramekins, cover them tightly with plastic wrap, and stash them in the fridge for up to 24 hours. Super handy!
When you are ready to bake those chilled ones, just remember to let them sit on the counter for about 15 minutes while the oven heats up, and then add 2-3 minutes to their baking time. If you’ve baked them already, they store well in the fridge for a couple of days. Just reheat them gently in a 350°F oven for about 5 minutes to get that center nice and oozy again. See how easy it is to have a ready-made dessert? Check out how others managed their chocolate bakes over here: Chocolate Lava Cake Made Easy at Home.
Frequently Asked Questions About Making Lava Cake
I always get questions when I share this recipe because people are simultaneously thrilled about how easy it is but terrified of messing up that molten center! Don’t worry, we’ve covered all the bases. Having reliable information means you can walk into the kitchen with confidence knowing you’ll succeed.
Here are the things I hear most often when folks are trying this gorgeous dessert for the first time. I want you to feel completely ready!
Can I bake this as one large lava cake instead of individual portions?
Yes, you absolutely can! If you don’t have ramekins or you’re making dessert for a bigger crowd, you can pour the batter into one 8-inch round cake pan. Just remember that because the pan is deeper, the middle takes longer to heat up, so you’ll need to increase your baking time to about 20 to 25 minutes. Keep checking it!
How do I know for sure when my cake is done?
This is the number one concern for every person making this lava cake! You are looking for those edges to look completely set—they should look firm to the touch, like a normal cake. However, the center should look slightly soft, maybe even a tiny bit shiny or jiggly when you gently nudge the pan. If you insert a toothpick, it should primarily come out clean, but honestly, just watching the edges is the best clue. If you’re at all unsure, pull them out early; they firm up as they cool slightly!
I don’t have ramekins; what else can I use?
If you are out of ramekins, don’t panic! You can use regular oven-safe mugs that hold about 6 to 8 ounces of liquid. The shape is slightly different, so the edges might not be as perfectly defined, but the inside will still be gooey. Just make sure those mugs are oven-safe first, okay?
Can I make the batter ahead of time and bake it later?
Yes, and this is my favorite trick for stress-free entertaining! You can mix the batter, pour it into your prepared ramekins, cover them tightly with plastic wrap, and stick them in the fridge for up to 24 hours. You just need to add about 2 or 3 extra minutes to your baking time since they are starting cold. It’s a lifesaver! If you’re interested in more reliable make-ahead recipes, take a look at my tips on my About Page.
PrintFoolproof Classic Chocolate Lava Cake Recipe
Make this easy chocolate lava cake for a decadent dessert with a signature molten center. This recipe is reliable and perfect for date nights or special occasions.
- Prep Time: 10 min
- Cook Time: 14 min
- Total Time: 24 min
- Yield: 4 servings 1x
- Category: Dessert
- Method: Baking
- Cuisine: American
- Diet: Vegetarian
Ingredients
- 4 ounces bittersweet chocolate, chopped
- 4 ounces unsalted butter
- 2 large eggs
- 2 large egg yolks
- 1/4 cup granulated sugar
- 2 tablespoons all-purpose flour
- Pinch of salt
- Butter and cocoa powder for preparing ramekins
Instructions
- Preheat your oven to 425°F (220°C). Generously butter four 6-ounce ramekins. Dust the inside of each buttered ramekin with cocoa powder, tapping out any excess. Place the prepared ramekins on a baking sheet.
- Combine the chopped chocolate and butter in a heatproof bowl set over a saucepan of simmering water (or use a microwave in 30-second intervals). Stir until the mixture is completely smooth. Remove from heat and let it cool slightly.
- In a separate medium bowl, whisk together the whole eggs, egg yolks, and granulated sugar until the mixture is pale and slightly thickened, about 2 minutes.
- Gently whisk the slightly cooled chocolate mixture into the egg mixture until just combined.
- Sift the flour and salt over the chocolate mixture. Fold the dry ingredients into the wet ingredients using a spatula until no streaks of flour remain. Do not overmix.
- Divide the batter evenly among the four prepared ramekins.
- Bake for 12 to 14 minutes. The edges should look set, but the center should still look soft and jiggly. This timing guarantees the gooey center you want.
- Let the cakes cool in the ramekins for exactly 1 minute. Carefully run a thin knife around the edge of each cake. Invert each lava cake onto a serving plate.
- Serve immediately while warm with powdered sugar, ice cream, or fresh berries.
Notes
- For the best molten center, do not overbake. Check the cakes at 12 minutes.
- If you do not have ramekins, you can bake this as one 8-inch cake, increasing the baking time to about 20-25 minutes.
- You can prepare the batter up to 24 hours ahead of time. Keep the filled, unbaked ramekins covered in the refrigerator and add 2-3 minutes to the baking time.
Nutrition
- Serving Size: 1 cake
- Calories: 410
- Sugar: 25g
- Sodium: 150mg
- Fat: 28g
- Saturated Fat: 17g
- Unsaturated Fat: 11g
- Trans Fat: 0.5g
- Carbohydrates: 30g
- Fiber: 2g
- Protein: 7g
- Cholesterol: 155mg