
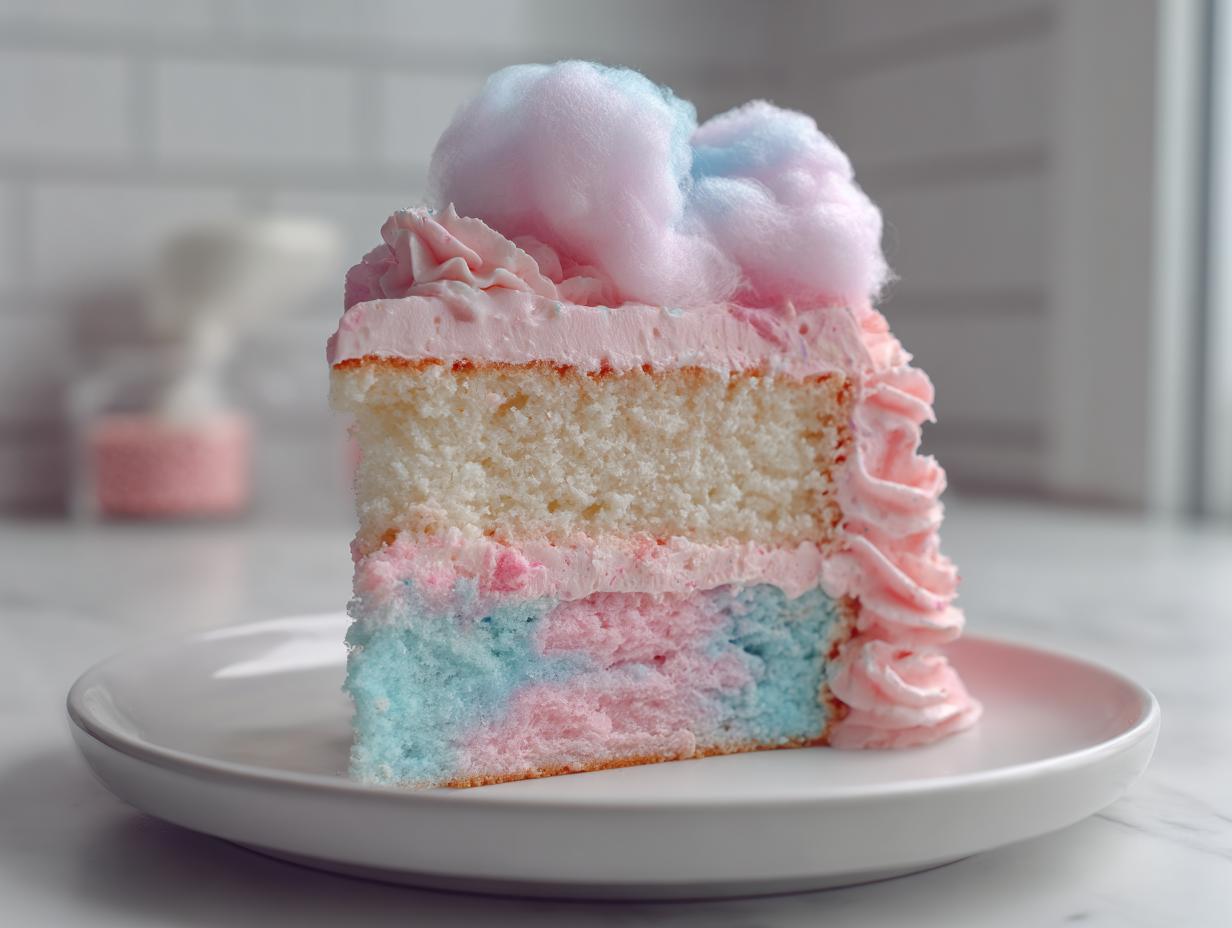
Doesn’t it just take you right back to bright lights and summer nights when you think about spun sugar? I bet you’re looking for a dessert that captures that pure, over-the-top, whimsical fun, and trust me, you’ve found it! I’m Kate Connolly, and I put serious work into making sure every recipe here is reliable—which is why I’ve tested this **cotton candy cake** until it’s absolutely perfect, fluffy, and structurally sound for your biggest celebration. Forget those sad, flat cakes; this easy recipe delivers maximum magic with minimal mess. It’s the showstopper you’ve been searching for, guaranteed to bring smiles to every face at your party.
- Why This Fluffy Cotton Candy Cake Recipe is a Showstopper
- Ingredients You Need for Your Cotton Candy Cake
- Step-by-Step Instructions for a Magical Cotton Candy Cake Recipe
- Expert Tips for the Best Cotton Candy Cake Presentation
- Ingredient Notes and Substitutions for Your Cotton Candy Cake
- Storage and Keeping Your Cotton Candy Cake Fresh
- Frequently Asked Questions About Making a Cotton Candy Cake
- Estimated Nutritional Data for This Sweet Carnival Treat
- Share Your Magical Creations
- Estimated Nutritional Data for This Sweet Carnival Treat
- Share Your Magical Creations
Why This Fluffy Cotton Candy Cake Recipe is a Showstopper
This isn’t just another sweet cake; it’s genuinely one of my favorite Easy Whimsical Desserts because it really delivers on fun without stressing you out. When you’re hunting for Fluffy Cake Ideas, this one hits all the major points—it’s light, bursting with nostalgic flavor, and looks like it belongs at the center of a carnival tent!
- It bakes up incredibly light thanks to careful creaming of the butter and sugar.
- The pastel pink and blue layers are way simpler to achieve than they look!
- It uses extract for flavor, meaning it stays moist longer.
Achieving That Signature Cotton Candy Flavor and Look
We rely on just two main things to nail that authentic carnival feel. First, a good quality cotton candy flavoring extract—don’t skip this! It gives you that intense sweetness throughout the layers and the frosting. Second, we use gel food coloring. Liquids can thin out the batter too much, but gel drops let you add just enough of that pretty pink and blue pigment to swirl together perfectly without changing the texture.
Ingredients You Need for Your Cotton Candy Cake
To make sure this cake comes out perfectly sweet and structurally sound, ingredient quality matters, especially for the frosting and the flavor! I’ve broken down exactly what you’ll need below into three easy groups. Remember, having everything ready to go makes the mixing process so much smoother, which is key when you’re working with those delicate pastel colors.
For the Fluffy Cake Layers
- 1 1/2 cups all-purpose flour
- 1 1/2 teaspoons baking powder
- 1/2 teaspoon salt
- 1 cup granulated sugar
- 1/2 cup unsalted butter, softened
- 2 large eggs
- 1 teaspoon vanilla extract
- 1/2 cup whole milk
- 1 teaspoon cotton candy flavoring extract
- Pink and blue gel food coloring
For the Homemade Cotton Candy Frosting
The frosting really makes this dessert pop, so make sure your butter is perfectly softened—not melted! That’s vital for a smooth buttercream base.
- 1 cup unsalted butter, softened
- 4 cups powdered sugar, sifted
- 1 teaspoon vanilla extract
- 1/2 teaspoon cotton candy flavoring extract
- 2-4 tablespoons heavy cream
- Pink and blue gel food coloring
Decoration Elements for the Cotton Candy Cake
This is where the final touch of whimsy comes in! Pro tip: Don’t touch these until the cake is fully assembled and chilled.
- 1 cup real cotton candy floss (pink and blue)
- Sprinkles (optional)
Step-by-Step Instructions for a Magical Cotton Candy Cake Recipe
Alright, this is the fun part where we turn simple pantry staples into pure magic! Having robust, tested instructions is how we ensure this cake comes out looking like a dream, not a disaster. I’ve laid out every single step below so you can bake with total confidence. If you’ve ever made a basic birthday cake, you can handle this, but paying close attention to the mixing order is what keeps it beautifully fluffy.
Mixing the Fluffy Cake Batter
First things first, get your oven preheated to 350°F (175°C) and prep those pans right now! In a small bowl, just whisk together your flour, baking powder, and salt. Don’t put them near the wet stuff yet. Now, using your mixer, cream that softened butter and sugar until it gets genuinely light and fluffy—this takes a few minutes, so take your time! Add your eggs in one by one, followed by the vanilla and that key cotton candy flavoring extract. Then, here’s the balancing act: add the dry ingredients alternating with the milk, starting and ending with the flour mixture. Stop mixing the second it all comes together. Seriously, overmixing is the enemy of fluff!
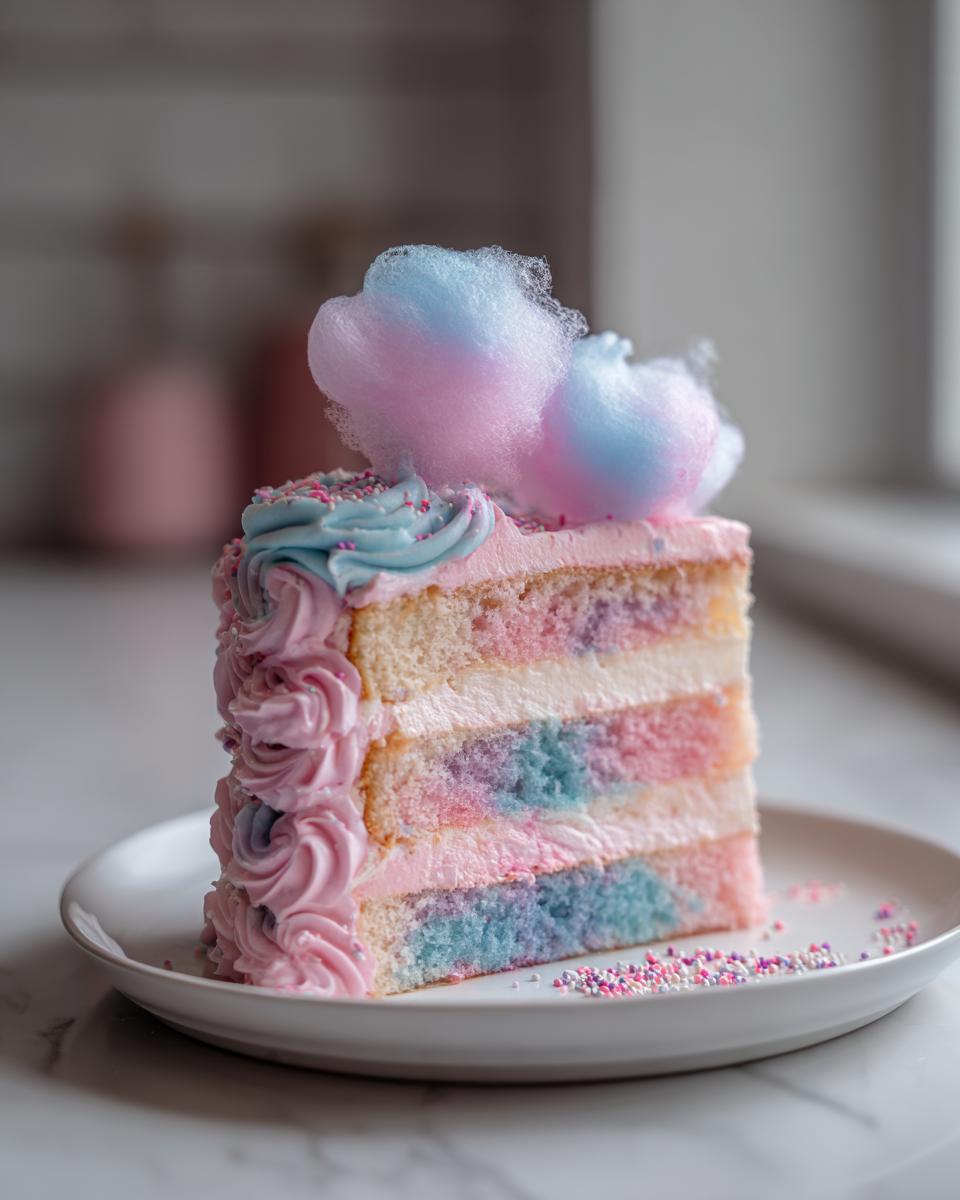
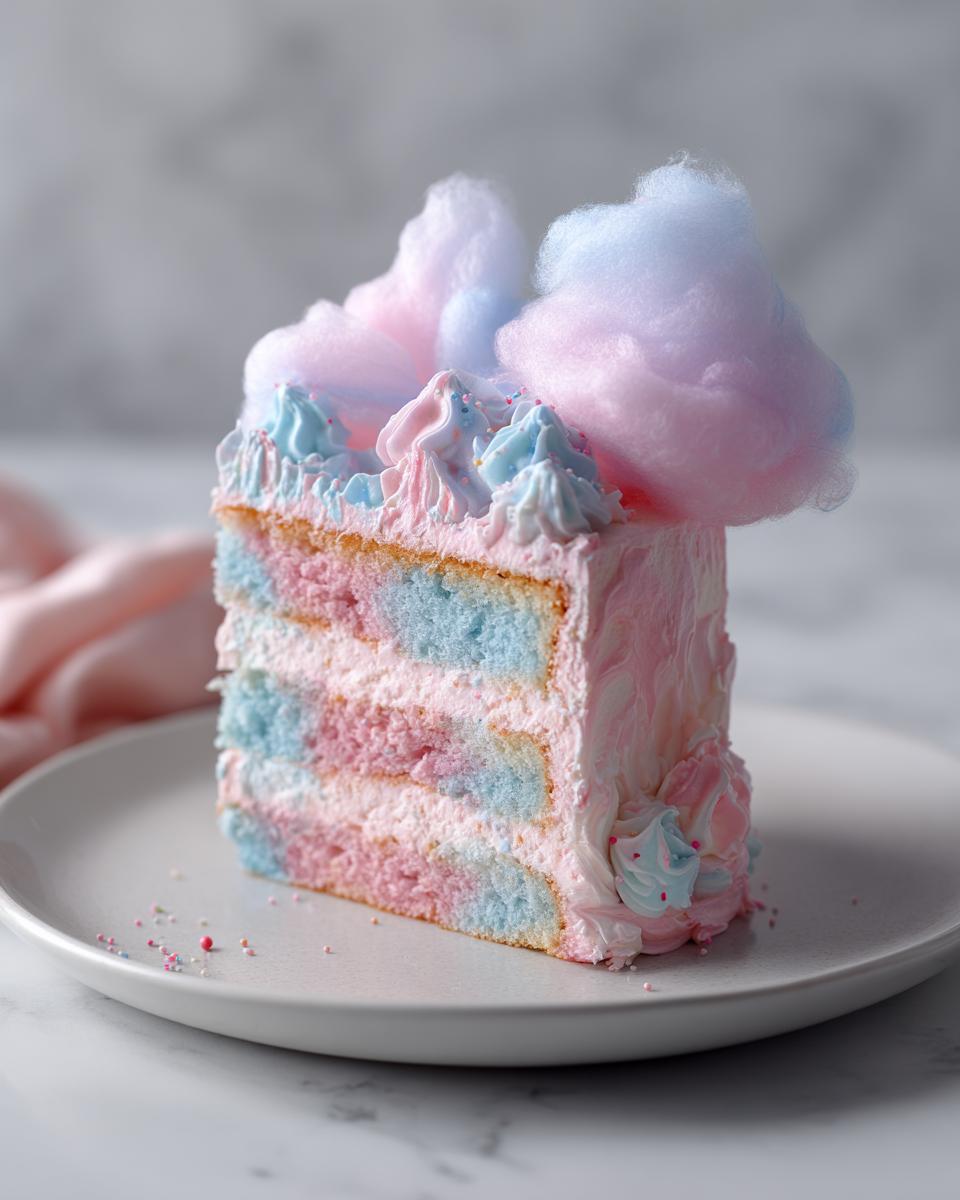
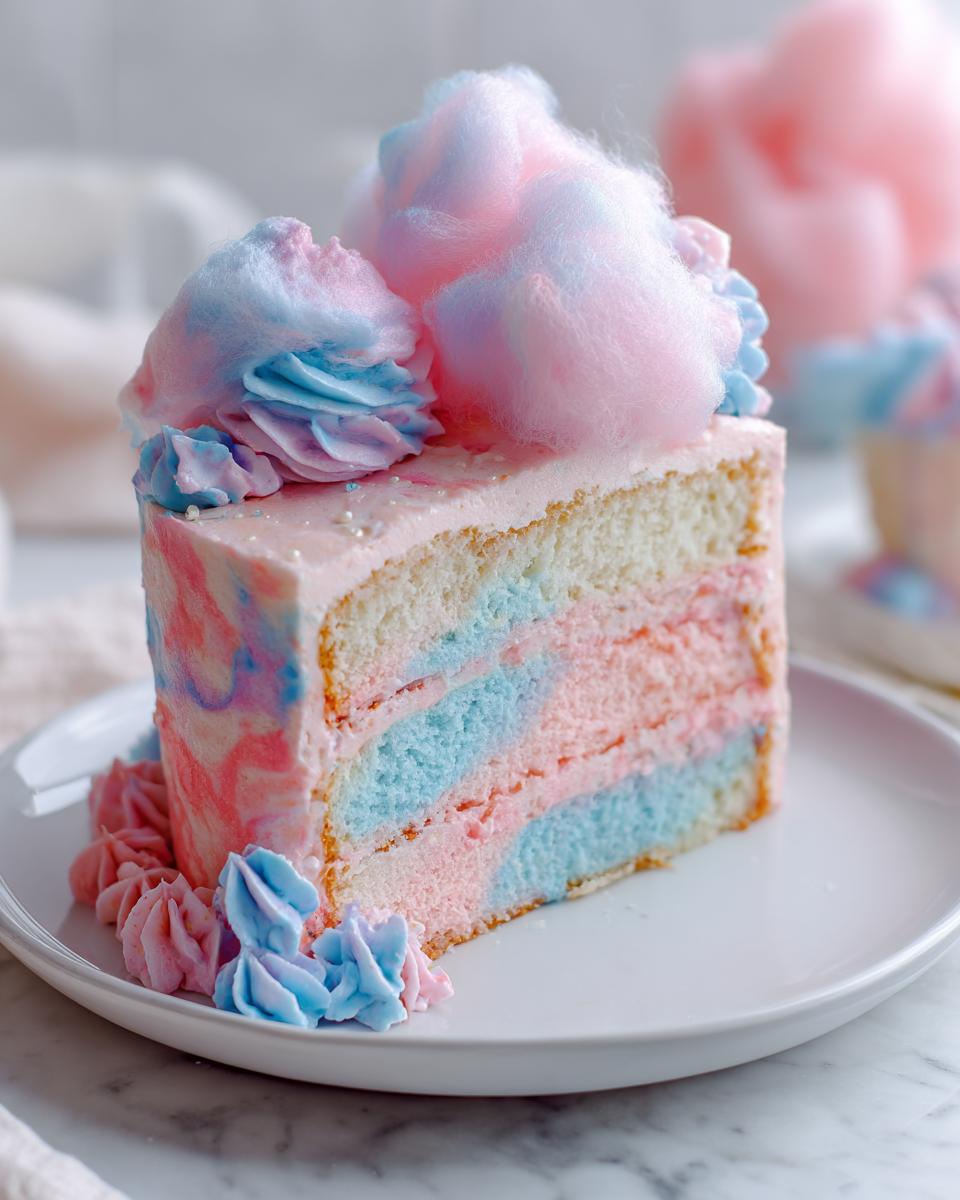
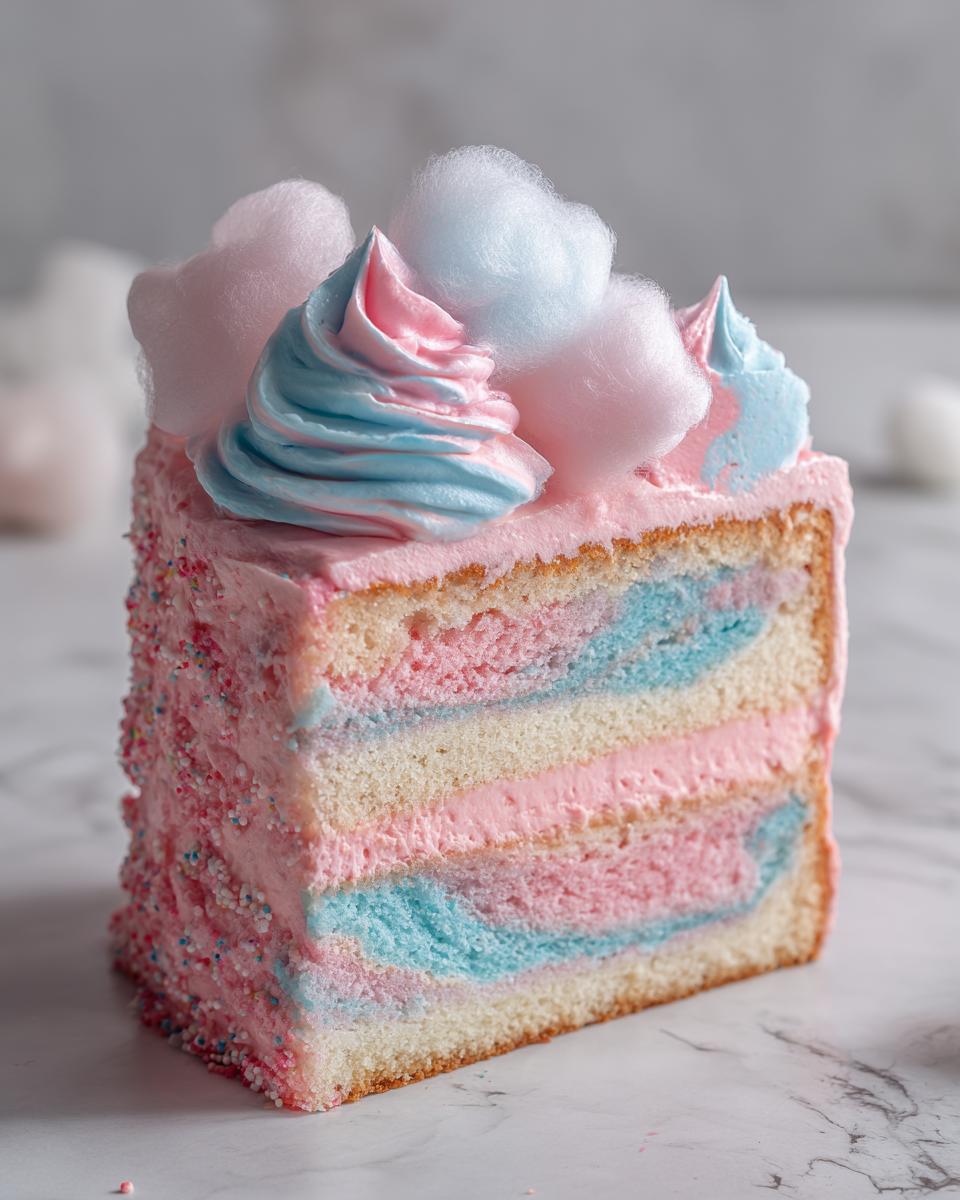
Creating the Pastel Pink and Blue Swirl Effect
This technique is what makes this a true Cotton Candy Cake masterpiece. Carefully divide your batter evenly into three bowls. One stays white, then gently add just a few drops of pink gel to the second bowl and blue to the third. Mix just until the color is there; don’t overdo it or you’ll deflate all that air we just worked so hard to create! Next, drop alternating spoonfuls of the white, pink, and blue batter randomly into your prepared pans. Take a knife or a skewer and gently run it through the batter just once or twice. That is all it takes to get those stunning pastel swirls!
Baking and Cooling the Layers
Pop those colorful pans in the oven, and bake them for about 28 to 32 minutes. You need to watch them closely. The test is simple: insert a toothpick into the very center, and if it comes out clean or with just a few moist crumbs attached, they are done. Let them cool in the pan for about 10 minutes—no longer! Then, gently invert them onto a wire rack to cool completely. They absolutely must be fully cooled before hitting them with the frosting, or you’ll end up with a sugary puddle. If you’re making vanilla layers from scratch, you might also love my recipe for super moist vanilla cupcakes as a practice run!
Preparing and Assembling the Cotton Candy Frosting
While those layers are cooling down, let’s tackle the Homemade Cotton Candy Frosting. Cream your butter until it’s smooth, then slowly add that sifted powdered sugar to avoid a sugar cloud explosion everywhere! Add the extracts and then the heavy cream drip by drip, mixing on low until it’s perfectly spreadable. If it’s too stiff, splash in a tiny bit more cream. Once you have that perfect fluffy texture, divide it in half. Color one bowl light pink and the other light blue. We’ll use a mix of white, pink, and blue for the grand finale!
Expert Tips for the Best Cotton Candy Cake Presentation
This cake is meant to be one of those Showstopper Cakes that stops people mid-sentence when they walk into the party, right? Presentation is everything here, especially because we nailed the flavor and the fluffy texture inside. My personal trick for turning this into one of those Unique Cake Designs is all about the temperature control just before the final coat. You absolutely must do a crumb coat first!
Assembling and Decorating Your Pastel Birthday Cake
Once those cake layers are totally cool, put a thin layer—we are talking almost transparent—of plain white frosting on the first layer, stack it, and then cover the entire thing in a very thin layer of *any* color frosting. Then, pop the whole thing in the fridge for at least 15 minutes. This chills everything down and traps any loose crumbs. For the final, gorgeous look, take your pink and blue frosting colors and alternate spreading them around the side of the cake. Use your offset spatula to gently swirl them just once or twice so they blend into dreamy ribbons. Don’t overwork it! The absolute most crucial tip for this cotton candy cake is this: only apply the real cotton candy floss right before you serve it. If you frost it on earlier, honestly, it melts into sticky disappointment. For that final carnival sparkle, a light dusting of rainbow sprinkles on top really seals the deal. If you want to see some stunning finished looks, check out inspiration from others who’ve made this magical treat here!
Ingredient Notes and Substitutions for Your Cotton Candy Cake
Honing in on the ingredients is how you make this cake truly yours! People always ask me about the flavoring, and there’s a big difference between the extract we use and those thicker syrups. The extract is concentrated, so a little goes a long way in achieving that signature sweetness throughout the layers without adding extra liquid. If you happen to use a syrup or a less potent flavoring, you might need to bump up that amount slightly, but be careful not to exceed 2 teaspoons total!
And remember what I said about gel coloring? It’s the best for keeping our Fluffy Cake Layers perfectly light. Liquid coloring is just too heavy. For decoration, if you can’t find pre-packaged floss, you *can* use a clear piping gel tinted pink and blue, but honestly, the real stuff is worth hunting down for that amazing texture right before serving!
Storage and Keeping Your Cotton Candy Cake Fresh
Okay, this is super important because we added real cotton candy fluff to the top! If you made this Cotton Candy Cake ahead of time, store the frosted layers loosely covered at room temperature for up to two days. That’s best for the texture of the buttercream, honestly.
But listen up: do NOT put the real cotton candy decoration on until you are literally about to serve it. Humidity is its sworn enemy and will turn it into sticky syrup fast! If you must refrigerate the whole assembled cake, make sure it’s tightly wrapped in plastic wrap to keep out moisture, and then let it sit on the counter for at least an hour before slicing so the butter softens up again.
Frequently Asked Questions About Making a Cotton Candy Cake
I know you might have a few lingering questions before diving into this colorful baking project! It’s totally normal. Whenever I try a new Fun Party Cake that looks this whimsical, I always need a little extra reassurance. Here are the questions I get asked most often about making this Cotton Candy Cake Recipe a resounding success.
Can I use store-bought cake mix for this Cotton Candy Cake Recipe?
You absolutely *can*, and it makes things lightning fast! If you go that route, stick to a good quality white or vanilla cake mix. To get the cotton candy flavor in, you’ll substitute the liquid called for on the box—usually milk or water—with a mix of half milk and half buttermilk, and add in about 1 and 1/2 teaspoons of the cotton candy flavoring extract. Divide that mix into your colors like we did with the from-scratch batter. However, I highly recommend trying the homemade version at least once, because the way we cream the butter and sugar is what guarantees that extra special fluffy texture that everyone loves!
Is the cotton candy flavor strong enough?
It can be! The extract is potent, but the flavor mellows a bit when baked alongside the vanilla and milk. If you want it stronger, try using a cotton candy syrup instead of the extract, or just add an extra half teaspoon of the extract to both the batter and the frosting. It’s all about personal preference for that sweet carnival taste!
Do I really need the gel food coloring?
For the visual effect? Yes, I really think so. The goal is those light pink and blue swirls, right? Gel colors are concentrated color drops, which means you can achieve vibrant pastels without adding excess liquid to the batter, keeping those layers perfectly light and fluffy. Liquid dye can sometimes muddy the color or throw off your texture balance. If you’re skipping the color altogether, the cake will still taste amazing, but it won’t have that signature look!
Is this a kid-friendly cake to make?
It is! It’s full of bright colors and sweet flavors, so kids absolutely adore it. The parts that might be tricky for very little ones are the electric mixer during the creaming, but they can certainly help divide the batter into the bowls for coloring! I actually have a simpler recipe for fun birthday rolls if you need an easier activity next time. Remember, for parties, you want a reliable cotton candy cake, and this one definitely works every time.
Estimated Nutritional Data for This Sweet Carnival Treat
I always want you to have a general idea of what you’re serving, especially for parties. Here is the estimated breakdown for one slice of this decadent Cotton Candy Cake. I’ve totaled up the ingredients based on averages, but keep in mind that everything from brands of butter to how much frosting you pile on will change these numbers a little!
- Serving Size: 1 slice
- Calories: 450
- Sugar: 65g
- Sodium: 250mg
- Fat: 20g
- Carbohydrates: 68g
- Protein: 4g
Please remember this is just an estimate! If you skip the real floss topping or use less sugar in the frosting, your totals will adjust easily. Baking should be joyful, not stressful over tracking every calorie!
Share Your Magical Creations
Now the best part: seeing what you created! I put so much heart into perfecting this cotton candy cake recipe so you could have a stress-free showstopper. Once you bake it up, please come back and leave a rating so other home cooks know how easy and fun it was! And don’t forget to tag me on social media! I absolutely love seeing your colorful results and hearing which part of the cake was everyone’s favorite. Happy baking, and I hope your celebration is full of whimsy!
Estimated Nutritional Data for This Sweet Carnival Treat
I always want you to have a general idea of what you’re serving, especially for parties. Here is the estimated breakdown for one slice of this decadent Cotton Candy Cake. I’ve totaled up the ingredients based on averages, but keep in mind that everything from brands of butter to how much frosting you pile on will change these numbers a little!
- Serving Size: 1 slice
- Calories: 450
- Sugar: 65g
- Sodium: 250mg
- Fat: 20g
- Carbohydrates: 68g
- Protein: 4g
Please remember this is just an estimate! If you skip the real floss topping or use less sugar in the frosting, your totals will adjust easily. Baking should be joyful, not stressful over tracking every calorie!
Share Your Magical Creations
Now the best part: seeing what you created! I put so much heart into perfecting this cotton candy cake recipe so you could have a stress-free showstopper. Once you bake it up, please come back and leave a rating so other home cooks know how easy and fun it was!
And don’t forget to tag me on social media! I absolutely love seeing your colorful results and hearing which part of the cake was everyone’s favorite—was it the fluffy texture or the sweet pop of flavor? Every rating helps other bakers feel confident trying something this whimsical. I can’t wait to see your beautiful, fluffy masterpieces!
If you are looking for even more fun desserts to try next, make sure you check out my full collection of the best dessert recipes—there are always new, reliable treats to explore!
PrintEasy Fluffy Cotton Candy Cake for Magical Birthdays

Make a whimsical, sweet, and fluffy cotton candy cake with pastel pink and blue swirls. This easy recipe delivers a showstopper dessert perfect for any celebration.
- Prep Time: 35 min
- Cook Time: 30 min
- Total Time: 65 min
- Yield: 10 servings 1x
- Category: Dessert
- Method: Baking
- Cuisine: American
- Diet: Vegetarian
Ingredients
- 1 1/2 cups all-purpose flour
- 1 1/2 teaspoons baking powder
- 1/2 teaspoon salt
- 1 cup granulated sugar
- 1/2 cup unsalted butter, softened
- 2 large eggs
- 1 teaspoon vanilla extract
- 1/2 cup whole milk
- 1 teaspoon cotton candy flavoring extract
- Pink and blue gel food coloring
- For the Frosting: 1 cup unsalted butter, softened
- 4 cups powdered sugar, sifted
- 1 teaspoon vanilla extract
- 1/2 teaspoon cotton candy flavoring extract
- 2–4 tablespoons heavy cream
- Pink and blue gel food coloring
- For Decoration: 1 cup real cotton candy floss (pink and blue)
- Sprinkles (optional)
Instructions
- Preheat your oven to 350°F (175°C). Grease and flour two 8-inch round cake pans.
- In a medium bowl, whisk together the flour, baking powder, and salt. Set aside.
- In a large bowl, cream the softened butter and granulated sugar together until light and fluffy. Beat in the eggs one at a time, mixing well after each addition. Stir in the vanilla extract and cotton candy flavoring extract.
- Gradually add the dry ingredients to the wet ingredients, alternating with the milk, beginning and ending with the flour mixture. Mix until just combined. Do not overmix.
- Divide the batter evenly into three separate bowls. Leave one bowl white. Add a few drops of pink gel coloring to the second bowl and mix until you achieve a light pink color. Add blue gel coloring to the third bowl and mix until you achieve a light blue color.
- Spoon alternating dollops of the white, pink, and blue batters randomly into the prepared cake pans. Use a knife or skewer to gently swirl the colors together once or twice to create a marbled, pastel effect. Do not overmix the colors.
- Bake for 28 to 32 minutes, or until a toothpick inserted into the center comes out clean.
- Let the cakes cool in the pans for 10 minutes before inverting them onto a wire rack to cool completely.
- Prepare the frosting: Beat the softened butter until creamy. Gradually add the sifted powdered sugar, mixing on low speed until combined. Add vanilla extract, cotton candy flavoring extract, and heavy cream, one tablespoon at a time, until you reach a smooth, spreadable consistency.
- Divide the frosting into two bowls. Color one bowl light pink and the other light blue using gel coloring.
- Once cakes are completely cool, place one layer on your serving plate. Spread a thin layer of white frosting (or one of the pastel colors) over the top. Place the second layer on top.
- Frost the entire cake with a thin crumb coat of white frosting and chill for 15 minutes.
- Apply the final layer of frosting. For a whimsical look, alternate spreading the pink and blue frosting around the sides and top of the cake, swirling gently with an offset spatula to blend the pastel colors.
- Immediately before serving, gently press or drape small tufts of real cotton candy floss onto the top and sides of the cake. Add sprinkles if desired.
Notes
- For the best pastel swirl effect, use gel food coloring instead of liquid coloring, as it adds less moisture to the batter.
- Apply the real cotton candy floss right before serving, as it dissolves quickly, especially in humid environments.
- You can substitute the cotton candy flavoring extract with a clear cotton candy syrup if you prefer a stronger flavor.
Nutrition
- Serving Size: 1 slice
- Calories: 450
- Sugar: 65
- Sodium: 250
- Fat: 20
- Saturated Fat: 12
- Unsaturated Fat: 8
- Trans Fat: 0.5
- Carbohydrates: 68
- Fiber: 1
- Protein: 4
- Cholesterol: 75