
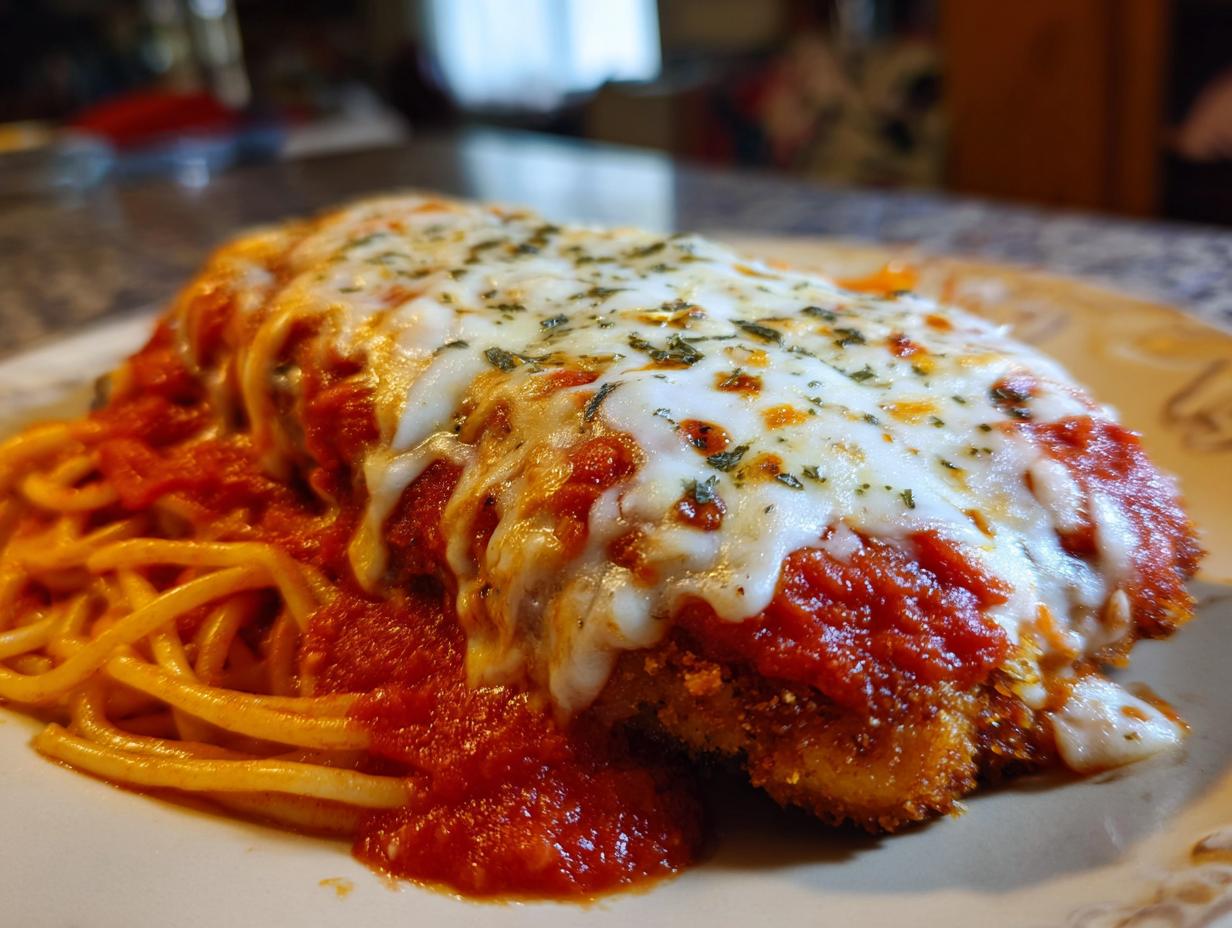
Oh, my friends, if you’ve been searching for a glorious, over-the-top Italian-American dinner that tastes better than your favorite takeout spot, stop scrolling right now! I know so many of you want that classic, comforting flavor but are terrified of ending up with soggy chicken. Well, I’m Kate, and I promise you that my tried-and-true chicken parmesan recipe is the one that finally solves that problem forever. We are focusing on absolute, non-negotiable crispiness by using a strategic pan-fry followed by a beautiful baked finish under all that gorgeous, gooey cheese. Trust me, every single step here is tested, reliable, and aimed at making you feel like a culinary champion tonight.
I want you to feel totally confident serving this up, which is why you’ll find all my best tips buried inside, helping you create the Best Chicken Parmesan Ever for your table. You can find more easy, delicious ideas perfect for busy weeknights over in my weeknight dinner recipes collection!
- Why This is the Best Chicken Parmesan Recipe Ever
- Ingredients for the Ultimate Crispy Chicken Parmesan Recipe
- How to Prepare the Perfect Chicken Parmesan Recipe
- Tips for a Healthier Baked Chicken Parmesan Recipe Variation
- Ingredient Notes and Substitutions for Your Chicken Parmesan Recipe
- Serving Suggestions for Your Easy Italian Dinner
- Storage and Reheating Instructions for Leftover Chicken Parmesan Recipe
- Frequently Asked Questions About This Chicken Parmesan Recipe
- Estimated Nutritional Data for This Chicken Parmesan Recipe
Why This is the Best Chicken Parmesan Recipe Ever
If you’ve been let down by chicken parmesan that gets limp five minutes after leaving the oven, you are in the absolute right place. This isn’t just another recipe; this is my blueprint for achieving Restaurant Style Chicken Parm right in your standard kitchen. I promise, you won’t want to go back to the old way after trying this combination.
What makes this the Best Chicken Parmesan Ever? It all comes down to texture and flavor balance. I’ve highlighted the game-changers below, but the most important takeaway is that we are layering flavors and textures like pros.
- Perfect Juiciness: We pound the chicken thin and even so it cooks quickly without drying out. That means tender, juicy chicken every time!
- Unbeatable Texture: We are kicking sogginess to the curb thanks to our special breading mixture and the two-stage cooking process.
- Flavor Depth: Using good quality marinara and adding Parmesan right into the crust means flavor explodes in every single bite. Check out my tips for making chicken crispy, just like in my fried chicken recipe guide!
Achieving Maximum Crispiness in Your Chicken Parmesan Recipe
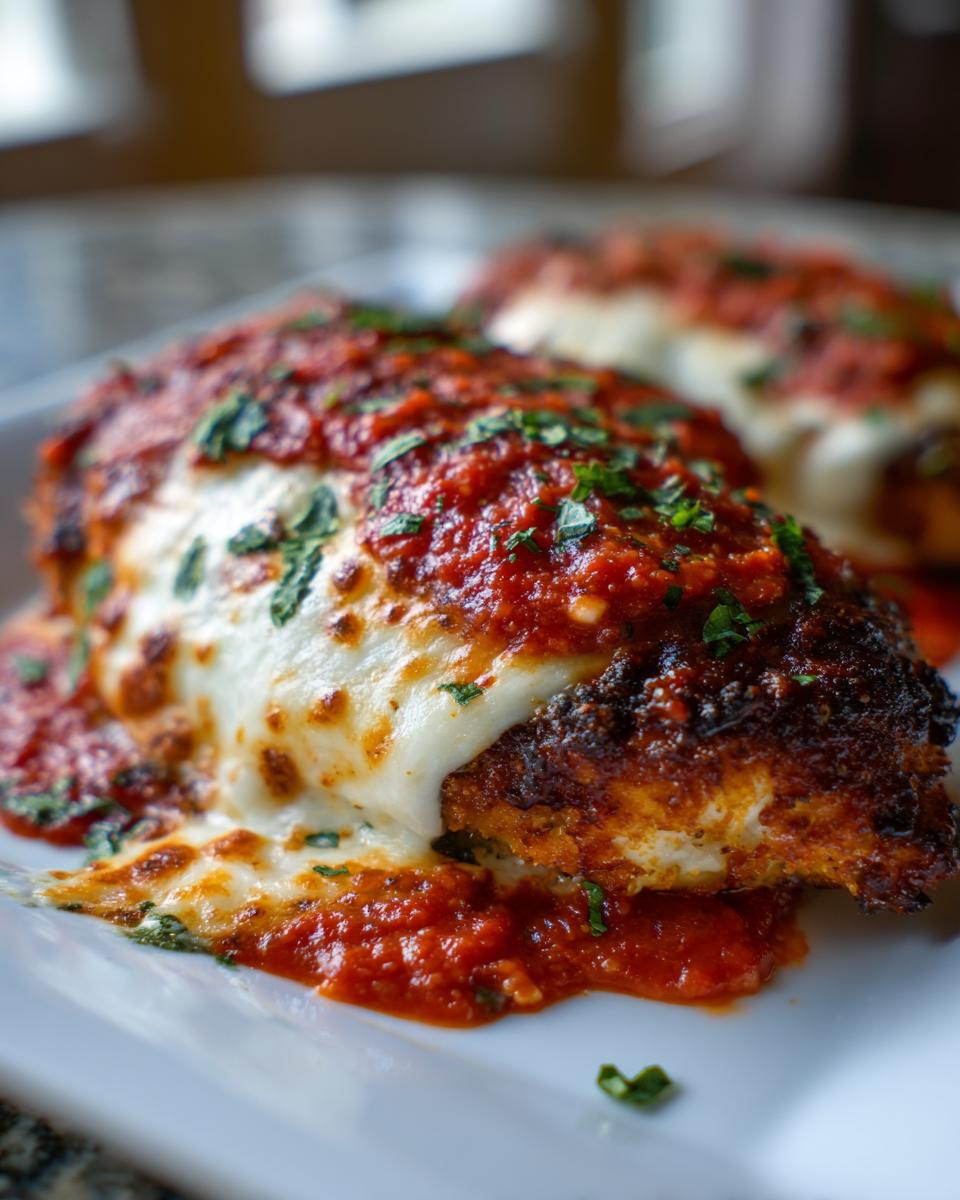
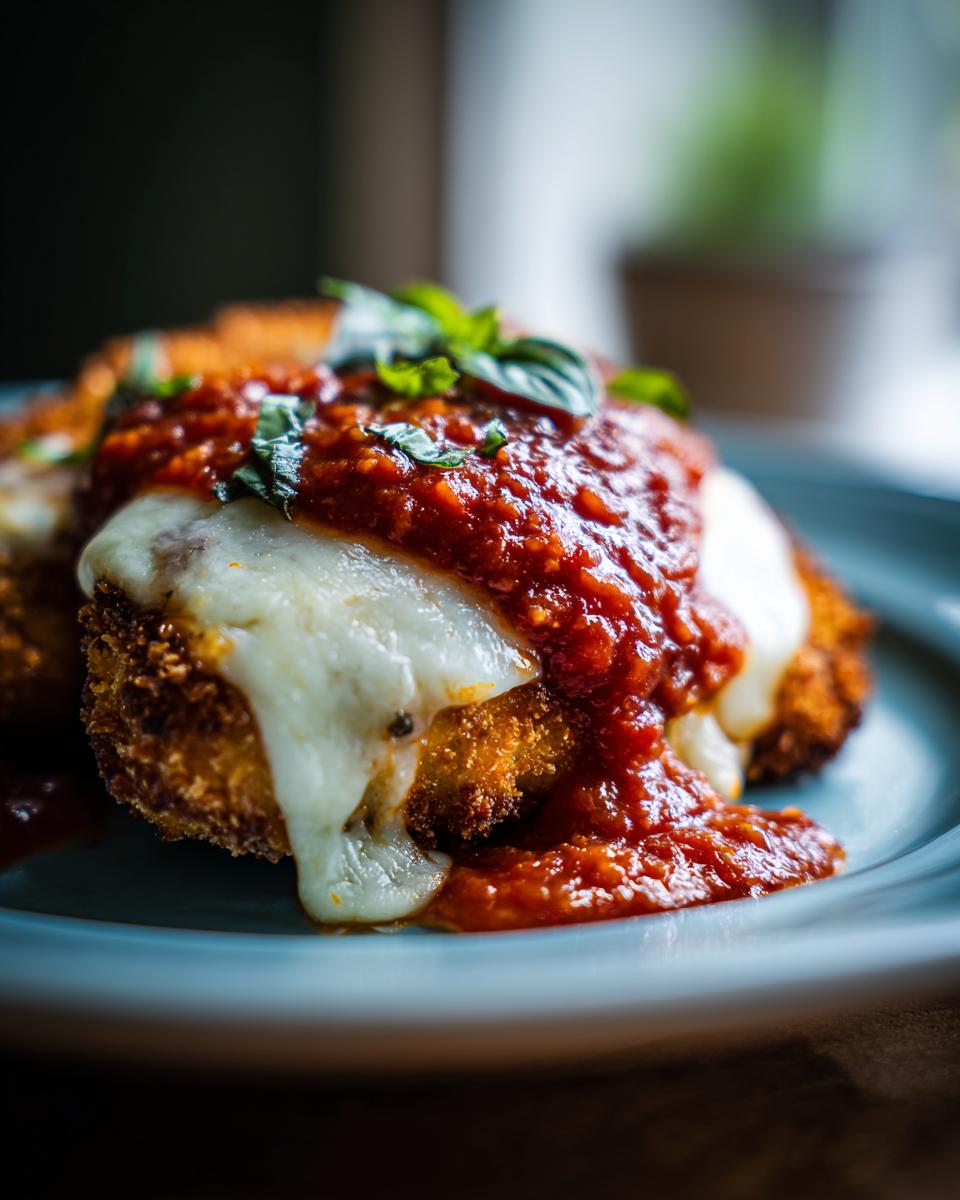
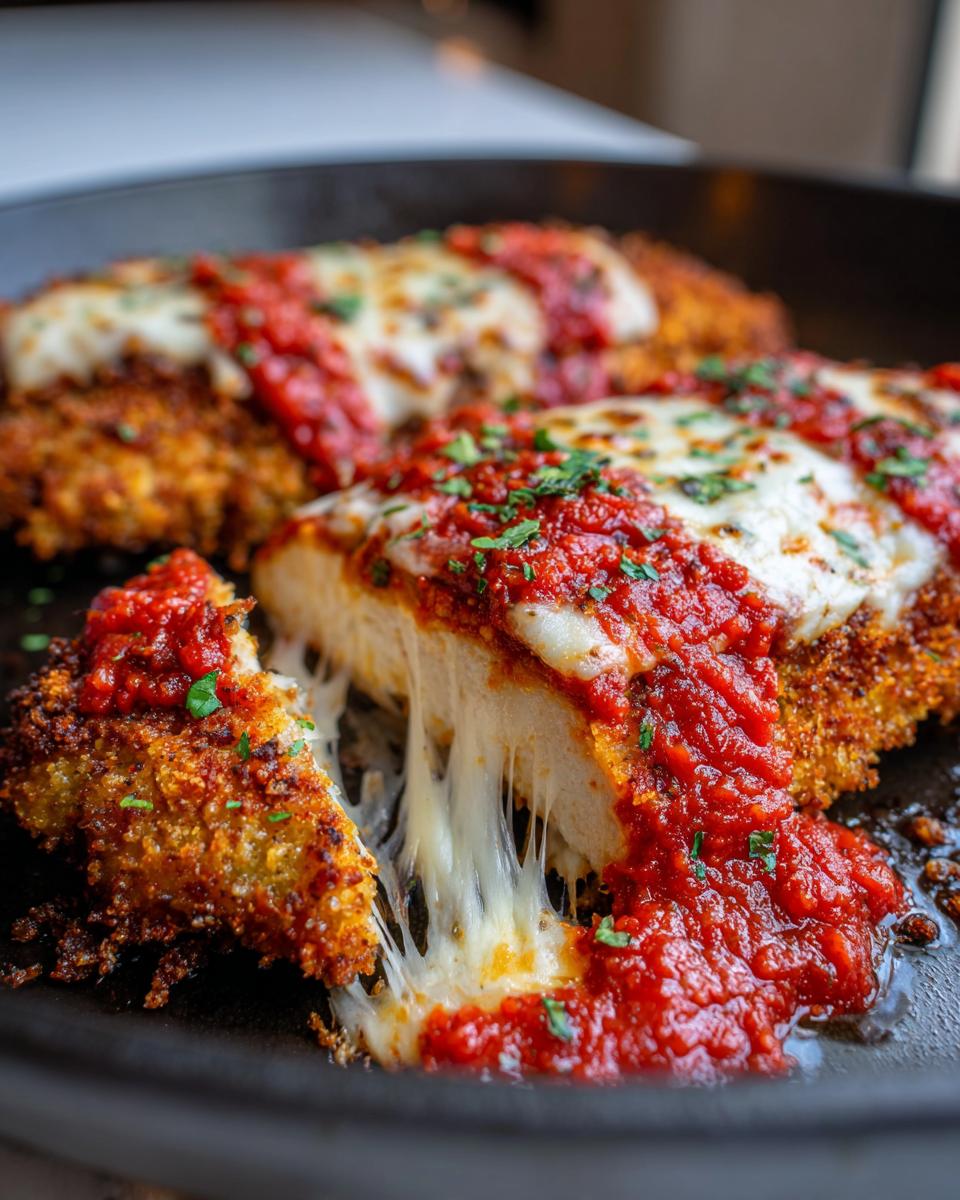
Okay, let’s talk about the crispy crust because that’s what everyone comes here for, right? Forget standard, boring breadcrumbs. The key here is Panko. Panko breadcrumbs are flaky and airy, and when combined with grated Parmesan cheese in that final dredging step, they create little crispy shields around that chicken.
When you press that Panko mixture onto the chicken cutlet, you are sealing the deal. You’re locking in moisture and creating surface area for frying. Standard breadcrumbs just clump up and soak up oil; Panko stays light and crunchy, which is exactly what a truly satisfying Parmesan Crusted Chicken needs.
Ingredients for the Ultimate Crispy Chicken Parmesan Recipe
This is where the dedication pays off before we even start cooking! I always tell people that for a top-tier chicken parmesan recipe, the ingredients don’t need to be complicated, but they do need to be the right ones. Don’t skip the quality on the sauce or the cheese; those elements really shine through after the baking time. You can see some other fresh Italian flavors you might want to whip up, like my bruschetta recipe, to start the meal off right!
Here is exactly what you need to gather for four incredible servings:
- 4 Boneless, skinless chicken breasts (we want them about 6 oz each, remember to pound them!)
- 1 cup All-purpose flour
- 2 large Eggs, whisked lightly
- 1 cup Panko breadcrumbs (Don’t substitute these, please! They are our secret weapon for that perfect crunch.)
- 1/2 cup Grated Parmesan cheese (This goes *into* the breading mix, so make sure it’s finely grated.)
- 1 teaspoon Garlic powder
- 1/2 teaspoon Dried oregano
- 1/4 teaspoon Black pepper
- 1/2 teaspoon Salt
- 1/2 cup Vegetable oil or canola oil, for that essential frying step
- 1 1/2 cups Marinara sauce (Seriously, use the best jarred stuff you can find, or make your own if you have time!)
- 8 ounces Fresh mozzarella cheese, sliced or shredded (Fresh melts so much better than the low-moisture stuff.)
- 1/4 cup Grated Parmesan cheese (This is for sprinkling right over the top at the end.)
- Fresh basil, chopped (Just a little bit for color and freshness when serving.)
See? Nothing crazy, but every component plays a huge role in turning this into that amazing, savory, Cheesy Chicken Bake we crave. It’s all about the assembly!
How to Prepare the Perfect Chicken Parmesan Recipe
This is the part where we stop dreaming about that Restaurant Style Chicken Parm and start making it happen! Getting these steps right is what separates a good meal from the absolute best you’ve ever made. Don’t rush the pounding; it really pays off later. You want those cutlets to be uniformly about half an inch thick so they cook nice and fast. Once they are pounded, give them a quick dusting of salt and pepper—that’s it for seasoning the inside.
Next, you need to set up your assembly line, what I lovingly call the dredging station. Use three separate shallow dishes. The first gets the flour, the second gets your whisked eggs, and that third one holds your golden Panko and Parmesan mixture. Having everything ready means you move quickly, and speed is your friend when building that crust. If you are looking for other great family mains, check out my chicken fried steak recipe for another satisfying comfort meal!
Breading Technique for Crispy Chicken Parmesan Recipe Success
Here’s the rhythm: Flour first—shake off any extra! Then dip it completely into the egg wash, letting the thick drips fall back into the bowl. The crucial step is next: Transfer it immediately to those wonderful Panko crumbs. Don’t just toss it around! You need to press down firmly with the palms of your hands on both sides to compact that Panko crust onto the meat. If you press hard, it won’t fall apart when it hits the hot oil. Do this for all four pieces.
The Two-Step Cook: Pan-Fry and Bake Finish for this Chicken Parmesan Recipe
We are pan-frying first to get that gorgeous golden color and lock in the crispness. Heat your oil over medium-high heat—you want it nice and hot, about 350°F, but not smoking. Fry the cutlets in batches for about three or four minutes on each side. They won’t be totally cooked through, and that’s okay! You’ll pull them out and put them on a wire rack over a baking sheet—this lets the oil drain away so your crust stays spectacular. Then, we move them to the oven to finish cooking safely to 165°F while the cheese melts into that perfect Cheesy Chicken Bake.
Tips for a Healthier Baked Chicken Parmesan Recipe Variation
Listen, I totally get it. Sometimes you want the satisfaction of a creamy, cheesy classic like this, but maybe we aren’t feeling the pan-frying step for a busy weeknight or trying to keep things lighter. That’s why I always include notes on how to modify my recipes! If you click over to my eggplant parmesan recipe, you’ll see I love making vegetarian twists too, but this one focuses on modifying the chicken itself.
If you are aiming for a Baked Chicken Parmesan Healthy version, you can absolutely skip using that oil in the skillet! The breading technique we used—that firm press into the Panko—is actually designed to stick well even without the initial fry. This makes it a fantastic No Fry Chicken Parmesan option.
So, here’s the swap for skipping the oil:
- Skip Step 4 (Pan-fry).
- Instead, after fully breading your cutlets, lay them onto that wire rack set over the baking sheet.
- This is important: You must spray them aggressively and generously on both sides with cooking spray or olive oil spray. Don’t be shy here; if you miss a spot, it might burn or stick!
- Bake them at 400°F for about 15 minutes. Flip them halfway through so they brown evenly.
- Once they are looking golden and reaching that internal temperature of 165°F, *then* you move them into the sauce and top with mozzarella as usual, finishing them in the oven until the cheese melts bubbly.
You lose a little depth of flavor you get from the hot oil crust, I won’t lie, but you save on fat and mess. It still yields a wonderfully satisfying, cheesy result perfect for a lighter Weeknight Chicken Recipe!
Ingredient Notes and Substitutions for Your Chicken Parmesan Recipe
Even though I gave you the exact ingredient list, I want you to feel comfortable making little tweaks based on what you have. When you’re aiming for that Restaurant Style Chicken Parm flavor, knowing *why* we choose certain ingredients is key. It builds confidence in the kitchen, which is my main mission here at Kings Cook!
When you’ve made this chicken parmesan recipe as many times as I have, you start to trust your instincts, but I’ll give you my tested rules of thumb first. If you’ve already made your main dish, maybe you’ll want to whip up some easy stuffed mushrooms as a starter!
Panko vs. Standard Breadcrumbs: Why We Stick to Panko
I know some recipes just call for seasoned breadcrumbs from the box. Please, if you take nothing else from this article about creating the Best Chicken Parmesan Ever, remember Panko. Standard breadcrumbs are like dust; they absorb moisture super quickly, which leads straight to sogginess when you add that sauce. Panko breadcrumbs are larger, flakier, and lighter. They fry up beautifully and hold their texture way longer, giving you that satisfying crunch even when coated in cheese.
Oil Choices for the Best Crispiness
For the initial pan-fry, you need oil with a high smoke point. I listed vegetable or canola oil because they are neutral and readily available. They hold up great to that medium-high heat we need to get the crust golden brown fast, without burning before the chicken cooks internally. Olive oil is delicious, but its smoke point is lower, meaning it can break down and taste bitter if you fry for too long. Save the good extra virgin olive oil for drizzling over your finished pasta!
Sauce and Mozzarella Decisions
The marinara sauce isn’t just for moisture; it’s a huge flavor driver! If you use a watery, thin sauce, it soaks into the Panko and turns it mushy almost instantly. Look for thick sauces, often labeled as “marinara” or “pasta sauce,” rather than thin “tomato sauces.” For the mozzarella, using fresh mozzarella—the soft balls packed in brine—melts into that incredible, gooey blanket we want. If you have to use pre-shredded, just know it won’t have the same creamy texture, but it will melt fine for your Cheesy Chicken Bake.
Serving Suggestions for Your Easy Italian Dinner
Okay, the hard part is done! You’ve got this masterpiece of crispy chicken, savory sauce, and melted cheese ready to go. Now, what do we put next to it on the plate? This is what turns a good meal into an epic, satisfying Easy Italian Dinner. My goal is always to make dinner feel like an event, even if it’s just Tuesday night!
You can’t really go wrong, but here are my tried-and-true pairings that balance out the richness of the chicken parmesan perfectly. If you want a fresh starter, you absolutely must check out my caesar salad recipe; it cuts through the richness of the cheese like a dream.
- The Classic Route: You have to serve this over a bed of spaghetti or linguine! Keep the pasta sauce simple—just tossed with a little butter or a touch more marinara so the chicken doesn’t get lost. A side of garlic bread for soaking up any extra sauce pooling on the plate is non-negotiable in my book.
- Lighter & Brighter: Sometimes you want the chicken but need something fresh. Serve it with a big side of lightly dressed greens. A simple vinaigrette or a bright Caesar salad works wonderfully. No heavy sides needed, just let that chicken be the star!
- The Low-Carb Fix: If you’re avoiding pasta, try serving the chicken parm over sautéed zucchini noodles or spaghetti squash. It gives you that comforting feel without the extra carbs. Plus, those vegetables soak up the sauce beautifully.
Whatever you choose, make sure you have something fresh to balance out that amazing, cozy comfort food feeling!
Storage and Reheating Instructions for Leftover Chicken Parmesan Recipe
Oh, the wonderful problem of having leftovers! Sometimes this chicken parmesan recipe tastes even better the next day, but only if you store it right. Storing leftovers is key to keeping that crust from turning into sadness mush overnight. I know everyone loves a quick microwave reheat, but trust me on this one: the microwave is the enemy of crispiness when it comes to breaded chicken!
When you’re saving this Easy Italian Dinner for later, you want to treat the components with a little respect to keep that beautiful texture intact. My best advice, especially if you plan on eating it more than two days later, is to separate the sauce from the chicken entirely. I know it seems like extra work, but it’s worth it because we want to save that crunchy coating!
If you want more fantastic ideas for turning leftovers into new meals, head over to my comprehensive list of weeknight dinner recipes—maybe tomorrow’s dinner becomes Chicken Parm sliders?
Here is how I manage the rest:
- Refrigeration Timeline: Store the chicken pieces in an airtight container in the fridge for up to three to four days. If you managed to save any chicken without the sauce on it initially, that’s even better!
- Sauce Separation Strategy: If you can, put the extra marinara sauce in a separate small container. When reheating, reheating the chicken separately and adding fresh (or slightly warmed) sauce on top keeps the breading fresher tasting. Mozzarella that has melted holds up okay, but too much moisture is the enemy.
Restoring the Crisp: Reheating Your Chicken Parmesan Recipe Leftovers
This is the most important part of this section, so listen up! If you want to recapture some of that amazing texture we worked so hard to achieve for your Weeknight Chicken Recipe, you need heat that circulates, not steam. That means ditching the microwave for this classic.
Oven or Toaster Oven Method (My Top Pick)
This method gets the best results, bringing back a wonderful crunch. Preheat your oven to about 375°F (190°C). Place the leftover chicken pieces on a wire rack set over a baking sheet. This elevation allows air to circulate completely around the chicken. Bake for about 12 to 15 minutes. If you didn’t save the sauce separate, wait until the last three minutes to scoop a little sauce over the top and quickly sprinkle on a tiny bit more Parmesan and mozzarella before finishing baking. This warms everything through gently while crisping up the edges again!
Air Fryer Option for Speedy Reheating
If you have an air fryer, this is a fantastic shortcut for reviving a slice of that Cheesy Chicken Bake. Set your air fryer to about 350°F. Place the chicken in the basket (don’t overcrowd!) and cook for 6 to 8 minutes, flipping halfway. The circulating hot air does an amazing job blasting away any residual moisture that softened the crust. It’s fast and usually gives you about 80% of the original crispness back!

Frequently Asked Questions About This Chicken Parmesan Recipe
It’s totally normal to have a few questions swirl around when you’re trying a brand-new, ultimate version of a classic like this! I always want you to feel totally secure about your dinner plans, especially when aiming for that perfect crust and gorgeous cheese pull. We are working hard to deliver the Best Chicken Parmesan Ever, and FAQs are just another way I can share my tested knowledge from the kitchen.
If you’ve mastered this spectacular Cheesy Chicken Bake, don’t forget to check out all my speedy options over at my weeknight dinner recipes page for inspiration later this week!
Can I prepare the breading for this chicken parmesan recipe ahead of time?
This is a classic make-ahead question, and honestly, for the best crispiness, the answer leans toward no! The Panko and Parmesan mixture needs to stay perfectly dry. If you mix it too early, especially if your kitchen is humid, that cheese starts absorbing moisture, and we lose that beautiful, flaky texture we worked so hard to create for our Parmesan Crusted Chicken.
I always recommend setting up your three dredging bowls right before you start pounding the chicken. Moving quickly from flour to egg to Panko ensures that last coating adheres perfectly and locks in the crunch. If you absolutely must prep, only mix the dry Panko and spice blend (without the grated Parmesan) and store that in an airtight container, adding the cheese right before you bread the chicken.
What is the secret to a truly juicy chicken breast in this chicken parmesan recipe?
It all comes down to even thickness! If your chicken breasts have thick spots and thin spots, the thin spots cook through too fast and dry out while you wait for the thick parts to finish. Patting them dry first (to help the flour stick!) is important, but the real magic is the pounding. You must use a mallet or even the bottom of a heavy pan; cover the chicken with plastic wrap first so you don’t tear it up. Keep pounding gently until the entire cutlet is consistently about 1/2-inch thick. This ensures every piece cooks at the same rate, guaranteeing you get that wonderfully Juicy Chicken Breasts Dinner experience every single time!
Can I use chicken tenders instead of full breasts for this easy chicken parmesan recipe?
Yes, you totally can! Chicken tenders make this dish an even quicker Weeknight Chicken Recipe. You just need to adjust your cooking times slightly since they are naturally thinner. When pan-frying, you might only need 2 to 3 minutes per side because we don’t have to worry as much about the internal temperature—they cook through much faster. Because they are smaller, they will bake much faster too, so keep a close eye on them during that final cheesy bake!
My family prefers a purely Baked Chicken Parmesan Healthy version; how do I maintain crispiness without any pan-frying?
I hear you! I put the full instructions in that section, but the short answer is maximum spray coverage. If you are going the oven-only route (which turns this into a great No Fry Chicken Parmesan), make sure you are very generous with the cooking spray on both sides *after* the Panko coating. The initial bake at 400°F needs to be long enough to render out some moisture before you add the sauce. If the chicken doesn’t get a good crisp going first, the sauce will instantly make it soft. A wire rack is absolutely essential here to let air circulate underneath!
How far in advance can I assemble the cheese and sauce layers?
If you are trying to prep for a party and want to save time right before guests arrive, you can assemble everything—chicken, sauce, and mozzarella—in the baking dish without baking it yet. Cover the dish tightly with plastic wrap and refrigerate for up to 24 hours. When you’re ready to bake, let it sit on the counter for about 30 minutes while your oven preheats. This helps the cold soak out a bit so it cooks more evenly. Since the chicken is already lightly browned, it usually only needs about 20 minutes in the oven, until that cheese is bubbly and golden!
Estimated Nutritional Data for This Chicken Parmesan Recipe
Now, I always like to be super upfront about nutrition because an amazing, indulgent meal like this deserves transparency! Please remember, this data reflects the ingredients listed in the recipe—the crispy, pan-fried version with the mozzarella and Parmesan on top—and may vary a tiny bit based on the specific brand of oil or marinara sauce you end up using. When I calculate these figures based on four generous servings, the result is a truly satisfying Italian Comfort Food experience!
This recipe, while featuring that delightful fried element, still packs a fantastic protein punch. It’s a wholesome, hearty meal that uses fresh chicken and minimal added sugar in the sauce (if you choose carefully!). Here’s what the numbers generally look like for one serving:
- Serving Size: 1 cutlet
- Calories: Around 580 (Don’t panic! A lot of that is flavor and healthy fats from the quality oil.)
- Protein: A whopping 45g! This is a powerhouse meal.
- Fat: About 32g (Remember, this includes the oil absorbed during that crucial crisping step.)
- Carbohydrates: Around 28g (Mostly from the breading and sauce.)
- Sodium: Approximately 850mg (This can vary a lot based on how much salt you use and the sodium content of your jarred marinara sauce.)
I know this isn’t the lightest salad topping, but honestly, when you’re whipping up a Family Favorite Chicken dish like this, you want the genuine flavor combination. If you are looking to reduce sodium, the easiest place to trim it when making this Easy Italian Dinner is by using low-sodium marinara sauce and being conservative with the salt you add to the breading mixture. Enjoy every bite!
PrintUltimate Crispy Chicken Parmesan Recipe (Pan-Fried & Baked Finish)

Learn how to make restaurant-style Chicken Parmesan with a perfectly crispy crust, juicy chicken, savory marinara, and gooey melted mozzarella. This recipe delivers the best chicken parmesan you have ever made, perfect for an easy Italian dinner.
- Prep Time: 20 min
- Cook Time: 25 min
- Total Time: 45 min
- Yield: 4 servings 1x
- Category: Dinner
- Method: Pan-Frying and Baking
- Cuisine: Italian-American
- Diet: Vegetarian
Ingredients
- 4 Boneless, skinless chicken breasts (about 6 oz each)
- 1 cup All-purpose flour
- 2 large Eggs, lightly beaten
- 1 cup Panko breadcrumbs
- 1/2 cup Grated Parmesan cheese (for breading)
- 1 teaspoon Garlic powder
- 1/2 teaspoon Dried oregano
- 1/4 teaspoon Black pepper
- 1/2 teaspoon Salt
- 1/2 cup Vegetable oil or canola oil, for frying
- 1 1/2 cups Marinara sauce (high quality recommended)
- 8 ounces Fresh mozzarella cheese, sliced or shredded
- 1/4 cup Grated Parmesan cheese (for topping)
- Fresh basil, chopped (for garnish)
Instructions
- Prepare the chicken: Place each chicken breast between two sheets of plastic wrap. Pound them to an even 1/2-inch thickness using a meat mallet. Season both sides lightly with salt and pepper.
- Set up the breading station: Prepare three shallow dishes. In the first, place the flour. In the second, whisk the eggs. In the third, combine the Panko breadcrumbs, 1/2 cup grated Parmesan cheese, garlic powder, oregano, salt, and pepper.
- Dredge the chicken: Take one chicken cutlet and dredge it thoroughly in the flour, shaking off excess. Dip it into the egg mixture, allowing excess to drip off. Finally, press the cutlet firmly into the Panko mixture, coating both sides completely to build a thick, crispy crust. Repeat for all cutlets.
- Pan-fry for crispiness: Heat the vegetable oil in a large, heavy-bottomed skillet over medium-high heat until shimmering (about 350°F). Carefully place two chicken cutlets in the hot oil. Fry for 3 to 4 minutes per side until golden brown and crisp. The chicken will not be fully cooked through at this stage. Remove the chicken and place it on a wire rack set over a baking sheet to drain excess oil. Repeat with remaining cutlets.
- Assemble the bake: Preheat your oven to 400°F (200°C). Spread a thin layer of marinara sauce in the bottom of a 9×13 inch baking dish. Place the fried chicken cutlets over the sauce.
- Top the chicken: Spoon about 2-3 tablespoons of marinara sauce over the top of each cutlet. Layer generously with the fresh mozzarella slices or shredded mozzarella. Sprinkle the remaining 1/4 cup of Parmesan cheese over the mozzarella.
- Bake until done: Bake for 10 to 15 minutes, or until the cheese is melted, bubbly, and lightly golden, and the internal temperature of the chicken reaches 165°F (74°C).
- Serve immediately: Garnish with fresh basil. Serve this family favorite chicken dinner over cooked spaghetti or alongside a crisp green salad.
Notes
- For the crispiest result, do not skip the double coating of breadcrumbs. Press the Panko firmly onto the chicken.
- If you prefer a baked chicken parmesan healthy version, you can skip the pan-frying and spray the breaded cutlets heavily with cooking spray before baking at 400°F for 15 minutes, flipping halfway, before adding sauce and cheese for the final bake.
- Use high-quality, thick marinara sauce; thin sauce can make the crust soggy faster.
Nutrition
- Serving Size: 1 cutlet
- Calories: 580
- Sugar: 7
- Sodium: 850
- Fat: 32
- Saturated Fat: 14
- Unsaturated Fat: 18
- Trans Fat: 0
- Carbohydrates: 28
- Fiber: 2
- Protein: 45
- Cholesterol: 155