
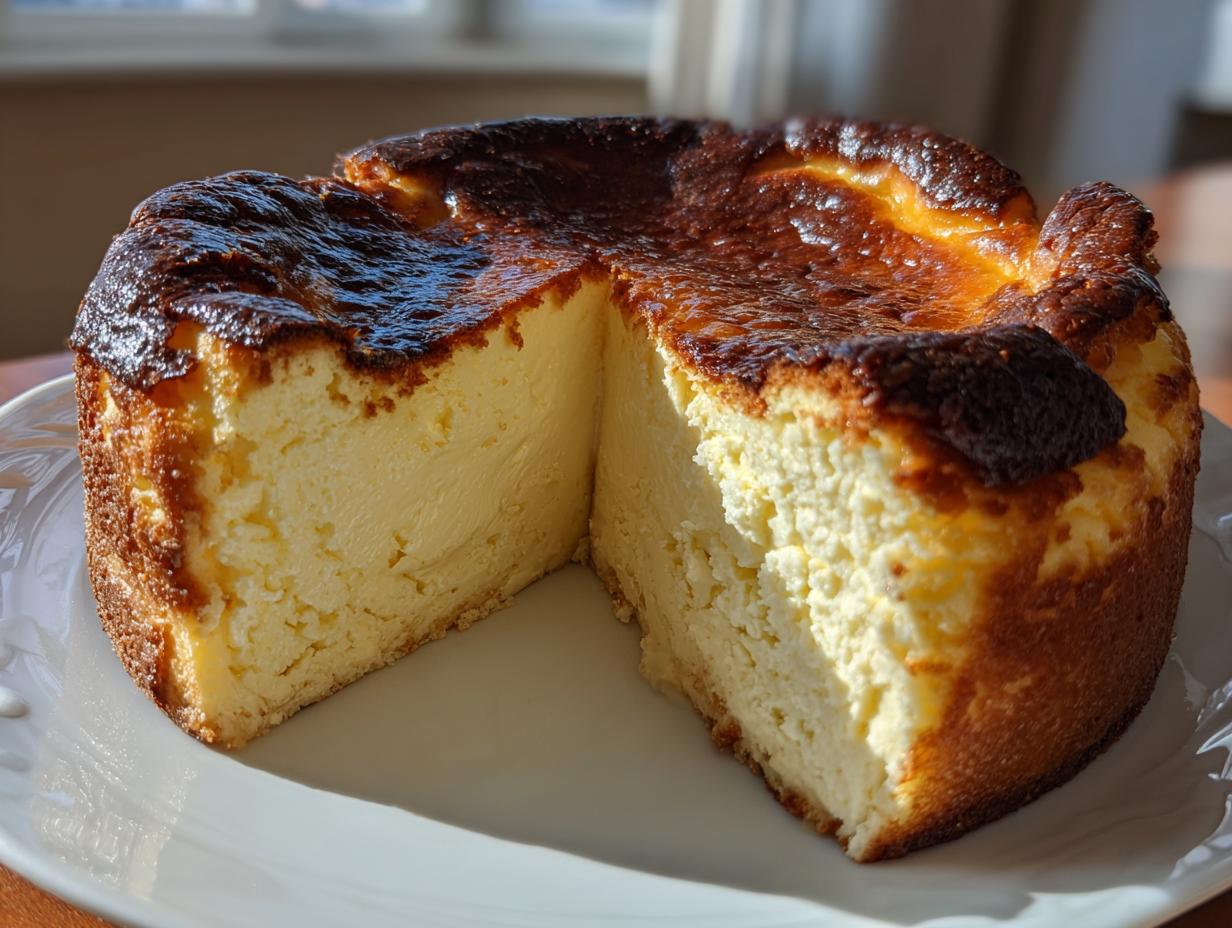
Welcome! Let’s Master Your Kitchen, Together. Have you ever seen a bakery case and thought, “That incredible, towering dessert is just beyond my reach”? Well, I’m here to smash that idea! The Basque burnt cheesecake is the showstopper you need in your baking repertoire, and honestly, it’s shockingly simple. We’re talking about a deeply caramelized, almost black top that gives way to the creamiest, velvety center imaginable. This isn’t some fussy New York style cake needing a water bath; this beauty embraces rustic simplicity! I have tested and re-tested this specific Basque burnt cheesecake recipe dozens of times right here in my own kitchen to ensure you get those perfect textures every single time. Prepare to feel like a dessert royalty!
- Why This is the Easiest Basque Burnt Cheesecake Recipe You Will Ever Make
- Essential Ingredients for Your Basque Burnt Cheesecake
- Equipment Needed for Crustless Cheesecake Baking
- Step-by-Step Instructions for the Best Burnt Cheesecake
- Troubleshooting Common Basque Burnt Cheesecake Issues
- Serving Suggestions for Your Caramelized Top Cheesecake
- Variations: Trying the Basque Cheesecake Loaf Pan Trend
- Storing and Reheating Your Decadent Cream Cheese Baking
- Frequently Asked Questions About Basque Burnt Cheesecake
Why This is the Easiest Basque Burnt Cheesecake Recipe You Will Ever Make
When I first saw pictures of the Basque burnt cheesecake, I thought it must be some incredibly complex Spanish technique. Nope! That’s the magic of this dessert, and why I adore it so much. This recipe delivers restaurant-quality results with almost zero fuss. If you’re looking for a showstopper without the stress, this is it. You’ll be amazed at how simple it is to nail this one. For more unbelievably easy desserts, check out this guide here!
Here is why baking this is a total breeze:
- It is naturally crustless! No fiddling with graham crackers or buttery crumbs.
- We bake it hot and fast—no fussy water bath required.
- The texture is foolproof if you just follow the mixing rules.
Achieving the Signature Caramelized Top Cheesecake
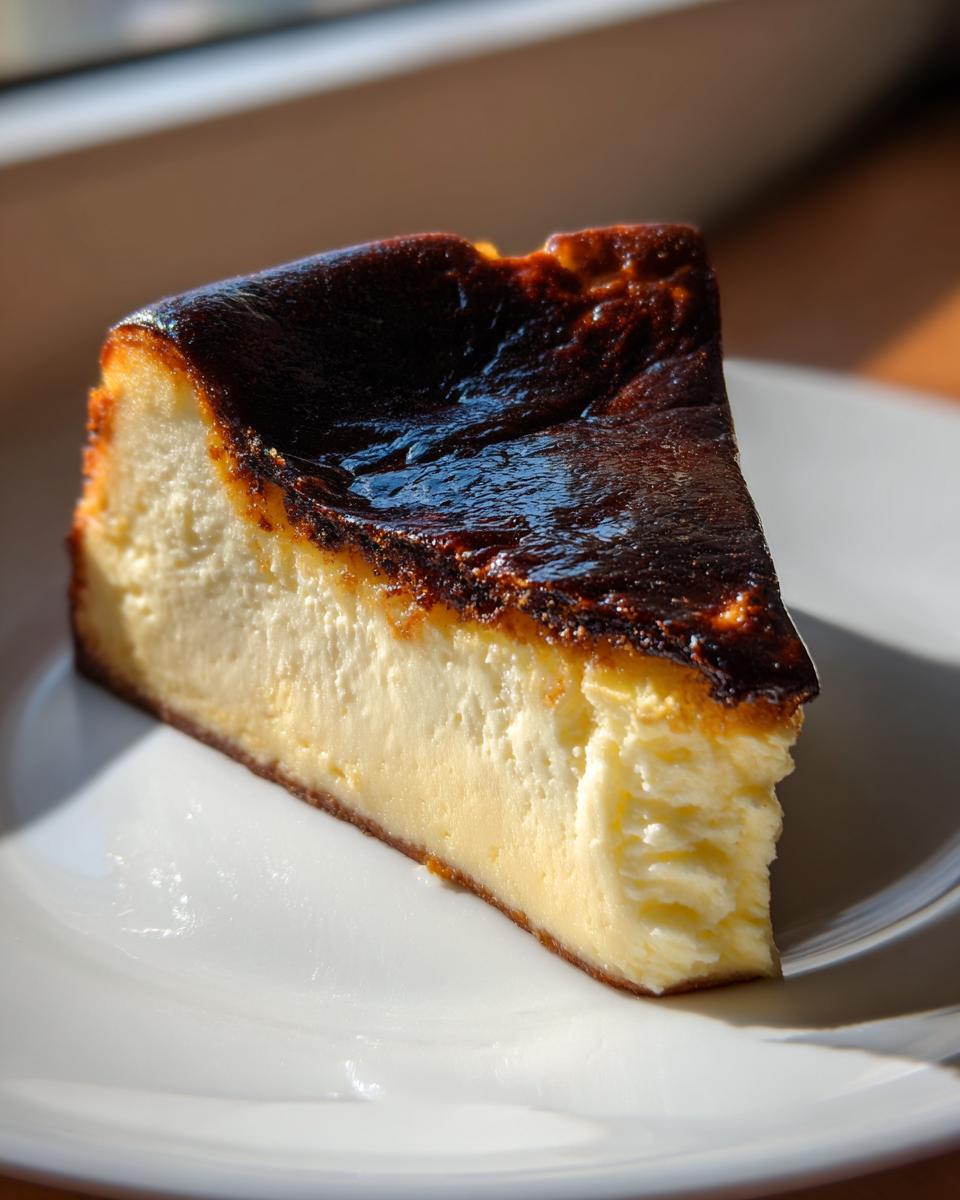
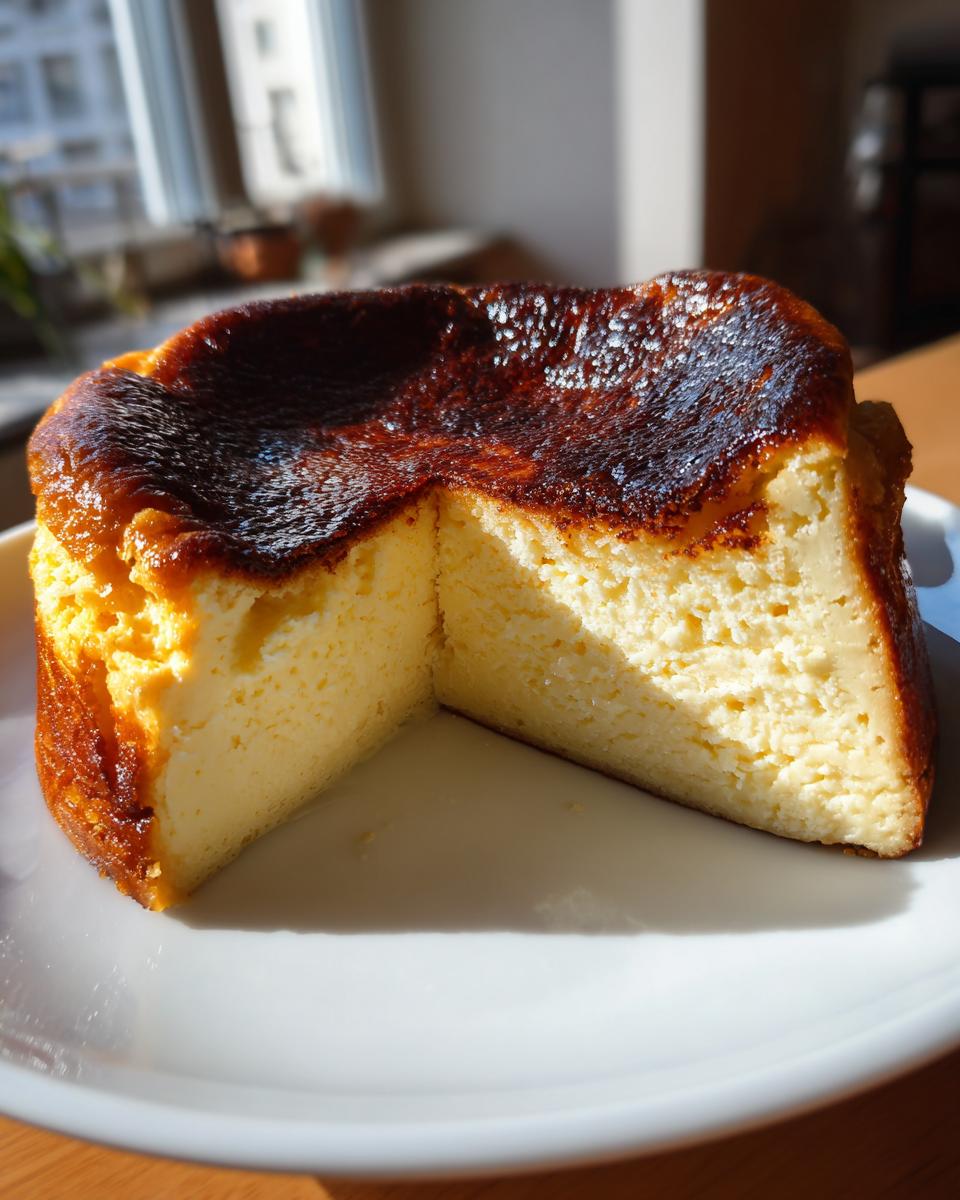
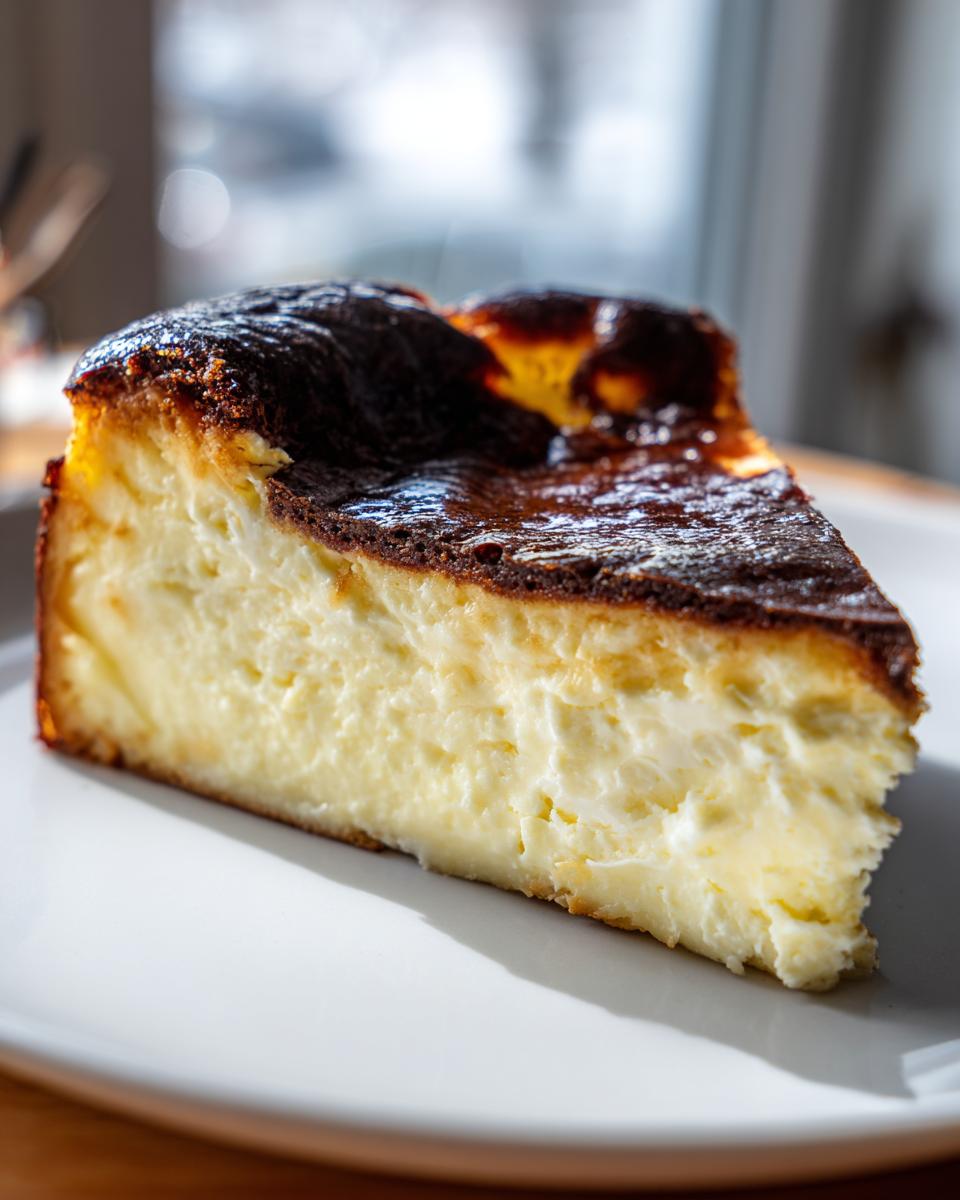
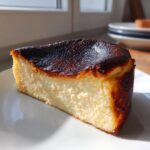
The entire look is about that deep, gorgeous char on top. Trust me, you might panic when the top looks almost black, but that’s exactly what we’re after! We crank the oven temperature way up past what you usually use for cheesecake. This super high, direct heat blisters the sugars on the surface instantly. This quick blast of heat creates that signature bittersweet, caramelized layer that keeps the center perfectly soft.
The Secret to a Creamy Cheesecake Dessert Center
The interior needs to be like velvet—mousse-like, almost runny when hot. My biggest tip for achieving this incredible creamy cheesecake dessert is making sure your cream cheese and eggs are truly at room temperature. If your ingredients are cold, you end up over-beating the batter trying to smooth out lumps. Over-beating introduces too much air, and when the cake cools, it collapses flat and turns grainy instead of that signature, decadent wobble. Keep that mixer speed low after the eggs go in!
Essential Ingredients for Your Basque Burnt Cheesecake
This list looks short, and that’s part of the beauty of the Basque burnt cheesecake! We rely on good quality ingredients since there are so few of them. I’ve listed everything you need below. Don’t try cutting corners here, especially on the dairy; it’s what makes the difference between good and truly spectacular. If you want to see how others structure their ingredient list, check out this inspiration here.
- 1.5 lbs (680g) full-fat cream cheese, softened to room temperature
- 1 1/4 cups (250g) granulated sugar
- 4 large eggs, room temperature
- 2 large egg yolks, room temperature
- 1 3/4 cups (420ml) heavy cream
- 1 teaspoon vanilla extract
- 1 tablespoon all-purpose flour
- Pinch of fine sea salt
Ingredient Notes and Substitutions for Basque Burnt Cheesecake
Pay attention to temperature! The success of this dessert hinges on everything—especially the cream cheese and eggs—being fully at room temperature. This lets the ingredients blend smoothly right away. For the cream cheese, I insist on full-fat blocks. Using “light” cream cheese just won’t give you the rich structure needed for the Basque burnt cheesecake.
We use just one tablespoon of flour. This is truly just a stabilizer; it’s not meant to add structure like in a regular cake. If you absolutely cannot use all-purpose flour, cornstarch is a decent one-to-one swap, but honestly, the flour works perfectly well for this recipe.
Equipment Needed for Crustless Cheesecake Baking
One of the great things about getting into the crustless cheesecake baking game is that you don’t need a whole suite of fancy gadgets. We are keeping this simple, remember? You likely have most of this stuff lying around already.
My kitchen setup for making this dessert is pretty straightforward. You’ll want something that can handle some thick batter, but nothing too powerful that it forces too much air in—we talked about that already!
- An electric mixer (handheld or stand mixer). This makes creaming the thick cheese much easier than the whisk alone, though Grandma would have used sheer elbow grease!
- A large mixing bowl for combining the batter.
- Measuring cups and spoons—accuracy really helps when dealing with cream cheese texture.
- An 8-inch springform pan. This is the standard size that works best with the time/temp ratio in this recipe.
- Lots and lots of parchment paper. Seriously, don’t skimp here! You need two large sheets, overlapping, to create those dramatic high sides.
- A baking sheet. This is essential, not just for stability on the high rack, but also just in case your parchment paper decides to leak a tiny bit near the bottom. Better safe than scrubbing the oven floor, right?</li
Step-by-Step Instructions for the Best Burnt Cheesecake
Okay, let’s get busy! This recipe moves fast once you start mixing, so have your ingredients ready to go. The entire process from mixing to oven is surprisingly quick, which is what makes the Basque burnt cheesecake such a winner for weeknights when you crave something truly decadent. I’ve laid out the steps exactly as I perform them. If you want a little extra guidance on technique, check out this super helpful guide for an easy recipe!
Preparing the Pan for Your Basque Burnt Cheesecake
This step is crucial for the signature look! We need tall sides because the batter rises quite a bit during baking. Take two large pieces of parchment paper and lay them across each other in an ‘X’ shape inside your 8-inch springform pan. Now, here’s the fun part: gently crinkle and push the paper into the corners of the pan. Don’t try to make it perfect! The creases and wrinkles are what create those beautiful, rustic waves along the side of your finished cheesecake. Make sure the paper sticks up at least two or three inches above the rim so it contains the batter.
Mixing the Batter for Velvety Baked Cheesecake
First things first: preheat that oven to a super hot 400°F (200°C). Seriously, crank it up! Now, get your softened cream cheese beaten until it’s silk smooth. Add the sugar and mix until just combined—we aren’t aiming for fluffy here. Next, the eggs go in one by one, followed by the yolks, mixing barely after each addition to avoid adding unnecessary air. Finally, pour in the heavy cream and vanilla. Mix on the absolute lowest speed until everything looks harmonious. Whisk your tiny bit of flour and salt separately, sprinkle it over the batter, and give it one last, very brief mix. Stop once you don’t see any dry streaks! Remember, less air equals that super velvety baked cheesecake center we want.
Baking and Cooling Protocol for Perfect Basque Burnt Cheesecake
Pour that lovely, smooth batter into your prepared pan, making sure it sits on a baking sheet—just in case! Bake this baby for about 45 to 55 minutes at that high heat. You need visual cues here: the top should look dark brown, deeply caramelized, sometimes even jet black in spots, but the very center should still have a pronounced, jiggly wobble, like soft pudding. Don’t worry if it sinks! That just means you did it right for the quintessential Basque burnt cheesecake.
Once it comes out, let it cool completely on a wire rack for at least two hours. Seriously, fight the urge to cut it! Once it’s room temperature, cover it loosely and move it to the fridge for 6 hours, or ideally overnight. This slow chill is what truly sets that creamy texture. If you need more tips on getting that perfect crustless bake, check out this guide: here.
Troubleshooting Common Basque Burnt Cheesecake Issues
Look, even when a recipe is as robust as this one, sometimes things don’t look exactly like the picture. Don’t toss it! That’s the beauty of home baking; we learn from every wobble and every crack. I’ve definitely had moments in the kitchen wondering, “What just happened to my stunning dessert?” Most issues with this type of cheesecake come down to two main culprits: temperature or mixing time.
If you want to get straight to the best tips for making sure you nail the texture next time, I found a great resource explaining the secrets to getting that perfect bake here.
My Center Still Looks Soupy After Chilling!
If your center is decidedly liquid and refused to set even after a full night in the fridge, the main reason is usually the eggs or cream cheese temperature. If those ingredients went into the mixer even slightly cold, they didn’t fully emulsify. This means the structure has huge air pockets that collapse when cooling. You might be able to save it by putting it back in a lower oven (say, 325°F) for another 10 or 15 minutes, but honestly, sometimes it’s better to just accept that it’s now an ultra-rich, scoopable dip and serve it with cookies!
Why Isn’t My Top Burnt Enough?
This is usually an oven calibration issue. If your top looks golden brown but hasn’t hit that signature dark mahogany, your oven isn’t hot enough! Remember, this recipe relies on that high heat blast at the beginning. If you know your oven runs cool, try setting it to 425°F instead of 400°F for the first 20 minutes. You just have to watch it super closely. If it’s browning too fast, pull it out early—a deep brown is good, but don’t scorch the *batter* itself, just the paper and the very top surface.
Why is My Cheesecake Grainy Instead of Velvety?
This is the classic over-mixing mistake, and I’ve caught myself doing it loads of times when I get impatient! When you’re mixing the cream cheese and sugar, you must stop as soon as it looks smooth. Once those eggs come in, you are mixing only until they disappear. If you run the electric mixer on high for too long, you whip too much air into that rich dairy fat. When it bakes, that air expands, setting the structure loosely, and when it cools, it shrinks unevenly, resulting in that slightly sandy, grainy texture we want to avoid for a truly velvety experience.
Serving Suggestions for Your Caramelized Top Cheesecake
Alright, the hard part—the waiting—is finally over! Now for the fun part: serving up your stunning Basque burnt cheesecake. I know you’re staring at that dark, dramatic top, wondering if it’s too much, but trust me on this next step—it’s perfect! The secret to releasing that incredible, melt-in-your-mouth texture everyone raves about involves temperature right at the end.
You just need to serve this masterpiece correctly. For that signature, almost pudding-like center, you absolutely must let it come back to room temperature for at least an hour after taking it out of the fridge. Cold cheesecake is dense cheesecake; room temperature lets all that fat and cream cheese relax into the velvety dream it’s supposed to be. It sounds counterintuitive after all that chilling, but this step makes all the difference for a true caramelized top cheesecake experience.

As for dressing it up? Keep it simple. The flavor profile is already bold and rich, so you don’t want heavy sauces fighting the beautiful burnt notes. I usually opt for one of two things:
- A very light dusting of powdered sugar right before serving. It gives you a beautiful contrast against the dark crust.
- A handful of fresh, bright berries—raspberries or sliced strawberries work wonders because their tartness cuts through the richness perfectly.
If you’re feeling extra fancy or just want a lovely little contrast on the side, sometimes I bring out a simple bowl of fruit compote. For example, a quick warm blueberry sauce is fantastic and you can find my simple recipe for that here, although you swap the tomatoes for blueberries, naturally!
Variations: Trying the Basque Cheesecake Loaf Pan Trend
Okay, so you’ve mastered the round one, but now you’re seeing them everywhere in rectangular pans, right? That Basque burnt cheesecake loaf pan variation is huge on social media because it gives you perfect, clean slices that look so modern on a plate. Honestly, I love it! It’s perfect if you aren’t hosting a huge crowd but still want that impressive dessert factor.
The great news is you don’t have to drastically change the batter at all. We just need to make sure our pan setup is totally secure because it’s taller than the springform. If you want to see how someone else tackled this trending pan size, there’s a great visual guide here.
Here’s what you need to know to make your Basque burnt cheesecake work beautifully in a loaf pan:
- Pan Prep is Key: Line a standard 9×5 inch loaf pan with parchment paper, but make sure you let the paper hang way over the two long sides like handles. This is vital! You’ll use those paper “handles” to lift the whole cheesecake out in one piece after it chills. Don’t worry about making it look neat; a little crumpling is fine.
- Baking Time Adjustment: Because the loaf pan is deeper than our standard 8-inch round, the heat takes a little longer to penetrate the center. Start checking for doneness around the 40-minute mark, even though the recipe calls for 45-55 minutes. You are looking for that same deep brown on top, but the jiggle in the center will look slightly smaller than in the round version. Err on the side of slightly underdone if you see the top character you love!
- Serving Bonus: Loaf slices are wonderful for a smaller gathering or even packing up for a picnic. They slice much cleaner than the round version once fully chilled.
If you’re worried about the loaf pan tipping because of the high sides, just make sure you bake it on a sturdy baking sheet, just like you would the round pan. Happy experimenting!
Storing and Reheating Your Decadent Cream Cheese Baking
So, you’ve made this masterpiece, and now you’re wondering how to make the goodness last—or if you *can* make it last! Unlike a typical sponge cake, this decadent cream cheese baking is actually quite sturdy when refrigerated, but we have to follow a couple of rules to keep that velvety texture alive.
The most important thing to remember is that this cheesecake gets better with time, up to a point. It firms up significantly when cold, so you get a denser—though still creamy—experience straight from the fridge. If you want the absolute melt-in-your-mouth texture we worked so hard for, you’ll need a little patience before serving leftovers!
How Long Does It Last in the Fridge?
I always suggest covering your leftover cheesecake tightly with plastic wrap before putting it in the refrigerator. You want to make sure the cut edges don’t dry out or pick up any strong smells from other leftovers lurking around in there. Honestly, this cheesecake tastes fantastic for a solid 4 to 5 days when stored this way. Some people claim it lasts longer, but I’ve never had one stick around that long!
If you need to transport leftovers or want to freeze some for later, you can definitely do that too! Wrap the whole chilled cake tightly in plastic wrap, then add a layer of aluminum foil around that. It freezes beautifully for up to two months. If you’re interested in storing other types of treats, I wrote a whole guide on keeping baked goods fresh, which you can check out here.
Reheating to Achieve That Perfect Temperature
This is where most people go wrong with leftovers! Remember how I kept stressing that room temperature serving is non-negotiable for the best texture? That applies to leftovers, too. If you eat it straight from the fridge, it will be firm and dense, which isn’t bad, but it isn’t the luxurious, creamy experience you want to replicate.
So, the reheating advice is simple: Don’t use heat! Just take the portion of cheesecake you plan to eat out of the refrigerator about 1 to 2 hours before serving. Let it sit on the counter, covered loosely, until it warms up slightly and loses that refrigerator chill. This short resting period allows the milk proteins and fats to relax back into that soft, velvety state. It’s zero effort, and it makes all the difference!
Frequently Asked Questions About Basque Burnt Cheesecake
I get so many questions about this incredible dessert! It’s totally normal when you’re making something that looks so dramatic. I’ve gathered up the most common things people ask me when they’re diving into their first Basque burnt cheesecake. Hopefully, these answers help banish any baking nerves you might have!
Can I use light cream cheese for this recipe?
Oh, please don’t! I know it’s tempting to look for a lighter option, but for this specific style of cheesecake, full-fat cream cheese (usually the brick style) is absolutely necessary. Light versions have more water content, and that messes up the delicate balance we set up for that velvety baked cheesecake center. It will likely result in a texture that is either too runny or develops a grainy consistency.
Why did my Basque Burnt Cheesecake sink in the middle?
If your cake has a massive crater after cooling, don’t panic—that’s actually considered right! We want that dramatic sink because it’s a sign that the center was perfectly soft and underbaked when it left the oven. If yours didn’t sink at all, it probably means you overbaked it slightly, leading to a more solid cake overall. A little sinking is how you know you’ve nailed that creamy cheesecake dessert experience!
What is the main difference between this and a New York cheesecake?
That’s a fantastic question! The biggest difference is texture and technique. New York cheesecake is dense, smooth, and relies on a water bath to protect the edges from cracking, resulting in a pale exterior. Our Basque burnt cheesecake is the opposite: it’s rustic, it’s intentionally burnt on top from high heat, and it never uses a water bath. We aim for creamy-custardy in the middle, not dense and firm!
Can I make individual Basque Cheesecakes?
Yes, you absolutely can! This is a great way to serve them too. You can make individual Basque cheesecakes using standard muffin tins, though you’ll need to line them very well with parchment paper around the edges. They bake much faster, probably around 15-20 minutes at 400°F, so keep a close eye on them and watch for that deep color!
If you’re looking for more fail-proof dessert inspiration that is just as impressive, browse my full collection of best recipes here on the site!
PrintThe Easiest Homemade Basque Burnt Cheesecake: Creamy, Caramelized Perfection
You can make this stunning, crustless Basque Burnt Cheesecake at home. This recipe delivers the signature creamy interior and deeply caramelized exterior without needing a water bath. It is simple and impressive.
- Prep Time: 20 min
- Cook Time: 55 min
- Total Time: 75 min
- Yield: 8 servings 1x
- Category: Dessert
- Method: Baking
- Cuisine: Spanish
- Diet: Vegetarian
Ingredients
- 1.5 lbs (680g) full-fat cream cheese, softened to room temperature
- 1 1/4 cups (250g) granulated sugar
- 4 large eggs, room temperature
- 2 large egg yolks, room temperature
- 1 3/4 cups (420ml) heavy cream
- 1 teaspoon vanilla extract
- 1 tablespoon all-purpose flour
- Pinch of fine sea salt
Instructions
- Prepare your pan: Line an 8-inch springform pan with two large sheets of parchment paper, overlapping them to create high sides that extend 2 to 3 inches above the rim of the pan. Crumple the paper slightly before placing it in the pan to help it conform to the shape.
- Preheat your oven to 400°F (200°C). This high heat is key for the burnt top.
- Beat the cream cheese: In a large bowl using an electric mixer, beat the softened cream cheese until it is completely smooth and there are no lumps. Scrape down the sides of the bowl often.
- Add sugar: Add the granulated sugar to the cream cheese mixture and beat until just combined and smooth. Do not overmix at this stage.
- Incorporate eggs: Add the eggs one at a time, beating well after each addition until just incorporated. Beat in the egg yolks next.
- Mix wet ingredients: Pour in the heavy cream and vanilla extract. Mix on low speed until the batter is uniform.
- Add dry ingredients: Gently whisk together the flour and salt in a small bowl. Sprinkle this mixture over the batter and mix briefly on low speed until just combined. You want a smooth, pourable batter.
- Pour and bake: Pour the batter into your prepared pan. Place the pan on a baking sheet to catch any potential drips.
- Bake for 45 to 55 minutes. The top should be deeply caramelized, almost black in spots, and the edges should look set. The center should still have a significant wobble, like soft gelatin.
- Cool: Remove the cheesecake from the oven. Let it cool completely on a wire rack at room temperature for at least 2 hours. The center will continue to set as it cools.
- Chill: Once cool, cover the cheesecake loosely and refrigerate for at least 6 hours, or preferably overnight, before serving.
- Serve: Remove the parchment paper sides just before serving. Serve at room temperature for the creamiest texture.
Notes
- For a loaf pan variation (as seen trending): Use a standard 9×5 inch loaf pan lined with parchment paper. Adjust baking time slightly, checking at 40 minutes.
- Room temperature ingredients are essential for a smooth, lump-free batter. Take your cream cheese and eggs out at least 1 hour before starting.
- Do not use a water bath; this recipe relies on high heat for the signature crustless texture.
- If your oven runs hot, start checking the color around the 40-minute mark to prevent burning too quickly before the inside sets.
Nutrition
- Serving Size: 1 slice
- Calories: 450
- Sugar: 35g
- Sodium: 250mg
- Fat: 35g
- Saturated Fat: 22g
- Unsaturated Fat: 13g
- Trans Fat: 0.5g
- Carbohydrates: 30g
- Fiber: 0g
- Protein: 8g
- Cholesterol: 180mg