

If the siren call of game day is sounding, you know exactly what that means: we need seriously satisfying appetizers! Forget those limp, floppy things you sometimes get out. Today, we are mastering the ultimate comfort food: restaurant-quality crispy potato skins. Trust me, making these at home is far easier than you think, and I’m Kate Connolly! I started Kings Cook because I believe everyone deserves reliable, easy recipes that banish kitchen stress for good. This recipe for loaded potato skins is foolproof, and once you bite into that crunch, you’ll never look back. We’re going to make your table feel like royalty! For more great snack ideas, check out my full collection of appetizers and snacks here on the site.
- Why This Crispy Potato Skins Recipe is Your New Game Day Favorite
- Essential Ingredients for Perfect Potato Skins
- How to Make Crispy Potato Skins: Step-by-Step Baking Guide
- Tips for the Ultimate Crunchy Potato Shells
- Making Potato Skins Ahead for Party Food Ideas
- Serving Suggestions for Bacon Cheddar Potato Skins
- Storing and Reheating Homemade Potato Skins
- Frequently Asked Questions About Oven Baked Potato Skins
- Nutritional Snapshot of These Loaded Potato Skins
- Share Your Perfect Potato Skins Experience
Why This Crispy Potato Skins Recipe is Your New Game Day Favorite
I know you want snacks that perform—they need to hold up to cheering and dipping without turning soggy! That’s why I developed this specific approach. This isn’t just another snack; it’s the Best Potato Skins Appetizer you’ll ever serve. They truly take simple comfort food to the next level. If you love these, make sure you try my jalapeño poppers next!
- They are hands-down the easiest Easy Game Day Snacks you can manage without stress.
- They have that incredible contrast: crunchy shell meeting molten, gooey cheese.
- They always disappear first, every single time I serve them for a gathering.
Achieving Restaurant Style Appetizers Texture
The secret weapon here is the double-bake. We bake the potato once to cook it through, and then we bake the shell again *before* adding the toppings. This removes excess moisture and guarantees those beautiful, rigid edges. That’s how you get those fantastic Restaurant Style Appetizers right here at home, not just some floppy skin!
Simple Potato Recipes for Any Gathering
Don’t let the steps scare you—it’s mostly hands-off time. That’s what I love most about these Simple Potato Recipes: you invest a bit of time in the baking and scooping, but the assembly is fast. They are so satisfying and universally loved by everyone, which is what you want when you have guests coming over.
Essential Ingredients for Perfect Potato Skins
When we talk about making truly great potato skins, the ingredients have to be top-notch. This is where we build that flavor foundation, and trust me, using the right kind of potato makes all the difference in the world. I don’t want you ending up with something disappointing, so let’s look at exactly what you need before you start your prep work. If you’re making a spread for game day, don’t forget to try my famous cheese ball alongside these!
Selecting the Right Potatoes for Potato Skins
You absolutely must start with Russet potatoes for this recipe. They are starchy, which means they bake up light and fluffy on the inside, giving you that wonderful contrast against the crispy outside shell. Also, always give them a proper scrub! Think of it like washing off a tiny layer of dirt before you bake them—you want them completely clean because that skin is going to be the star of the show. If the skin isn’t clean before it hits the oven, it just won’t taste right later.
Toppings for Loaded Potato Skins
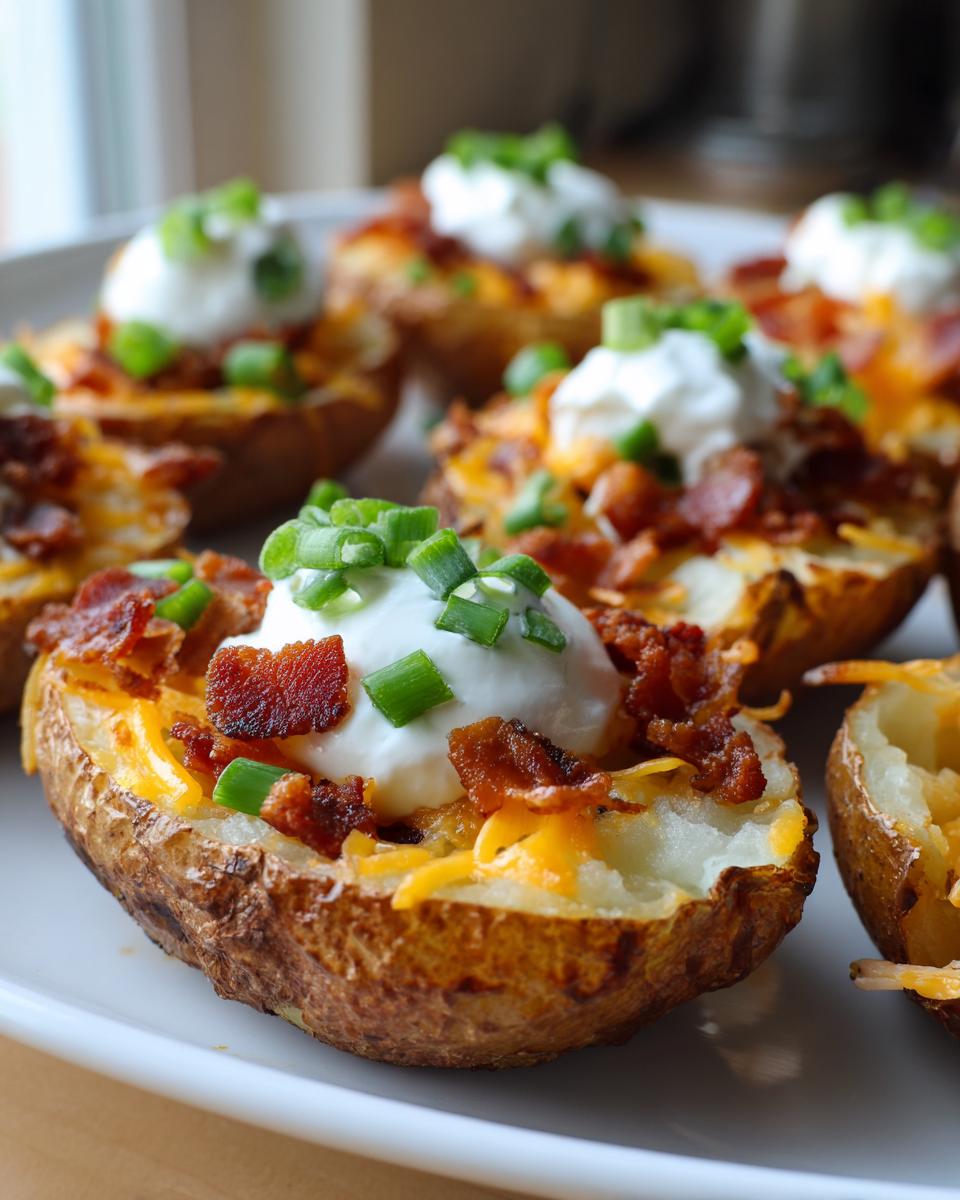
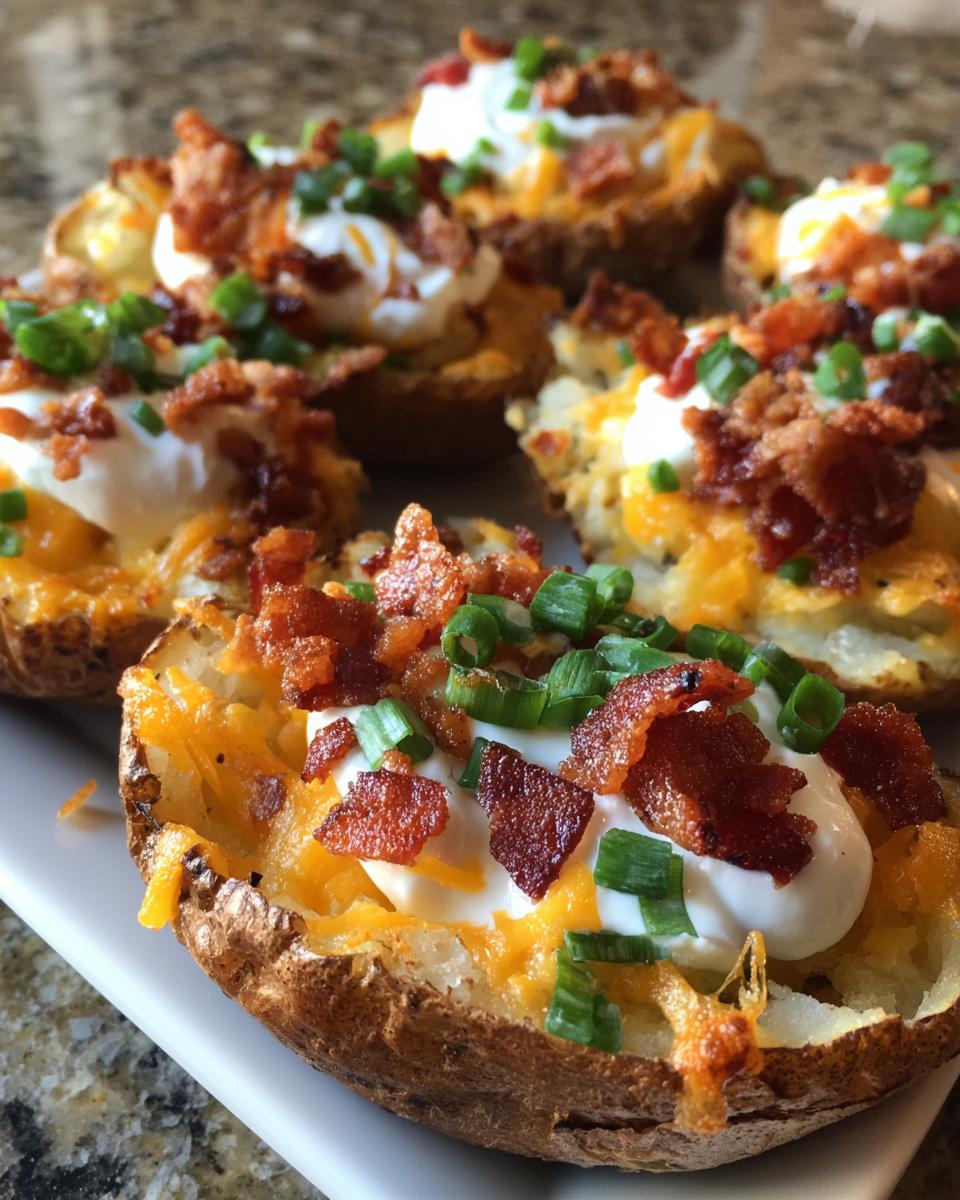
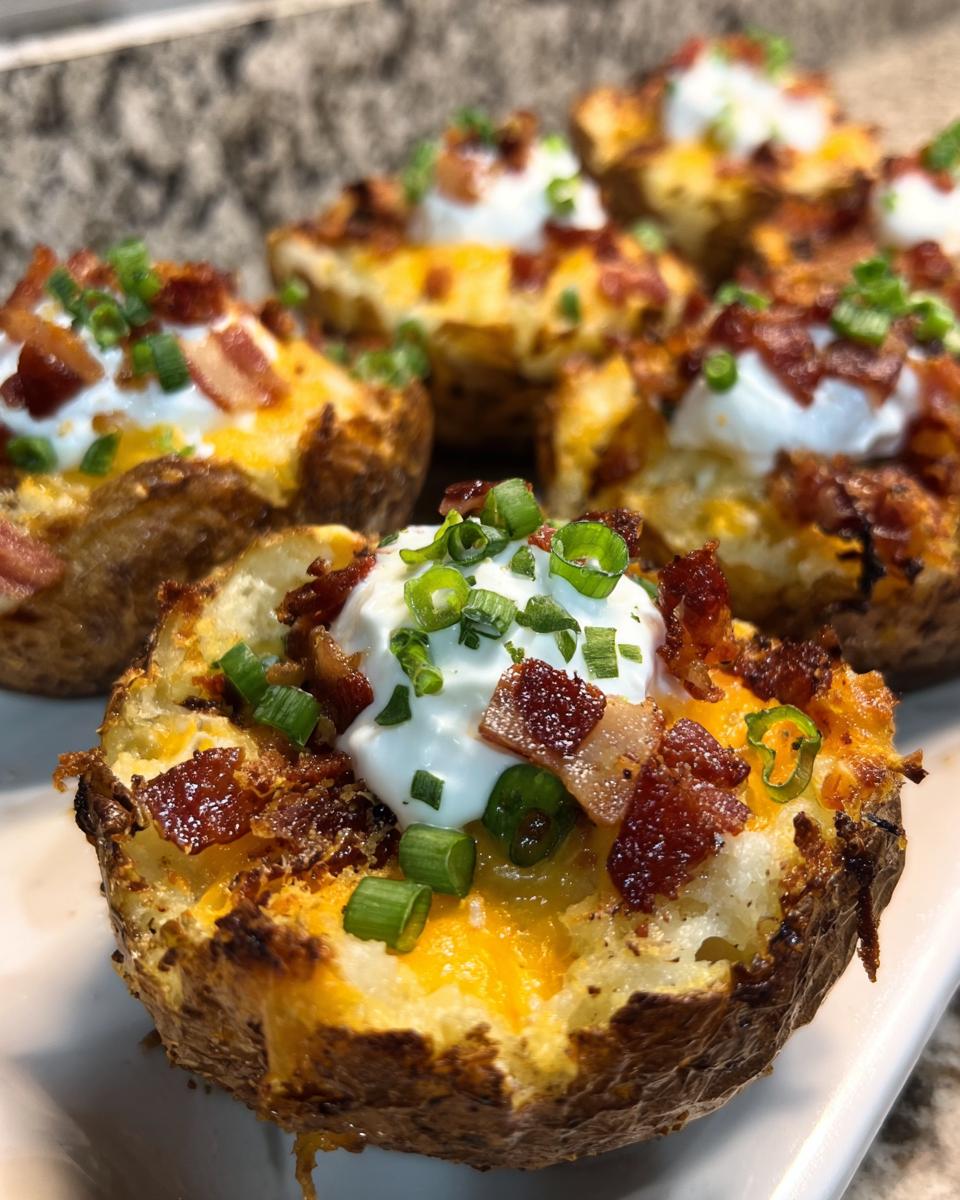
Now for the fun part—the glorious fillings that make these amazing Loaded Potato Skins! You’ll need sharp cheddar cheese; please don’t skimp here! Sharp cheddar gives you a much better flavor punch compared to mild cheese. We’re crumbling up six slices of crispy bacon—real bacon, please, no substitutes here! Then, of course, we need the cool, creamy contrast from the sour cream, and finally, some fresh green onions chopped up to give us that nice little bite of freshness at the end. These toppings pile up beautifully, making every bite perfect.

How to Make Crispy Potato Skins: Step-by-Step Baking Guide
Okay, let’s dive into the actual making of these amazing potato skins. The technique might sound fancy, but it’s just following a couple of key cooking stages that guarantee that satisfying crunch and that perfectly soft interior. Stick with me through these steps, and I promise you’ll be serving up the best party food around. If you want to see some other great oven-baked snacks, check out my recipe for oven baked potato skins, though this layered approach is the secret sauce!
Baking the Potatoes for Tender Centers
First things first: heat that oven up to 400 degrees Fahrenheit! You need to scrub those Russets until they are spotless and then, this is important, pierce them all over with a fork. Think of it like giving them little safety vents. Pop them right onto the oven rack—no pan needed yet—and bake them for about 50 to 60 minutes. They need to be completely firm on the outside and tender when you squeeze them. Once they come out, let them cool down enough so you don’t burn your fingers, okay? Safety first!
Preparing the Shells for Maximum Crunch in Your Potato Skins Recipe
Once they’re cool enough to handle, slice them right down the middle lengthwise. Now you have to be gentle here! Scoop out almost all the fluffy potato, but leave yourself a good, sturdy 1/4-inch thick shell—that’s the structure of your perfect Potato Skins Recipe. Place those empty shells skin-side up on a baking sheet. Now, brush both the outside and the inside lightly with olive oil and sprinkle them with salt and pepper. Pop them back into an oven now set to a slightly lower 375 degrees F, and bake for 10 minutes. This pre-bake is non-negotiable for crispiness!
Assembling and Finishing the Cheesy Potato Skins
Time for the glory! Pull out your shells after that 10-minute crisping session. Fill each one generously with the sharp cheddar and the crumbled bacon we set aside. We’re baking these wonderful Cheesy Potato Skins one last time for about 8 to 10 minutes, or just until that cheese is perfectly melted, glossy, and starting to bubble happily around the edges. They should look ready for their close-up!
Tips for the Ultimate Crunchy Potato Shells
Look, I know you want these potato skins to be sturdy—no one likes a floppy appetizer! If you follow the recipe, you’ll be miles ahead, but I want to give you my best secrets for turning those baked shells into true pub-style crunchers. These are the little tweaks that elevate them from good to absolutely flawless. If you love crispy edges, you must also check out my roasted potato recipe for amazing garlic herb roasted potatoes!
Expert Secrets for Crispy Potato Skins
Remember when I mentioned lightly brushing the inside of the shells with olive oil before the second bake? Do that again! Yes, it sounds like oily overkill, but this extra layer ensures that the starches on the inside bake up hard, creating those truly Crunchy Potato Shells. My other big tip for an expert crispy outcome is making sure the potatoes are totally dry before they go into the oven for that very first bake. Moisture is the enemy of crisp!
Making Potato Skins Ahead for Party Food Ideas
If you’re hosting a big blowout or getting ready for game day, you know timing is everything. You can’t be stuck fiddling with every single batch of potato skins right when guests are walking through the door! The good news is this recipe is fantastic for preparing in advance. You can definitely get ahead on the heavy lifting before your party starts because we have a perfect stopping point.
Follow the recipe right up until Step 6. That means you’ve baked the shells, you’ve brushed them with oil, and you’ve given them that initial 10-minute crisping bake. Then, you fill them up with the cheddar cheese and the crumbled bacon. This is where you stop! Cover that entire baking sheet tightly with plastic wrap—make sure it’s sealed well—and pop it into the refrigerator for up to a full day. This makes them excellent for Party Food Ideas!
When your guests start arriving, all you have to do is uncover them and slide them into the oven for that final 8 to 10 minutes until everything is melted and bubbly. It’s fast, fresh, and tastes homemade, even though you made them hours earlier. If you’re looking for another great make-ahead appetizer for your spread, my recipe for pigs in a blanket is always a huge hit!
Serving Suggestions for Bacon Cheddar Potato Skins
While the beauty of our recipe lies in its classic combination of sharp cheddar and smoky bacon, I know how much you love customizing things! Once these warm Bacon Cheddar Potato Skins come out of the oven, that’s your stage for creativity. They are absolutely perfect as is, but sometimes you need that extra little something to make them truly yours, especially if you have picky eaters or folks who love bold flavors.
Don’t forget those cool toppings, like the sour cream we used! If sour cream isn’t your jam, try using full-fat Greek yogurt; it gives you that same tangy cooling effect but with a little less richness. For guests who love dipping, having small bowls of creamy ranch or even a zesty blue cheese dressing on the side is a huge win. You can find my go-to recipe for amazing deviled eggs if you need another cold dip option for the table!
Let’s talk cheese variations, too. If you want a little extra nutty sharpness, try swapping half of your cheddar for Gruyère or Colby Jack. Monterey Jack melts beautifully and keeps things extra gooey. And for the green garnish? While I love the little punch of fresh green onions, sometimes I’ll use finely snipped fresh chives instead. Chives have a milder, more delicate onion flavor that is just lovely against the salty bacon.
Storing and Reheating Homemade Potato Skins
Leftovers? What are those? Just kidding! Even the best party food sometimes has a few stray skins left over. Thankfully, these Homemade Potato Skins store relatively well, provided you store them correctly so they don’t turn damp and sad overnight. I’ve had to hide a few myself to save them for lunch the next day, so I know the drill!
First, the storage part. Wait until the skins have cooled down completely after that final bake—putting warm food directly into the fridge creates condensation, and condensation equals sogginess. Once they are totally cool, place them in an airtight container. You could also use a sturdy zip-top bag if you don’t have extra fridge space. They are perfectly good stored like this for maybe two or three days, tops.
Now for reheating—this is key! You absolutely have to avoid the microwave if you want to keep that awesome crispiness we worked so hard to achieve. If you zap them in the microwave, the steam trapped inside will turn the shells soft instantly. Trust me, that is heartbreaking.
Instead, preheat your oven, or even a toaster oven if you only have one or two skins, to about 350 degrees Fahrenheit. Pop those leftovers directly onto a baking sheet. Heat them for about 8 to 12 minutes. This gentle, dry heat pulls the moisture right back out of the shells, making them wonderfully crunchy again! You might even want to throw them under the broiler for about 60 seconds at the very end for an extra burst of color, but watch them closely so the cheese doesn’t burn. It’s like magic how they crisp right back up! If you need more make-ahead amazingness, check out these stuffed mushrooms recipe ideas.
Frequently Asked Questions About Oven Baked Potato Skins
I get so many wonderful questions as you all start making these, and I’m happy to help troubleshoot! It’s all about taking these simple potatoes and turning them into show-stopping Easily Game Day Snacks. If you have a question about technique or toppings, chances are someone else is wondering the same thing. Below are some of the most common things I hear after folks tackle this recipe! Don’t forget to check out my main collection of appetizers and snacks for even more party inspiration.
Can I use an air fryer for crispy potato skins?
Oh, I love my air fryer, and yes, you absolutely can use it for these! If you want to get that ultra-crispy texture faster, transferring the shells into the air fryer for that second pre-bake (after oiling them up) is a brilliant move. Set your air fryer to about 390 degrees F. You’ll only need about 6 to 8 minutes to get them nice and crisp before you load them up with cheese and bacon. It cooks faster than the oven, which is great when you are rushing to get those Pub Style Potato Skins out before kickoff!
What is the best way to scoop the potato filling?
This seems simple, but it makes such a difference in keeping your final product looking beautiful! Once the potato is cool enough, use a small spoon—a regular teaspoon works best for me—and gently work your way around the inside perimeter of the potato half. The key is to move slowly and scrape the cooked potato down toward the center. If you try to dig deep fast, you will definitely tear a hole in the bottom, and then you’ll just have a bowl of messy, cheesy potato instead of a structured skin! Remember, we want a nice, sturdy border so those toppings stay put.
Can I skip the bacon in this potato skins recipe?
Of course, you can! My recipe is naturally great for flexibility. If you need a vegetarian option for your gathering, you can skip the bacon entirely. To keep that smoky, salty flavor profile, try substituting the bacon with finely diced, roasted mushrooms tossed in a tiny bit of smoked paprika and salt. They offer a lovely, earthy chewiness that stands up well to the sharp cheddar. They make great Loaded Potato Skins without the meat!
How much potato needs to be left in the shell?
I recommend aiming for about 1/4-inch thickness, as noted in the main instructions. This is thick enough to support a hearty mound of cheese and bacon, but thin enough to crisp up nicely in the oven. If you leave it too thick—say, 1/2 inch—the inside won’t dry out properly during the second bake, and you risk a soggy bottom. We want structure so these are easy to handle as appetizers!
Nutritional Snapshot of These Loaded Potato Skins
I know some of you are counting calories, and others just want to know what they are packing into their day when they grab one of these amazing appetizers. Since these are loaded up with cheese and bacon, they certainly lean toward comfort food territory, but knowing the numbers is always smart! Remember, this is just an estimate based on the ingredients listed, so things like how fatty your bacon is can change these figures a little bit. These numbers reflect a serving size of two of our glorious Loaded Potato Skins.
- Serving Size: 2 skins
- Calories: 310
- Fat: 19g (with 10g being Saturated Fat)
- Carbohydrates: 25g
- Protein: 12g
- Sugar: 2g
- Sodium: 350mg
See? Not too bad for something that tastes like it came straight from a stadium pub! We keep the sugar really low because we aren’t using any sugary sauces, and while the sodium is a bit higher (hello, bacon and cheese!), it’s totally manageable for a party snack. Enjoy them guilt-free!
Share Your Perfect Potato Skins Experience
Now that you have mastered the art of crispy, cheesy perfection, I would absolutely love to see what you made! Seriously, nothing makes me happier than hearing that my recipes helped banish some kitchen stress and brought joy to your gathering. If you made these incredible potato skins for game day or just for a cozy night in, please head down to the comments below and leave a rating for the recipe!
If you have Instagram or Facebook, snap a quick picture of your gorgeous, loaded shells and tag me! I love seeing your beautiful results and hearing about which toppings you chose. Did you go classic bacon and cheddar, or did you try something totally new? Let me know which combination made your batch the ultimate crowd-pleaser!
If you want to read a little more about my philosophy on cooking and why I believe every home cook can feel like royalty in their kitchen, you can always check out my About Page. Happy cooking, and I can’t wait to see your creations!
PrintThe Ultimate Crispy Loaded Potato Skins: Perfect Game Day Appetizer

Make restaurant-style crispy loaded potato skins at home. These oven-baked potato shells are filled with melted cheddar cheese and bacon, creating the best game day snack or party food.
- Prep Time: 20 min
- Cook Time: 70 min
- Total Time: 90 min
- Yield: 8 servings 1x
- Category: Appetizer
- Method: Baking
- Cuisine: American
- Diet: Vegetarian
Ingredients
- 4 large Russet potatoes
- 2 tablespoons olive oil
- 1/2 teaspoon salt
- 1/4 teaspoon black pepper
- 1 cup shredded sharp cheddar cheese
- 6 slices bacon, cooked and crumbled
- 1/2 cup sour cream
- 2 tablespoons chopped fresh green onions
Instructions
- Preheat your oven to 400 degrees Fahrenheit. Scrub the potatoes clean and pierce each one several times with a fork.
- Bake the potatoes directly on the oven rack for 50 to 60 minutes, or until the skins are firm and the insides are tender.
- Remove the potatoes from the oven and let them cool until you can handle them safely. Reduce the oven temperature to 375 degrees Fahrenheit.
- Slice each potato in half lengthwise. Carefully scoop out most of the inside potato flesh, leaving about a 1/4-inch thick shell. Place the shells skin-side up on a baking sheet.
- Brush the outside and inside of each potato shell lightly with olive oil. Sprinkle with salt and pepper.
- Bake the shells for 10 minutes to help them crisp up.
- Remove the shells from the oven. Fill each shell generously with shredded cheddar cheese and crumbled bacon.
- Return the baking sheet to the oven and bake for another 8 to 10 minutes, or until the cheese is fully melted and bubbly.
- Remove from the oven. Top each potato skin with a dollop of sour cream and a sprinkle of fresh green onions before serving immediately.
Notes
- For extra crispy potato skins, you can lightly brush the inside of the scooped-out shells with a little extra olive oil before the second baking step.
- Prepare the bacon and shred the cheese ahead of time to make assembly quick for parties.
- You can make these ahead by completing step 6 (filling with cheese and bacon) and storing them covered in the refrigerator for up to one day. Bake as directed before serving.
Nutrition
- Serving Size: 2 skins
- Calories: 310
- Sugar: 2
- Sodium: 350
- Fat: 19
- Saturated Fat: 10
- Unsaturated Fat: 9
- Trans Fat: 0.5
- Carbohydrates: 25
- Fiber: 3
- Protein: 12
- Cholesterol: 45