

Have you ever bitten into that perfect, pillowy, slightly charred piece of naan at your favorite Indian restaurant and sighed, knowing yours at home never quite measure up? I’ve been there! It feels like you need that giant, fiery tandoor oven just to get that soft, chewy texture we all crave. Well, stop sighing, because I’m Kate Connolly, and I am here to tell you a secret: you absolutely do *not* need a tandoor!
This recipe for homemade naan bread is the game-changer. We are going to nail that restaurant-style result using just your everyday stovetop skillet. I promise, this method delivers bread that is incredibly soft, perfectly fluffy, and chewy every single time—no guessing games involved. Honestly, serving this alongside a big bowl of my chickpea curry is my favorite weeknight victory. You can trust this recipe; it’s extensively tested to bring that magic right into your kitchen. If you want to see the magic happen, check out how other bakers have loved this technique over at Flavor Nibble!
- Why This Homemade Naan Bread Recipe Guarantees Softness (EEAT Focus)
- Simple Ingredients for Perfect Homemade Naan Bread at Home
- How to Make Naan Dough: Step-by-Step Mixing and Kneading
- Skillet Naan Bread Tutorial: Cooking Your Homemade Naan Bread
- Finishing Your Buttery Naan Recipe
- Variations: Making Homemade Garlic Naan Bread
- Storage and Reheating Instructions for Homemade Naan Bread
- Frequently Asked Questions About Homemade Naan Bread
- Pairing Your Homemade Naan Bread with Meals
Why This Homemade Naan Bread Recipe Guarantees Softness (EEAT Focus)
I get asked all the time: What makes this homemade naan bread different from the dense rounds I sometimes end up with? It all comes down to honoring the dough, friends. We need that pillowy, chewy texture, and that doesn’t happen by accident; it happens through technique. My testing confirmed that using full-fat yogurt isn’t just for flavor—it adds acidity that tenderizes the gluten structure as it rests. Trust me on this one; don’t try to swap it for skim milk, or you lose that incredible tenderness.
Also, we talk a lot about kneading. You have to work that dough! Kneading builds the strength needed so the naan can hold onto the gases during cooking, but you can’t skip the rest time either. That 1.5 hours of rising isn’t just waiting; it’s when the yeast does its slow, crucial work to make sure every piece puffs beautifully. It leads to that superior, restaurant-quality result that readers like those over at Lilluna are raving about.
The Secret to Puffy Naan Bread Method: Yogurt and Yeast
This pairing is pure science meeting flavor! The yeast gets hungry and starts producing carbon dioxide gas, which gives the dough its lift. But the yogurt is the unsung hero; its acidity slightly breaks down the tough gluten strands we develop while kneading. This means the gas bubbles trapped by the yeast can expand way easier, resulting in that incredible airy puff and stretchiness you see in real tandoor bread.
Simple Ingredients for Perfect Homemade Naan Bread at Home
One of the best parts about making homemade naan bread at home is that you probably have 90% of these things sitting in your pantry right now! We aren’t hunting for anything fancy here; just good, clean staples will get you there. The ingredient list is short and sweet, which is perfect for a quick weeknight bake if you get the Rising time factored in. When you look at the list, remember where the real magic happens.
Right now, here is exactly what you need:
- 1 teaspoon active dry yeast — make sure this is fresh!
- 1 teaspoon sugar — just a little snack for the yeast.
- 1/2 cup warm water (about 105-115°F) — temperature is key here, too warm and you kill the yeast!
- 2 1/2 cups all-purpose flour, plus more for dusting
- 1 teaspoon salt
- 1/2 cup plain yogurt, full fat recommended — this is non-negotiable for the chew!
- 2 tablespoons milk
- 2 tablespoons vegetable oil, plus more for brushing
- 2 tablespoons melted butter, for brushing — get ready for that wonderful buttery finish!
Ingredient Substitutions and Notes
Okay, let’s talk swaps, because life happens! If you only have Greek yogurt, you can totally use it, but go ahead and thin it out with a tablespoon or two of milk or water until it has that nice pourable consistency, similar to a full-fat regular yogurt. If you find your dough is still too sticky during kneading, don’t panic and dump in a ton of flour. Add it just one tablespoon at a time until it feels right. Remember what I always say: for chewy results, you want a soft dough, not a stiff one.
How to Make Naan Dough: Step-by-Step Mixing and Kneading
Now we get down to the real action—making the dough! If you want that restaurant-quality texture, you have to treat the dough with respect. We start with activating our yeast, which is Step 1 in the instructions. See, you mix that tiny bit of yeast and sugar right into the warm water and wait patiently. If it gets foamy after about five minutes, you’re golden! That fluff on top tells you the yeast is alive and ready to work its airy magic on our homemade naan bread.
Next up, it’s time to bring everything together. In your big bowl, skip the mixer for now; I want you to use your hands or a sturdy spoon to combine the flour, salt, yogurt, milk, oil, and that active yeast mixture. Don’t worry about it looking pretty yet—it’ll be a shaggy mess! The most important part after mixing is the kneading. You need to turn that mess out onto a lightly floured surface and knead for a good five to seven minutes. Keep working it until it stops fighting you and turns smooth and elastic. While you’re at it, take a look at my tips for focaccia bread recipe; the dough handling principles are similar!
The Crucial First Rise for Fluffy Indian Flatbread
This resting period is non-negotiable if you want truly fluffy Indian flatbread. Once you dust your bowl with oil and tuck your beautiful dough ball inside, cover it up tight. You absolutely must let it sit somewhere warm—like near the stove or in an oven that’s turned off. We are waiting (be patient!) for it to double in size, which usually takes about an hour and a half. When it looks deeply puffed up, you know the yeast has done its job getting those air pockets ready for the hot skillet. For more great bread tips, always check out what the folks at Dina’s Plates are suggesting!
Skillet Naan Bread Tutorial: Cooking Your Homemade Naan Bread
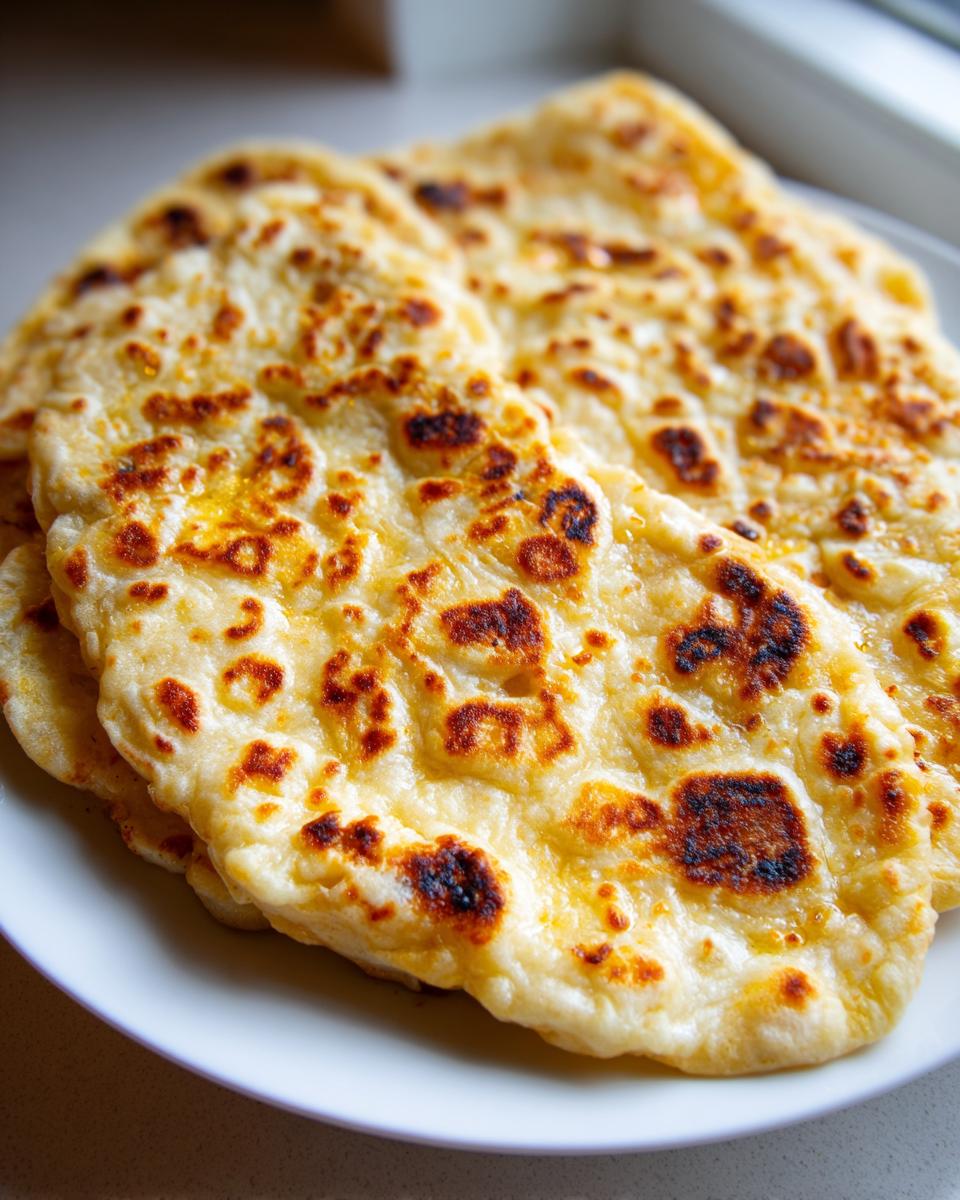
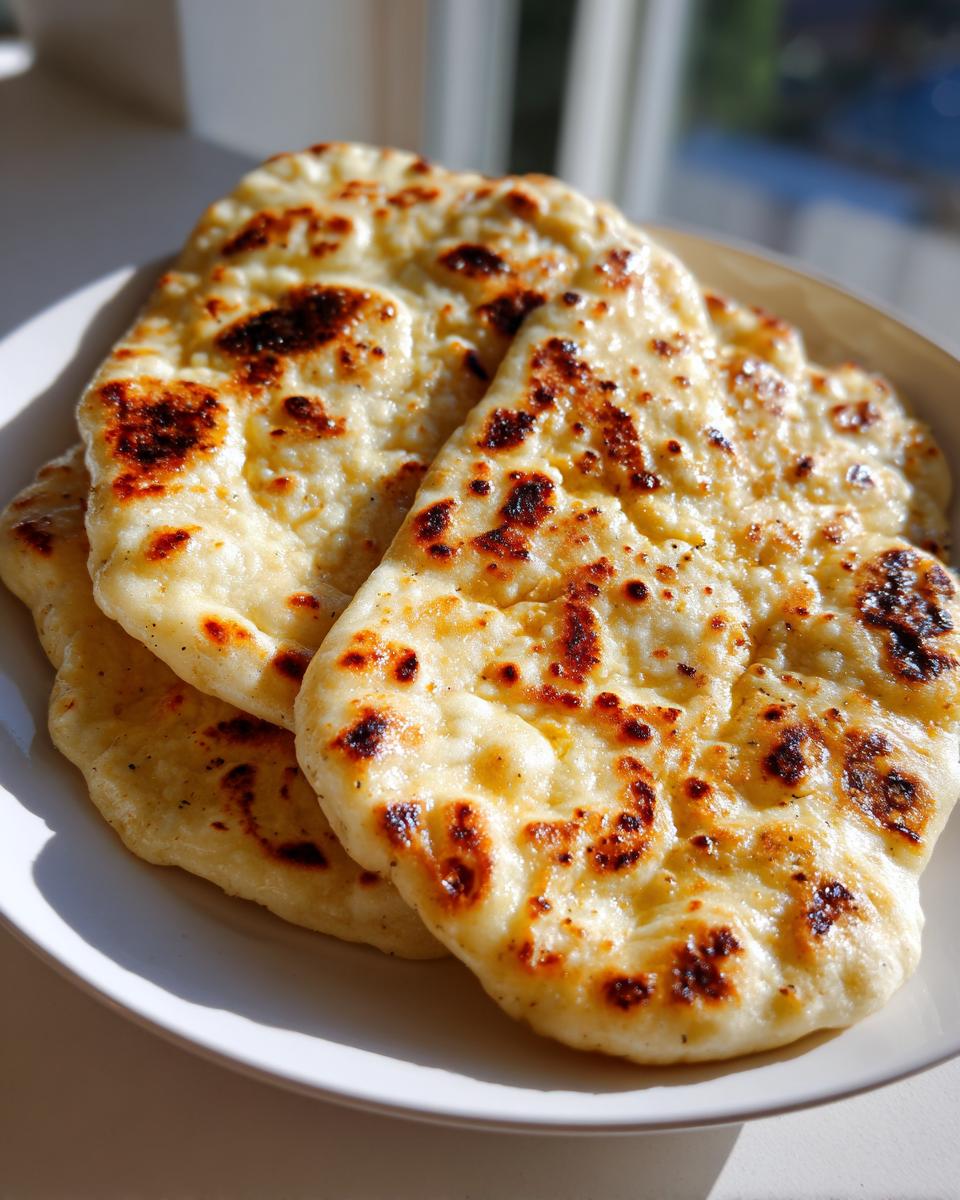
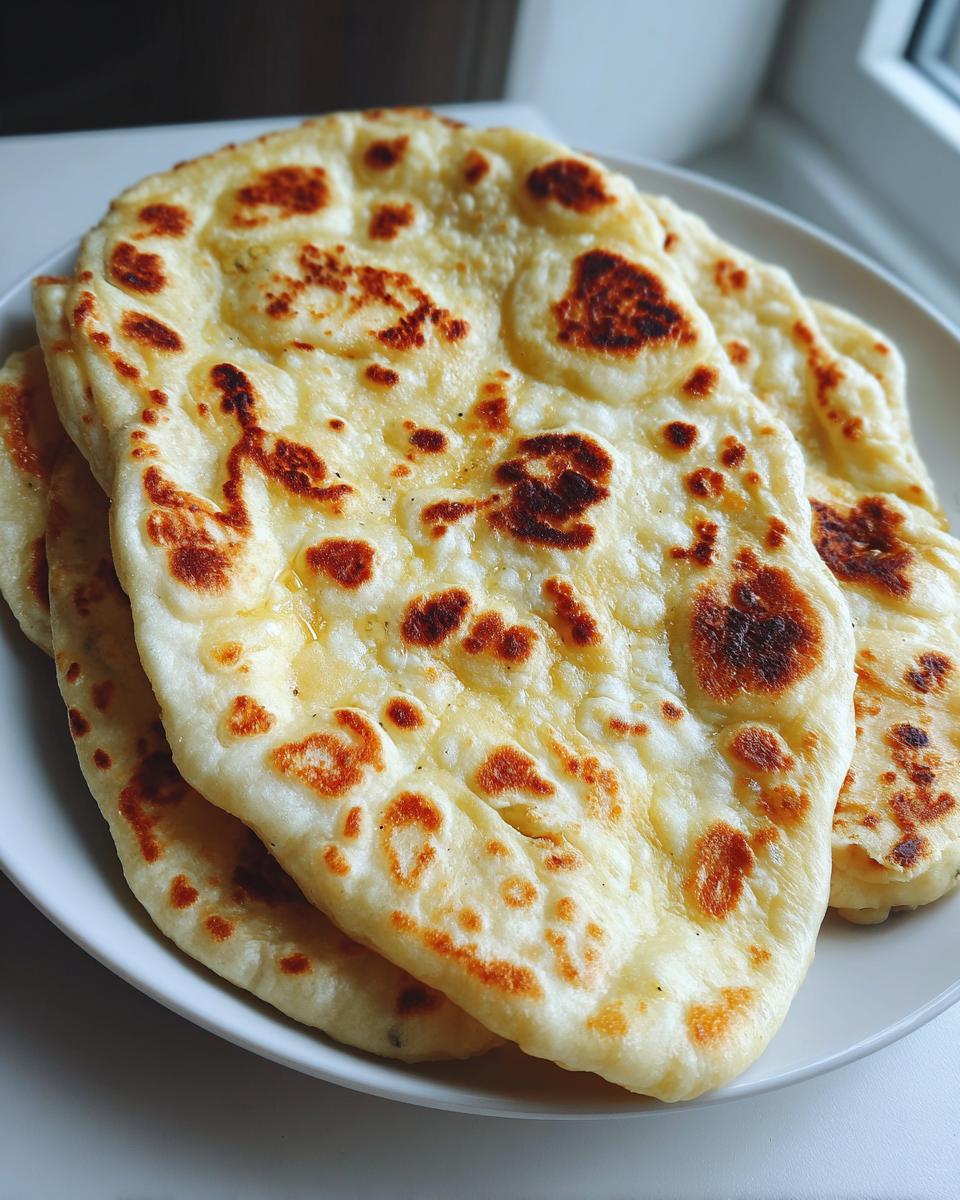
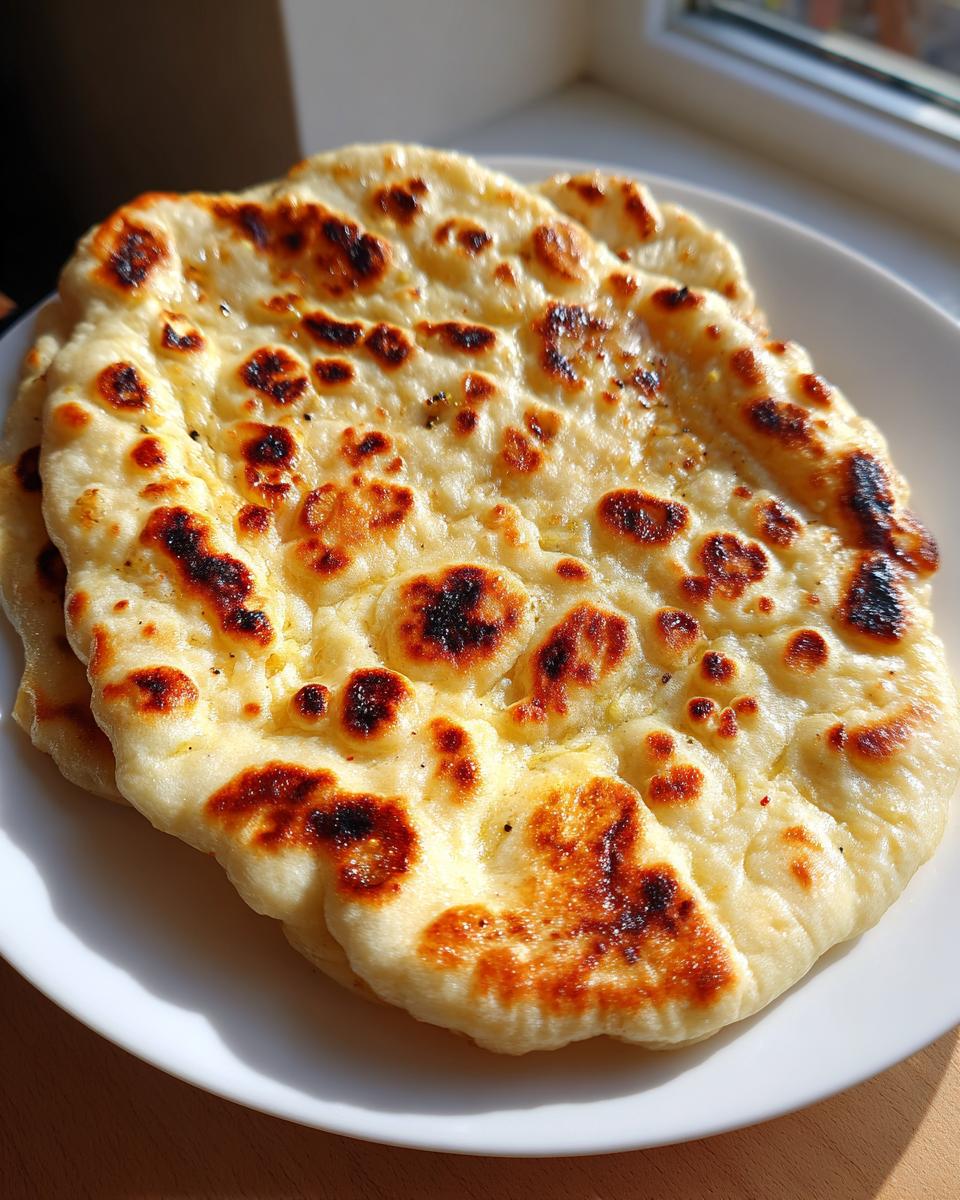
Okay, this is the part where all that patience pays off! Remember, we are trying for restaurant style naan at home here, and that means heat—serious heat! You need to take your cast-iron skillet—or the heaviest pan you have—and get it ripping hot over medium-high heat. Don’t put any oil or butter in the pan yet! We want that surface screaming hot so when the dough hits it, it sizzles instantly, creating those beautiful bubbles and that signature chewy texture.
Once the pan is hot, you take one of those rested dough balls and roll it out right away. Aim for about 1/8 of an inch thick, maybe a little teardrop shape if you’re feeling fancy. Lay that flat bit of dough gently onto the dry, hot skillet. Watch it! Within a minute or two, you’ll see big bubbles pop up all over the surface. That’s the good stuff! Flip it over and cook the other side until it has those lovely golden spots. This is where the comparison to my wonderful dinner rolls recipe ends; bread should puff, not just brown!
If that direct pan contact isn’t giving you enough char, don’t be shy—I have the trick! Be sure to check out the amazing technique detailed over at Viral Cooking for handling this step.
Achieving Restaurant Style Naan at Home: The Charring Trick
This is the secret weapon for that slightly smoky, perfectly blistered look. Once you flip the naan and the second side is cooking, if you have a gas stove, turn one of the burners down low. Using a sturdy pair of kitchen tongs, carefully lift the naan right off the skillet and hold it briefly over the open flame. Just a few seconds on each side, turning constantly, and *poof*! It will puff up dramatically and get those beautiful dark patches. If you don’t have gas, just maximize the pan contact on the hottest part of your skillet to encourage maximum charring.
Finishing Your Buttery Naan Recipe
Once that naan is off the hot pan—and trust me, you need to move fast—we immediately smother it with flavor! This step transforms it into the incredible buttery naan recipe you deserve. Take that melted butter and brush it generously over the top surface while it’s piping hot. The butter melts right in, adding richness and keeping that beautiful chew alive. As you finish each piece, don’t just stack them; wrap all the cooked naan snugly in a clean tea towel and place them in a basket. This traps the steam, keeping them perfectly soft until you bring the whole warm batch to the table!
Variations: Making Homemade Garlic Naan Bread
I swear, once you master the soft base recipe, you’ll immediately want to try variations, and let’s be honest, homemade garlic naan bread is non-negotiable for most of us, right? It takes maybe two extra minutes, but the payoff is huge. This is where we take that lovely warm naan right off the skillet and brush it with something truly spectacular.
Remember that melted butter we use for finishing? You’re going to mix in two cloves of finely minced fresh garlic and about a tablespoon of chopped cilantro right into that butter *before* you start brushing. The heat from the bread melts the garlic just right, releasing all those fragrant oils. The folks over at Cooking Lola know exactly how amazing this flavor combination is!
Seriously, this addition turns your simple flatbread into the perfect, savory hug for any curry or dip you’re serving. If you love garlic flavor profiles, you absolutely have to check out my easy garlic bread recipe too—it uses the same logic of coating something warm in rich garlic goodness!
Storage and Reheating Instructions for Homemade Naan Bread
Listen, you probably won’t have leftovers because this homemade naan bread is addictive, but if you do, we must treat it right! Store any extra naan bread in a truly airtight container at room temperature for up to two days. Don’t put them in the fridge; they get tough! Forget the microwave for reheating—it makes them gummy.
The best way to bring them back to life is on a dry skillet over medium heat for about 30 seconds per side, or warm them quickly in a 300°F oven wrapped loosely in foil. If you’re planning ahead, you already know my rule for keeping baked goods soft, check out my tips for storing zucchini bread; the same principle applies here for texture!
Frequently Asked Questions About Homemade Naan Bread
I know when you’re dealing with dough, questions pop up fast! I put together a few of the things I get asked most often. Don’t stress if your vision of fluffy Indian flatbread isn’t immediate; we’ll troubleshoot!
How thick should the naan be rolled?
For that perfect combination of chewiness and puff, you shouldn’t roll it too thin! Aim for about 1/8 of an inch. If you roll it thinner than that, you won’t give the yeast enough dough structure to trap the steam and create those huge bubbles. If you roll it much thicker than that, it might turn into an end result closer to bread dough than a light flatbread, though that’s still tasty!
How long does the dough take to rise?
This is where patience comes in for that chewy naan no tandoor method. You need the dough to double in size, which usually takes about 1 to 1.5 hours in a comfortably warm spot in your kitchen. If your kitchen is cold, it might take longer, so don’t rush it! If you’re desperate for quick naan, you can try my weeknight dinner recipes that skip the rising time, but for this recipe, that rise is the secret weapon!
Can I make this Homemade Naan Bread Recipe without yeast?
You can, but the results will change significantly. If you skip the yeast, you’re usually heading toward a baking powder/soda recipe, which means you’ll get a quick flatbread texture, often called a ‘no yeast naan bread option.’ It won’t be as airy, stretchy, or fluffy as the version that uses that yeast to create real structure. I promise the 90 minutes of rise time is worth the incredible texture here!
Can I use the oven instead of a skillet for this Chewy Naan No Tandoor recipe?
Oh, you *can* put them in the oven, but honestly, you’re going to lose that perfect texture we worked so hard for. The skillet is superior because it transfers super direct, intense heat to the dough base immediately, which causes that instant puff and charring. Baking in the oven tends to dry the naan out before it puffs completely, often leading to a crisper edge rather than the soft, chewy result you want!
Pairing Your Homemade Naan Bread with Meals
Now that you have this incredible, soft, warm homemade naan bread straight from your skillet, what are you going to eat it with? My favorite thing, obviously, is scooping up every last bit of a rich, creamy curry. If you need a fantastic pairing, you absolutely have to try my chickpea coconut curry recipe; the naan soaks up that broth perfectly!
But don’t stop there! These aren’t just easy side dishes for curry, although they excel there. Use them instead of pizza dough for a quick appetizer, or serve them alongside big bowls of chili or stew for dipping. They are fantastic simply slathered with a little extra butter and garlic for a savory snack!
PrintEasy Homemade Soft & Fluffy Naan Bread (No Tandoor Needed)

You can achieve soft, chewy, restaurant-style naan bread right in your home kitchen using a simple skillet. This reliable recipe focuses on the dough technique needed for a fluffy texture and easy stovetop cooking.
- Prep Time: 20 min
- Cook Time: 15 min
- Total Time: 1 hour 45 min
- Yield: 8 servings 1x
- Category: Side Dish
- Method: Stovetop (Skillet)
- Cuisine: Indian
- Diet: Vegetarian
Ingredients
- 1 teaspoon active dry yeast
- 1 teaspoon sugar
- 1/2 cup warm water (about 105-115°F)
- 2 1/2 cups all-purpose flour, plus more for dusting
- 1 teaspoon salt
- 1/2 cup plain yogurt, full fat recommended
- 2 tablespoons milk
- 2 tablespoons vegetable oil, plus more for brushing
- 2 tablespoons melted butter, for brushing
Instructions
- Activate the yeast: In a small bowl, combine the warm water, sugar, and yeast. Let this mixture sit for 5 to 10 minutes until it becomes foamy. This shows the yeast is active.
- Mix the dough: In a large bowl, whisk together the flour and salt. Make a well in the center and pour in the yeast mixture, yogurt, and 2 tablespoons of oil. Mix with a wooden spoon or your hands until a shaggy dough forms.
- Knead the dough: Turn the dough out onto a lightly floured surface. Knead for 5 to 7 minutes until the dough is smooth and elastic. It should be soft but not overly sticky.
- First rise: Lightly oil a clean bowl. Place the dough in the bowl, turning to coat. Cover the bowl with plastic wrap or a clean kitchen towel. Let the dough rise in a warm place for 1 to 1.5 hours, or until it has doubled in size.
- Divide and rest: Gently punch down the risen dough. Divide it into 8 equal pieces. Roll each piece into a smooth ball. Cover the dough balls and let them rest for 15 minutes.
- Roll the naan: Heat a cast-iron skillet or heavy-bottomed pan over medium-high heat until it is very hot. Lightly flour your work surface. Take one dough ball and roll it out into an oval or teardrop shape, about 1/8 inch thick.
- Cook the naan: Place one rolled piece of dough onto the hot, dry skillet. Cook for about 1 to 2 minutes until large bubbles start to form on the surface and the underside has light brown spots.
- Flip and char: Flip the naan. Cook the second side for about 1 minute until it develops dark brown or slightly charred spots. For extra puffing, you can briefly place the naan directly over a low gas flame using tongs, turning constantly until it puffs up completely.
- Finish: Immediately brush the cooked naan generously with melted butter. Keep the cooked naan warm by wrapping it in a clean towel while you cook the remaining pieces.
Notes
- For Garlic Naan Bread: Mix 2 cloves of minced garlic and 1 tablespoon of chopped fresh cilantro into the melted butter before brushing the cooked naan.
- If your dough feels too sticky during kneading, add flour one tablespoon at a time. You want a soft dough, not a stiff one, for chewy results.
- The key to restaurant-style naan is a very hot cooking surface. Do not overcrowd the skillet.
Nutrition
- Serving Size: 1 piece
- Calories: 195
- Sugar: 1.5
- Sodium: 250
- Fat: 5
- Saturated Fat: 2.5
- Unsaturated Fat: 2.5
- Trans Fat: 0
- Carbohydrates: 32
- Fiber: 1
- Protein: 5
- Cholesterol: 5