
Have you ever stared at a picture of perfectly smooth, almost trembling Asian steamed egg custard and thought, “Nope. Too delicate. Too fussy. I’ll burn the house down trying”? Believe me, I get it! When I first started cooking, anything that required steaming felt like advanced science. But I discovered this simple approach that guarantees you that incredible, velvety texture. This is easily the most reliable and straightforward way to make authentic steamed egg custard. My whole goal here at Kings Cook is to turn that intimidation into pure joy, proving you can master this classic comfort food right at home.
- Why This Authentic Steamed Egg Recipe Delivers Velvety Steamed Eggs
- Gathering Ingredients for Perfect Steamed Egg Custard
- Step-by-Step: How to Make Smooth Steamed Egg
- Tips for Success: Achieving That Velvety Steamed Eggs Surface
- Variations: Making Your Steamed Egg Custard Your Own
- Egg Custard Troubleshooting Tips for Beginners
- Storage and Reheating Instructions for Leftover Steamed Egg Custard
- Frequently Asked Questions About Steamed Egg Custard
- Understanding the Nutrition in Your Steamed Egg Custard
Why This Authentic Steamed Egg Recipe Delivers Velvety Steamed Eggs
When you’re tired of eating eggs that look like they survived a bumpy car ride—all holes and crags—you need a recipe you can trust. This method is my secret weapon for achieving that dreamy, silken texture every single time. You’ll love how fast this comes together, making it perfect for a last-minute side dish or a quick, light lunch.
- That perfect 1:2 liquid-to-egg ratio means no guesswork!
- Straining guarantees a bubble-free, glossy surface.
- It’s done steaming in under 15 minutes—talk about fast comfort food!
- It provides the perfect neutral base for savory toppings.
I put similar attention into my scrambling technique; you can see how I make sure my eggs are tender over on my easy tender eggs guide, but for steaming, precision is everything.
Quick Facts: Prep Time, Yield, and Category
No need to hover over the pot for hours! This recipe is designed for busy weeknights, giving you maximum flavor payoff for minimal effort.
| Detail | Time/Amount |
| Prep Time | 10 minutes |
| Cook Time | 15 minutes |
| Yield | 2 servings |
| Cuisine | Chinese |
Gathering Ingredients for Perfect Steamed Egg Custard
Okay, this is where we secure the win for that beautiful, smooth result—it all comes down to the ratio. Seriously, if you get this balance wrong, you end up with soup or something closer to a baked quiche. We are aiming for that classic, delicate structure of a perfect texture egg custard, which means we need exact measures for our liquid base.
For two perfect servings, you need three large eggs, which is your foundation. Then, for the liquid side—and this is the key for the silken egg custard tutorial—we use a mix. You’ll need six tablespoons of warm water and six tablespoons of low-sodium chicken broth. See how we split the liquid? That adds complexity without overpowering the egg flavor.
We finish that base off with just a tiny bit of seasoning: one teaspoon of light soy sauce for that authentic color and flavor, half a teaspoon of rich sesame oil, and a tiny pinch of salt. Don’t skip the green onions for garnish later; they make the final presentation pop!
Ingredient Notes and Substitutions for Your Savory Custard Recipe
I always tell people, if you’re going to do one thing right, it’s prepping your liquids correctly. That water has to be warm, not cold, and definitely not boiling hot! Cold liquid shocks the egg proteins, which can lead to curdling or that awful uneven set. Warm water, though? It helps everything blend beautifully.
Now, about that broth—using chicken broth instead of using all water is my little trick for building flavor in this savory custard recipe. It deepens the taste so much! However, if you’re vegetarian, please don’t fret. You can absolutely substitute the chicken broth with low-sodium vegetable broth or even just water, but I highly recommend adding an extra dash of light soy sauce if you go the all-water route to keep that savory baseline.
Remember, this recipe is built on simplicity, which is why I focus on ingredients you can find easily. No fancy fish stocks needed here! We want reliability so you can feel confident making this traditional steamed recipes favorite anytime the craving hits you.
Step-by-Step: How to Make Smooth Steamed Egg
This process is incredibly straightforward, but timing and gentle handling are everything if you want that perfect, quiveringly smooth result. Think of this part less like cooking and more like careful assembly. First things first: get your steamer ready! Water needs to be in your pot, about an inch deep, and brought up to a gentle simmer over medium-high heat while you mix everything else.
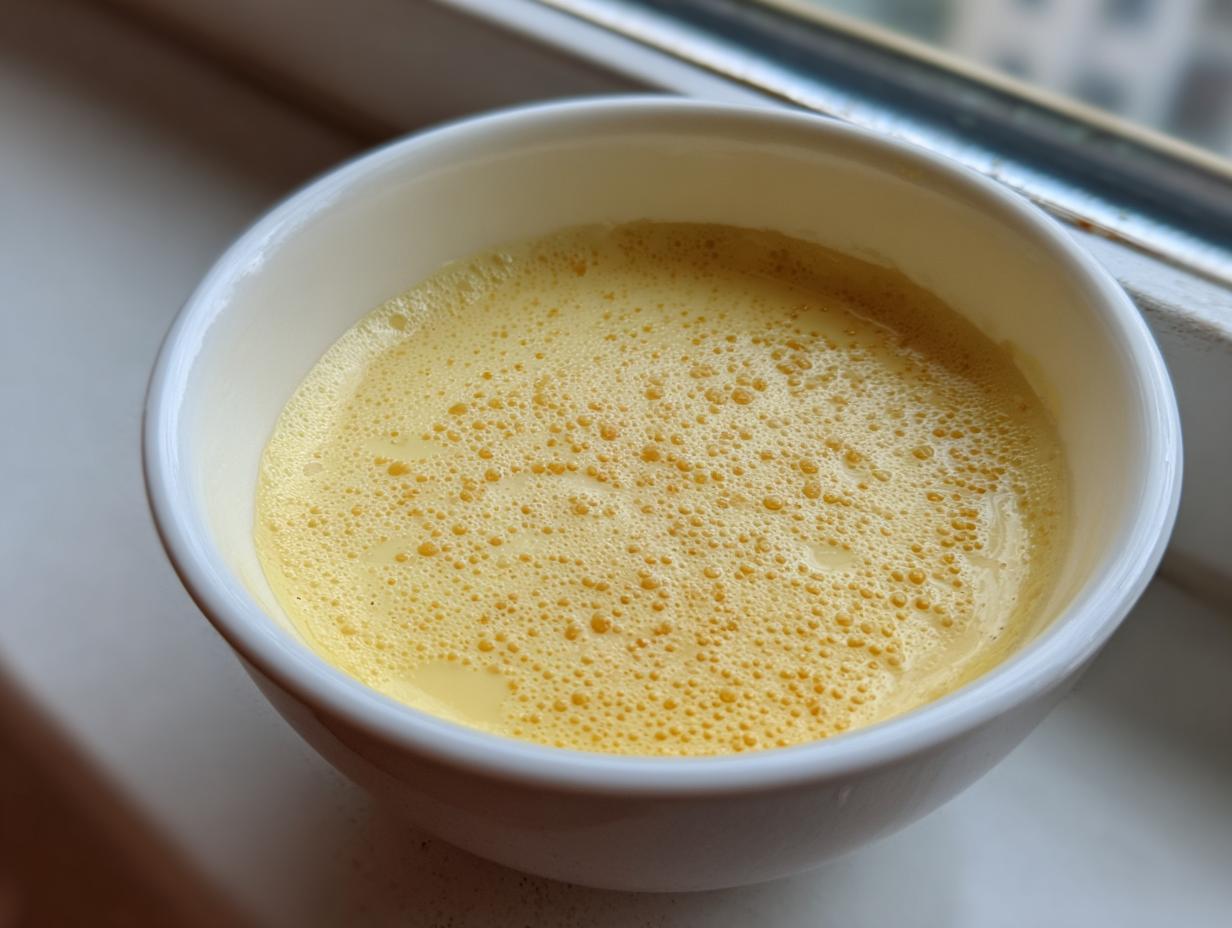
Next, deal with the eggs. In a medium bowl, whisk those three eggs really gently. I mean it—we aren’t making a fluffy omelette here! We want just enough movement to break up the yolks and whites, but the moment they look uniform, stop. We are trying to incorporate as little air as possible into this dish. If you need a refresher on gentle egg whisking, my guide on easy tender eggs covers similar principles!
Now, gently pour your pre-mixed warm liquid ingredients (remember that perfect 1:2 ratio we talked about?) into the eggs while stirring softly. If you pour too fast, you create tiny pockets of air that turn into holes later. Take your time here; this gentle combining is what sets up the proper foundation for your Chinese steamed egg custard. I know I sound like a broken record, but being gentle is vital for this dish.
The Crucial Technique: Straining and Covering Your Steamed Egg Custard
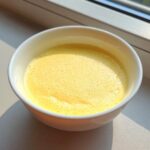
This next part, dealing with the mixture before it hits the steam, is what separates the good custards from the *great* ones for this silken egg custard tutorial. Before the liquid goes anywhere near the steamer, you absolutely must pour the whole mixture through a fine-mesh sieve into your final heatproof bowl. Why? We are removing any tiny, unmixed bits of egg white or lingering bubbles. This straining is the key to that flawless finish.
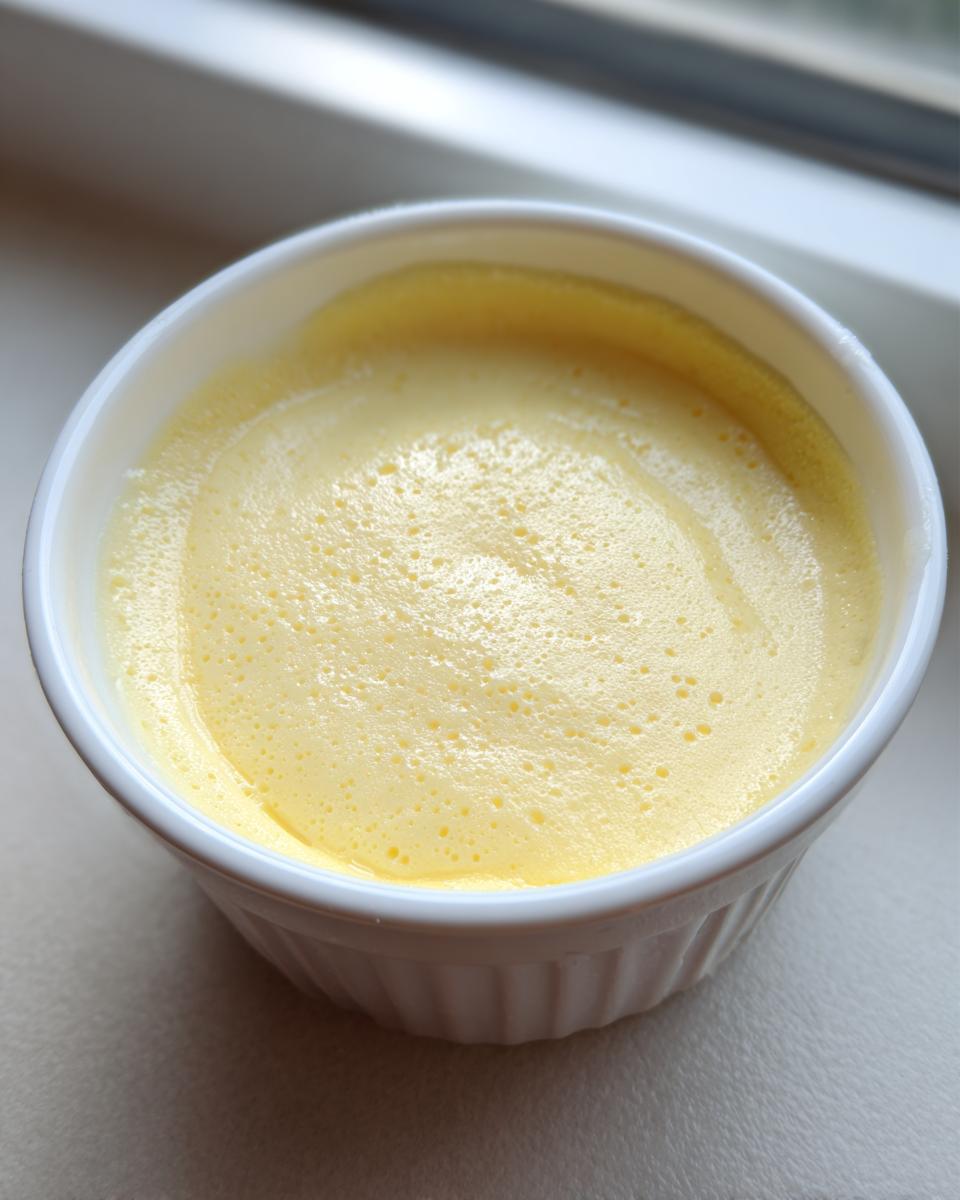
Once strained, cover that bowl tightly! Please use aluminum foil or an inverted plate. This step is crucial because if you skip covering it, condensation will drip right onto your beautiful custard surface—and that drip will create an ugly bump or hole. We want this dish to look pristine!
Once your water is softly simmering—remember, Step 1 said medium-high heat initially, but now we reduce it—carefully place that covered bowl into the steamer. Now, turn the heat way down to low. Keeping the heat very low is what allows the proteins to set slowly and evenly. Let it work its magic for about 12 to 15 minutes. That gentle heat guarantees the best texture!
Tips for Success: Achieving That Velvety Steamed Eggs Surface
You’ve strained the mix, you’ve covered the bowl—fantastic! Now we move into the final stage where finesse really matters if you want that truly velvety steamed eggs look instead of something riddled with craters. The enemy of smooth custard is aggressive heat. I cannot stress this enough: once the mixture is in the steamer, you must keep the temperature low and steady.
If the heat coming from your stovetop is too high, the water boils too violently, creating huge pockets of steam pressure underneath your bowl. This pressure forces its way through the delicate egg proteins, resulting in those annoying holes all over the top. Think of it like trying to coax something tender into shape rather than forcing it. Keep the heat on the lowest setting that maintains a gentle, consistent simmer.
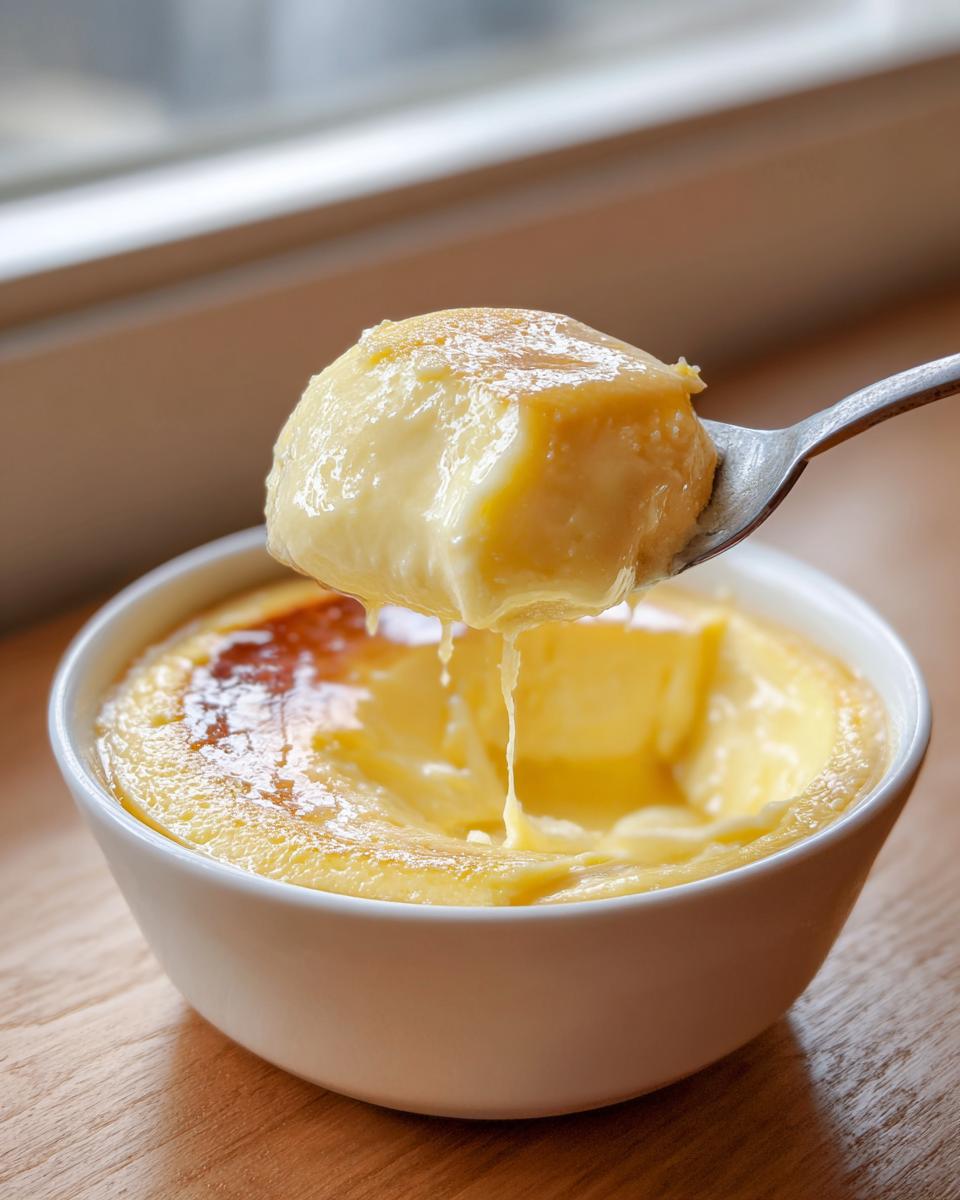
Another small thing I learned years ago—and this helps with the overall texture, not just the surface—is to let the custard rest briefly *after* you take it out of the steamer. Remove the bowl, keep it covered, and let it sit on the counter for maybe five minutes. This gentle carryover cooking is perfect. It firms up the center just enough so it doesn’t collapse when you go to serve it, but it won’t overcook.
If you’re looking for other amazing, low-effort entrées that require a little patience, check out how I nail those delicate easy crab cakes. Good technique multiplies across many recipes, I promise!
Variations: Making Your Steamed Egg Custard Your Own
While this recipe delivers an amazing foundational Chinese steamed egg custard just as it is, I love seeing how you all start customizing it! Since the base is so mild and clean-tasting, it’s the perfect blank canvas for creativity. I always encourage my readers to experiment safely; we want flavor additions, not structural disasters!
Most of my favorite variations involve savory add-ins nestled right into the liquid mixture before straining. If you have some minced ground pork or even ground chicken leftover from dinner prep, just stir a tablespoon or two in. It cooks perfectly right inside the custard, adding a wonderful richness.
If you prefer vegetables, finely diced mushrooms (shiitake work great!) or the green parts of scallions can be added. Just be careful not to overload the mixture; too many solids can interfere with that smooth setting process. If you want a tiny spice kick without adding meat, a whisper of white pepper in the liquid mixture works wonders—it enhances the savory notes beautifully.
Serving Suggestions for this Asian Comfort Food Recipe
Because this savory custard is soft and delicate, it really shines when paired with something that offers a contrasting texture. Think of it as the soothing partner to something crunchy or something flavorful!
The absolute classic way to eat this is spooned over plain white rice alongside a simple stir-fry. It adds moisture and protein to the meal without weighing you down. For instance, I often serve mine next to my quick tofu and broccoli stir-fry. The textures contrast so nicely!
And of course, don’t forget the finishing touch! After you remove the foil and see that gorgeous, smooth texture, drizzle it generously with a little extra soy sauce and sesame oil if you didn’t put enough in initially. That simple finish is what pulls the entire flavor profile together for the best bowl of Steamed Egg with Soy Sauce magic!
Egg Custard Troubleshooting Tips for Beginners
Listen, even Kate Connolly ruins things sometimes! Cooking is about learning, and when you’re mastering a delicate technique like steaming, a few bumps in the road are normal. The great news is that almost every common problem people have with their steamed egg custard has a simple fix rooted right back in our ratio or temperature control. Don’t get discouraged if your first attempt doesn’t look like a porcelain dish!
Let’s tackle the most common fears first. Have you ever pulled the bowl out and noticed the surface looks like Swiss cheese, full of holes? That’s entirely because the heat was too high! Remember when I stressed keeping the steamer on low? High heat causes vigorous boiling, which punches holes into your delicate custard as it sets. Next time, turn that heat down until it’s barely simmering. It takes longer, but that low, slow steam creates perfection. If you’re looking for something more forgiving that bakes up reliably, maybe try my chicken fried steak recipe for dinner tonight!
What if your custard turned out watery or curdled? This usually comes down to two things. First, that ratio we discussed: if you used too much liquid (water or broth) compared to the eggs, the egg proteins just can’t hold the structure and it remains thin. Always stick strictly to the 1:2 liquid-to-egg volume. Second, if it looks grainy or curdled, you might have used ice-cold liquid, which shocks the eggs, or you might have aggressively whisked the mixture introducing way too much air initially. Mixing softly and using WARM water are non-negotiable for achieving that perfect texture egg custard.
Finally, if it’s completely unset in the center after 15 minutes, simply put the lid back on, reduce the heat if it was boiling too hard, and steam for another 3 to 5 minutes. Don’t pull it out until you see that slight, gentle wobble. Learning these little nuances is what turns basic techniques into reliable skills, and you are absolutely learning them right now!
Storage and Reheating Instructions for Leftover Steamed Egg Custard
I love this Chinese steamed egg custard because it’s one of those rare dishes that is truly delicious the next day! It’s already so soft, so reheating it without turning it into scrambled mush is the trick. If you’re batch cooking for quick lunches, which I totally recommend, you need a solid plan for storage.
When you have leftovers, the most important thing is to keep them covered tightly. If you stored them in the original heatproof bowl, make sure that aluminum foil seal is completely secure. If not, transfer them to an airtight container. You can safely keep this savory custard in the refrigerator for about three to four days. Any longer and the texture starts to degrade, which is just sad for something we worked so hard to make silky!
Reheating for That Velvety Texture
If you want to bring back that just-made, wobbly texture, gentle heat is your only friend. You absolutely should not zap this in the microwave on high power. When you blast silken egg custard with intense microwave energy, it cooks too fast and rubberizes, creating little pockets of hotter spots and ruining the smooth mouthfeel we spent all that time perfecting.
My preferred method is actually just returning the covered bowl to the steamer. Put it back over very low heat—barely a simmer—for about five minutes. This gently warms the custard all the way through without cooking it further. It brings back that beautiful, delicate quiver.
If you are really in a rush, the microwave works, but you have to baby it. Place a cup of water next to the custard dish in the microwave and use a medium-low power setting for about 30 to 45 seconds. Check it, stir very gently in the center if you can (or just gently shake the bowl), and repeat in 15-second bursts until just warm. See? It pays off to handle this delicate dish with care, even when reheating it!
Frequently Asked Questions About Steamed Egg Custard
Why do I need to use warm water instead of cold water?
That’s a great question, and it gets right to the heart of what makes this a reliable silken egg custard tutorial! Using warm (not hot!) water helps everything blend together much more smoothly right from the start. If you introduce very cold water to the eggs, the proteins can seize up unevenly when they hit the steam, leading to a texture that’s slightly grainy or curdled. Think of it as giving the egg mixture a gentle head start so it sets evenly over low heat—it eliminates a major source of kitchen stress!
What is the difference between this and a baked custard?
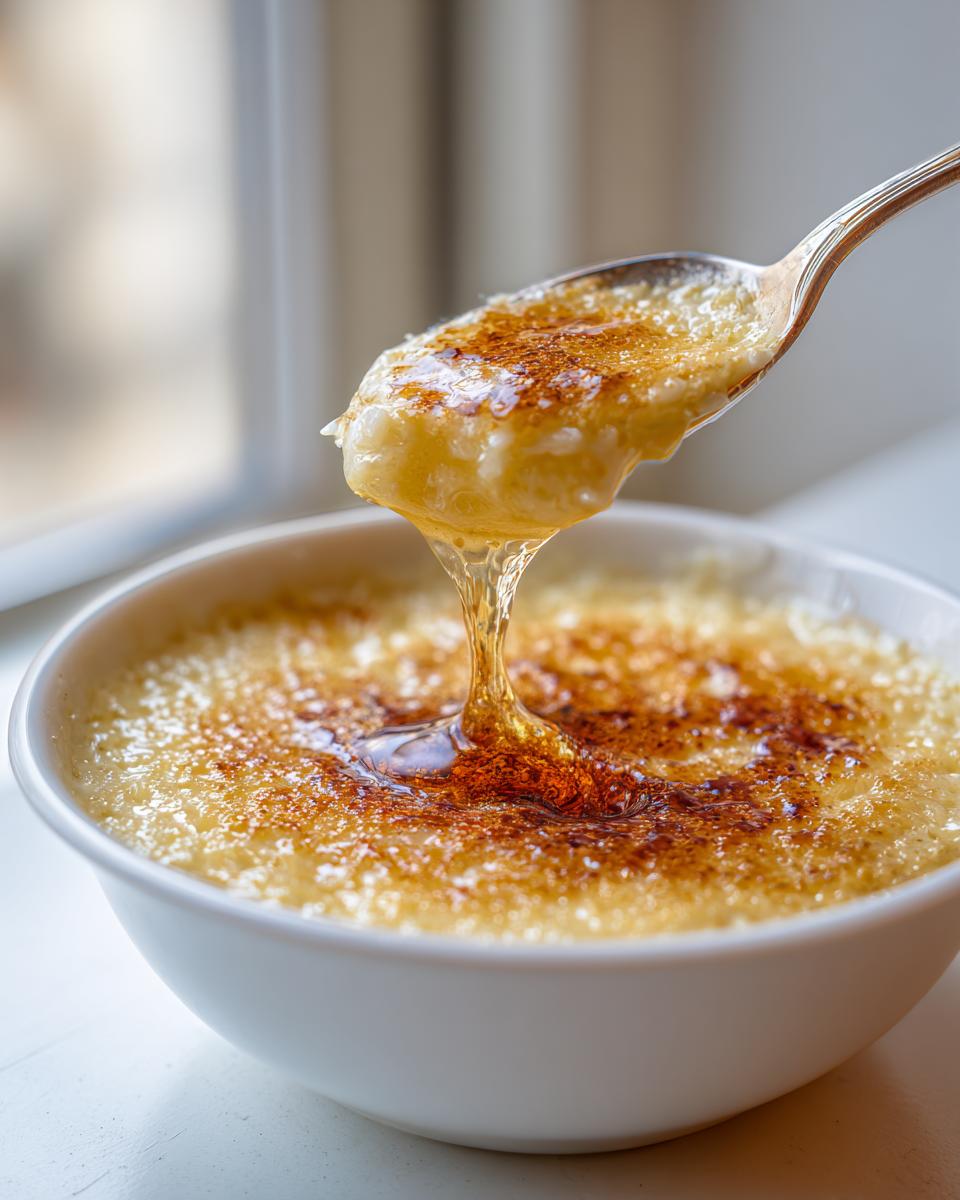
This is a common point of confusion! The essential difference lies in how the heat is applied. This is a true steamed egg custard, which means it’s cooked by moist, gentle steam. This steam cooks the custard evenly from all sides and keeps the surface moist, resulting in that incredibly tender, jiggly texture. A baked custard, like a crème brûlée, cooks in an oven, often using a water bath (bain-marie), which cooks from the bottom up and can often result in a slightly firmer, more cake-like consistency, which is why we sometimes call that a steamed cake consistency rather than custard.
My custard still has holes, even though I strained it. What did I do wrong?
Don’t worry, this happens to everyone learning a new technique! If you strained it and still have holes, I can almost guarantee the heat source was too high. For this specific dish, the steam needs to be barely perceptible—a gentle, quiet puff, not a rolling boil. Aggressive boiling underneath the bowl creates too much pressure and forces air bubbles up through the liquid egg before it can set. Next time, turn your setting down just a touch lower than you think you need to. Low and slow is the secret handshake for fluffy steamed egg technique!
Can I use this recipe for a sweet dessert instead of savory?
Absolutely! Since our base recipe uses just a pinch of salt and light soy sauce, it’s very easy to convert this into a delicate Asian dessert custard. For a sweet version, simply skip the soy sauce and salt entirely. Instead, use the same 1:2 ratio of liquid (use only warm water or milk) to eggs, and whisk in about 3–4 tablespoons of sugar per 3 eggs. It’s fantastic served with a drizzle of honey or some sweetened ginger syrup. If you love making eggs for occasions, you might also want to check out my easy recipe for classic deviled eggs!
Understanding the Nutrition in Your Steamed Egg Custard
I always get asked if these simple, comforting Asian dishes are healthy, and the answer for this steamed egg custard is a big yes! Since we aren’t frying anything and we’re using such simple components—mostly eggs and broth—the nutritional profile is really clean, which I love. Remember, I studied nutrition science, so I always make sure the recipes I share are reliable *and* good for you!
The estimates below are based on making the recipe exactly as written, serving two people, and not including any heavy toppings like minced pork. It’s a fantastic source of high-quality protein without a lot of the heavy fats you find in other comfort foods. If you’re tracking macros, this is a great side dish or light meal option. For similar fresh, healthy ideas, you should take a look at my quinoa salad recipe!
Here is the breakdown for half of the recipe:
| Nutrient | Amount |
| Calories | 110 |
| Protein | 10g |
| Fat | 6g |
| Carbohydrates | 2g |
| Sugar | 1g |
| Sodium | 350mg |
It’s important to remember this is an estimate. If you use regular broth instead of low-sodium, that sodium number will change quickly! Also, if you load it up with extra soy sauce or savory meats, the totals will shift. But as a standalone, light, foundational dish, this savory custard recipe is fantastic for feeling satisfied without feeling weighed down at all.
PrintPerfect Silken Steamed Egg Custard: The Easy Asian Comfort Food Recipe
Learn how to make authentic, velvety smooth Chinese steamed egg custard. This simple recipe uses a precise water-to-egg ratio for a perfect, hole-free texture every time.
- Prep Time: 10 min
- Cook Time: 15 min
- Total Time: 25 min
- Yield: 2 servings 1x
- Category: Side Dish
- Method: Steaming
- Cuisine: Chinese
- Diet: Low Fat
Ingredients
- 3 large eggs
- 6 tablespoons warm water
- 6 tablespoons chicken broth (low sodium)
- 1 teaspoon light soy sauce
- 1/2 teaspoon sesame oil
- Pinch of salt
- Optional Topping: Thinly sliced green onions
Instructions
- Prepare the steamer: Fill a pot with about one inch of water and bring it to a simmer over medium-high heat.
- Whisk the eggs: In a medium bowl, gently whisk the 3 eggs until just combined. Do not over-whisk to avoid incorporating too much air.
- Mix the liquid: In a separate measuring cup, combine the warm water, chicken broth, light soy sauce, sesame oil, and salt. Whisk gently until the salt dissolves.
- Combine the mixture: Slowly pour the liquid mixture into the whisked eggs while stirring gently. This 1:2 liquid-to-egg ratio helps create a smooth texture.
- Strain the custard base: Pour the entire mixture through a fine-mesh sieve into a heatproof bowl (this step removes any unmixed egg or bubbles, which is key for a perfect texture).
- Cover the bowl: Cover the bowl tightly with aluminum foil or a plate to prevent condensation from dripping onto the custard surface while steaming.
- Steam: Carefully place the covered bowl into the simmering steamer. Reduce the heat to low.
- Cook: Steam for 12 to 15 minutes. The custard is done when it is mostly set but still has a slight wobble in the very center.
- Rest: Remove the bowl from the steamer and let it sit, still covered, for 5 minutes.
- Serve: Remove the cover, garnish with green onions if desired, and serve immediately as a savory custard recipe.
Notes
- For the silken texture, use warm (not hot) water and broth. Cold liquids can cause the egg proteins to seize unevenly.
- Keep the heat very low during steaming. High heat creates large bubbles, resulting in a holey or bumpy surface.
- If you want a richer flavor, substitute half the water with reserved chicken broth.
- Troubleshooting: If your custard is watery, you likely added too much liquid or did not steam it long enough.
Nutrition
- Serving Size: 1/2 of recipe
- Calories: 110
- Sugar: 1
- Sodium: 350
- Fat: 6
- Saturated Fat: 2
- Unsaturated Fat: 4
- Trans Fat: 0
- Carbohydrates: 2
- Fiber: 0
- Protein: 10
- Cholesterol: 210