
Are you ever stuck between wanting that comforting, juicy flavor of a classic cheeseburger and needing a meal that actually fits your fitness goals? I totally get it. When I was studying nutrition science, figuring out how to balance flavor and function was my main challenge!
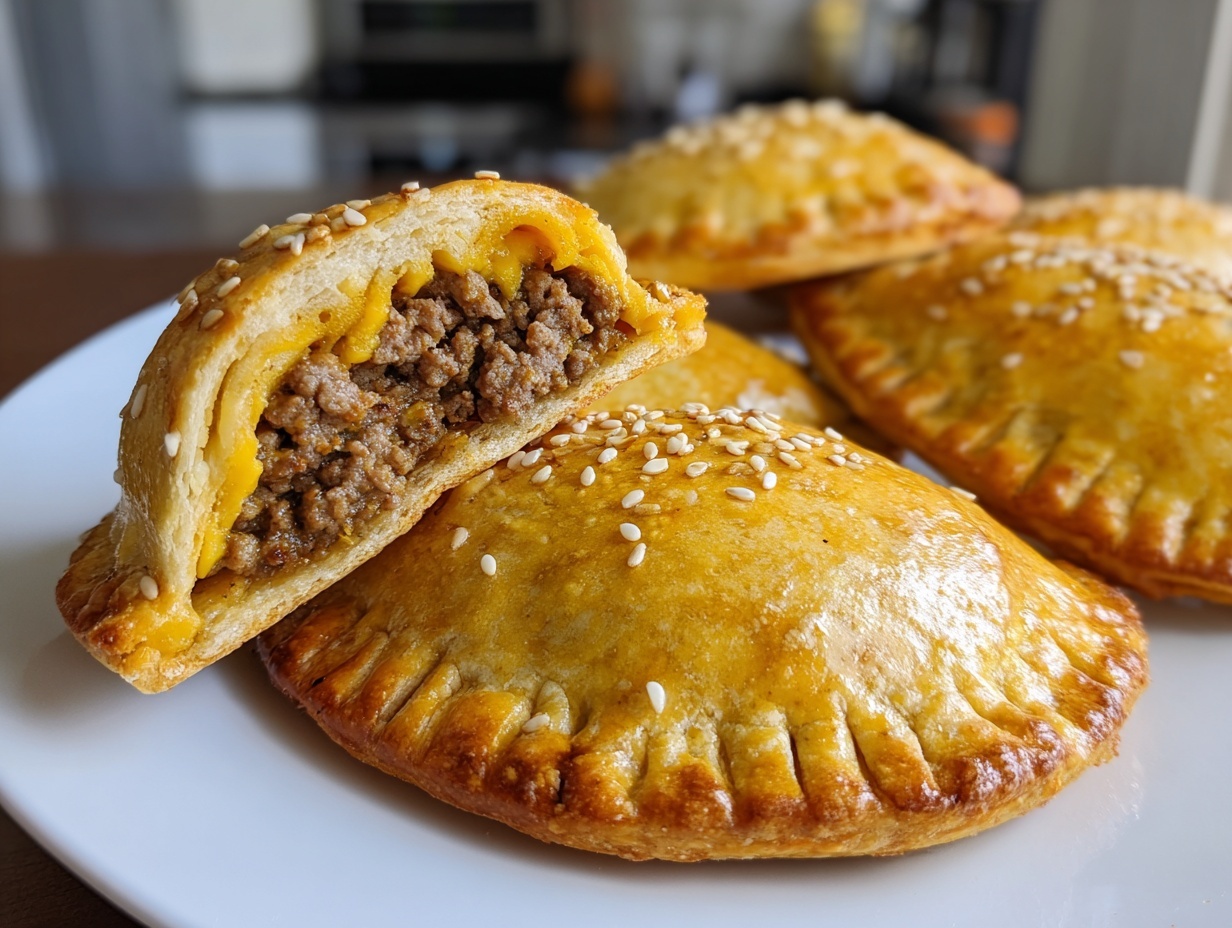
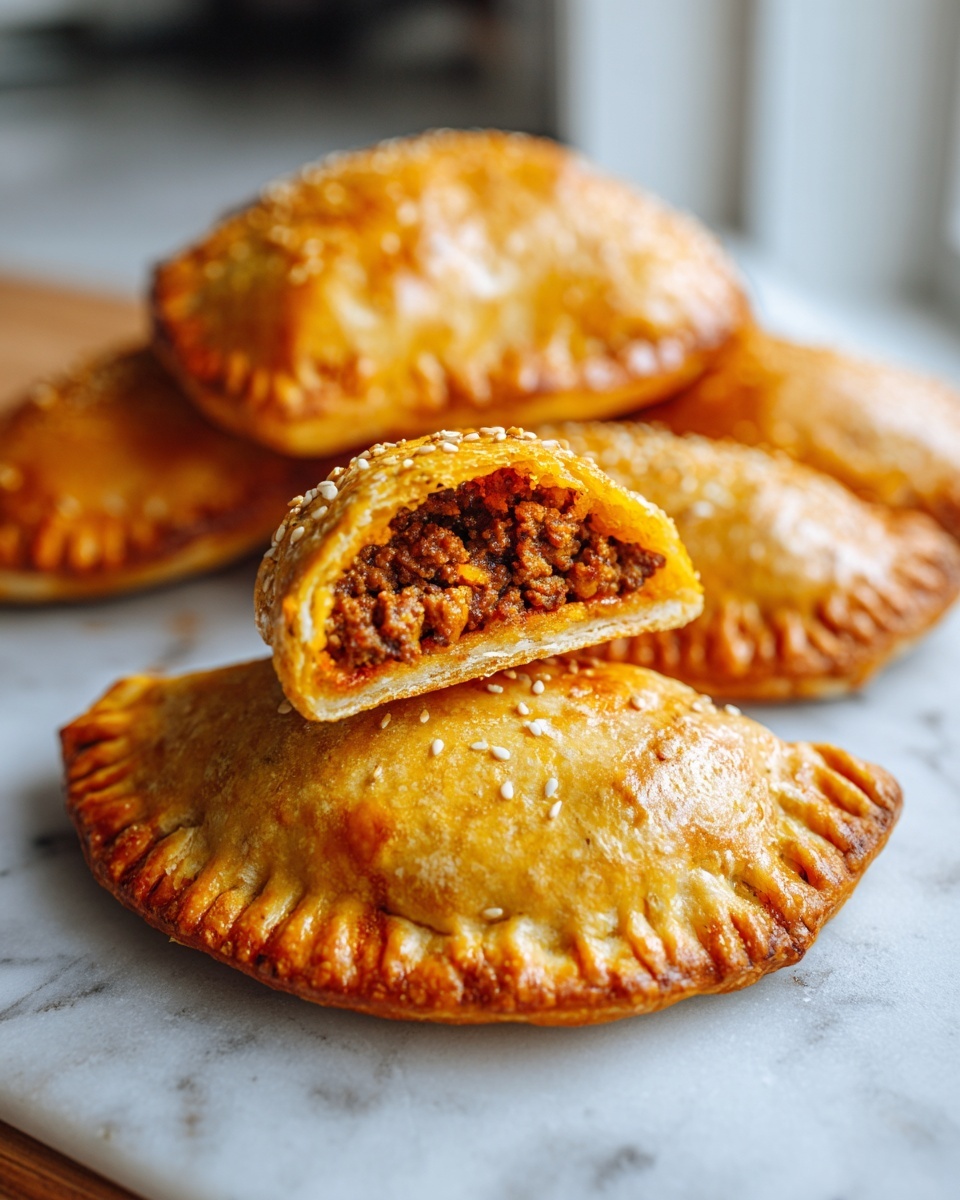
Well, I finally cracked the code for you busy folks who need great **high protein cheeseburger pockets**. Forget sad, dry protein snacks. These baked hand pies deliver that savory, cheesy burger experience tucked perfectly into a crisp, golden crust. They are absolute lifesavers for quick dinners or easy high protein lunch ideas. Trust me, Kate Connolly, I’ve tested this filling until it was absolutely perfect—flavorful, satisfying, and packed with lean protein so you can feel good about eating them!
- Why You Will Love These High Protein Cheeseburger Pockets
- Essential Ingredients for Perfect High Protein Cheeseburger Pockets
- Step-by-Step Guide to Making Homemade Burger Pockets
- Baking Time and Temperature for Golden High Protein Cheeseburger Pockets
- Tips for Success with Ground Beef and Cheese Recipes
- Storage and Reheating Instructions for Meal Prep Cheeseburger Bites
- Serving Suggestions for Satisfying High Protein Meals
- Frequently Asked Questions About High Protein Cheeseburger Pockets
- Estimated Nutritional Data for These Pockets
Why You Will Love These High Protein Cheeseburger Pockets
Seriously, these pockets check every single box for a perfect weeknight meal or a hearty snack. When I first developed this recipe, I was aiming for convenience without sacrificing that major flavor payoff. And wow, did we nail it!
Here’s why these beautiful savory bites earned a permanent spot in my regular rotation:
- They deliver amazing classic burger flavor—cheese, savoriness—without the mess of actually grilling.
- We boosted the protein significantly using lean beef blended with smooth cottage cheese. Hello, satisfying high protein meals!
- The total prep and cook time clocks in under 45 minutes. Weeknight dinner win!
- They are totally portable! Pack them up cold or warm for lunch the next day.
Essential Ingredients for Perfect High Protein Cheeseburger Pockets
When it comes to reliable recipes, the magic always starts with high-quality building blocks. For these **high protein cheeseburger pockets**, we are focusing on maximizing flavor while keeping that fat content down. That means using a nice, lean ground beef—I insist on 90% lean or higher because we are already adding cheese and flavor boosters!
The real secret weapon in here, besides the obvious cheddar, is the low-fat cottage cheese. I know, cottage cheese in a savory pocket sounds strange, but trust me, when blended completely smooth, it acts as a fantastic binder and pumps up the protein without making the filling taste dairy-heavy. We want that classic burger profile shining through, so we bring in onion, Worcestershire sauce, and a great spice blend.
We are relying on refrigerated pie crusts here for simplicity, which is perfect for busy weeknights. If you grab these lean ground beef pockets for your meal prep, make sure your components are prepped correctly!
Ingredient Notes and Protein Substitutions
Let’s talk specifics because this is where we build confidence in the kitchen. That cottage cheese needs special attention. If you don’t blend it until it’s totally smooth—like silky cream—you’ll end up with little curds, which isn’t what we want in our finely seasoned meat mixture. You can use a food processor or even an immersion blender to get it just right.
Now, if you’re trying to keep the carbs lower for those keto cheeseburger wraps, you absolutely can skip the pie crust! Simply use a sturdy low-carb tortilla wrap instead of the dough circles, fill them up, fold, and proceed with egg washing and baking. It works beautifully! Also, for the sharpest flavor, make sure your cheddar is sharp; low-quality cheese melts differently and the flavor gets lost.
Step-by-Step Guide to Making Homemade Burger Pockets
Alright, time to roll up those sleeves! This is the part where you transform simple ingredients into these amazing easy ground beef hand pies. Don’t feel intimidated; I’ve broken this down so clearly that even if you’ve never folded a pastry in your life, you’re going to nail it. First things first: get that oven preheated to 400 degrees Fahrenheit and line a baking sheet with parchment paper. We want easy cleanup more than anything!
Mixing the Savory Baked Turnover Recipe Filling
Grab a big bowl for your filling. We’re combining the ground beef, that smooth cottage cheese, the finely chopped onion, and all those wonderful seasonings—Worcestershire, mustard powder, garlic powder, salt, and pepper. Now, this is important: mix it gently. You aren’t making meatballs here! Overmixing the meat wakes up the proteins and makes them tough. Just fold everything together with your hands until you see the spices and onion are evenly distributed. Don’t worry about mixing the cheese in yet; we save that for last.
Here’s my little trick, which I learned from years of working with lean meats: before you start filling your dough, take just a tiny teaspoon of your meat mix and microwave it for 30 seconds until it’s cooked through. Taste it! Does it need a tiny pinch more salt or pepper? Now is the time to adjust the seasoning for your whole batch. That little step ensures incredible flavor in every single one of these **savory baked turnover recipe** pockets.
Once you’re happy with the taste, stir in that shredded cheddar cheese until it’s dotted all through the mixture. That’s it for the mixing!
Assembling and Sealing Your High Protein Cheeseburger Pockets
Unroll your pie crusts onto a lightly floured surface. I usually use a large cookie cutter or even the edge of a small plate to cut out rough circles, aiming for about 5 to 6 inches across. This size gives you enough dough to seal properly. You should get about six to eight circles, depending on how generous you were with the cutter.
Take one dough circle. Place about two to three tablespoons of your filling right on one half—don’t go crazy piling it high, or it will burst! Make sure you leave about a half-inch border clear around the edge. This border is crucial for a good seal.
Fold the empty dough half over the filling to make a perfect half-moon shape. Now for the sealing: take a fork and firmly press all along that curved edge, crimping it down. I mean it—press hard! This seals in the flavor and keeps your filling safe during baking; nobody wants leaky **high protein cheeseburger pockets**.
Once they are all sealed and sitting on your parchment-lined sheet, take your beaten egg and brush the tops lightly—that’s what gives them that gorgeous shine. If you want that classic burger bun look, sprinkle on some sesame seeds. Ready for the oven!
Baking Time and Temperature for Golden High Protein Cheeseburger Pockets
We’re nearly there! Once those beautiful pockets are sealed and brushed with egg wash, they head into the heat. Remember, since we are using pre-made refrigerated crusts, we want a good, hot oven to get that pastry flaky fast before the filling dries out. Set your oven to a solid 400 degrees Fahrenheit.
Bake these **high protein cheeseburger pockets** for about 18 to 22 minutes. You aren’t just watching the clock, though; you are looking for visual cues! You want a crust that is a deep, rich golden brown—that’s how you know it’s flaky and not doughy. If you carefully poke one that seems done, the filling should feel firm, indicating that beef and cheese have melted perfectly. They’ll look just like gorgeous little savory baked turnover recipe masterpieces!
Tips for Success with Ground Beef and Cheese Recipes
Even though this recipe is straightforward, those little expert details are what separate a good batch from an absolutely amazing batch of **homemade burger pockets**. My absolute number one tip, especially when dealing with ground beef mixes, is what I mentioned earlier: do not, I mean, do not overmix the meat when you add your seasonings and cottage cheese.
Seriously, handle that filling gently! Overworking it makes those proteins tighten up, and your pocket filling ends up tasting rubbery instead of tender. You just want everything incorporated, which should take you less than a minute.
The second key takeaway regards leaks. Leaks happen when the seal is weak. You must crimp those edges firmly with the tines of a fork. Press down hard on that half-moon edge all the way around—that’s how we keep all that cheesy goodness locked inside! When you focus on that firm seal and the tender meat texture, you nail the perfect ground beef and cheese recipes every time.
Finally, to really hit that signature “burger” profile in your fit food cheeseburger flavor, don’t skimp on that dried mustard. It mimics the tang of yellow mustard beautifully without making the final product taste like a deli sandwich!
Storage and Reheating Instructions for Meal Prep Cheeseburger Bites
One of the best things about these savory pockets is how perfectly they work for your weekly meal prep. You make one batch and suddenly you have delicious, ready-to-go meals waiting! When storing these **meal prep cheeseburger bites**, make sure they have cooled completely first. Pop them into an airtight container.
They keep beautifully in the refrigerator for up to four days. If you’re freezing leftovers, I recommend wrapping individual pockets tightly in plastic wrap first, then placing those into a freezer-safe bag. That extra barrier helps prevent freezer burn.
When it comes time to reheat, the oven is definitely my preferred method. Pop them back onto a baking sheet at about 350 degrees Fahrenheit for about 10 minutes. This crisps the pastry right back up! If you’re in a total rush, the microwave works in a pinch, but know that the crust will soften up a bit. Either way, you’ve got a fantastic meal prep cheeseburger bites waiting!
Serving Suggestions for Satisfying High Protein Meals
These **high protein cheeseburger pockets** are truly fantastic on their own, but serving them right brings the whole burger experience home! Since we’ve packed so much savory flavor into the filling, you don’t need heavy sides competing with them.
For dipping, you absolutely must have the classics! I always set out little ramekins of ketchup and mustard. If you like a little smoky sweetness, grab a low-sugar BBQ sauce. That little dip makes them even more fun, and dipping is essential for those satisfying high protein meals.
As for a side dish? Keep it light. A crisp side salad with a light vinaigrette cuts right through the richness perfectly. Or, if you want something warm, some oven-roasted green beans or light broccoli florets are easy additions that keep the overall meal feeling balanced and healthy!
Frequently Asked Questions About High Protein Cheeseburger Pockets
I always get a ton of questions whenever I share a new recipe, especially one that tries to sneak in extra protein! Since these **high protein cheeseburger pockets** are a favorite for meal prepping, I wanted to answer the most common things folks ask me below. Let’s clear up any confusion so you can jump straight into cooking!
Can I swap the ground beef for ground turkey?
Oh, absolutely! You can definitely use ground turkey, but here’s a little tip from my nutrition science background: turkey is usually much leaner than the 90% beef I recommend. If you use ground turkey (especially 93% or 99% lean), you might find your filling a bit dry because the cottage cheese binder needs a little healthy fat to work with. To adjust, I usually add an extra teaspoon of Worcestershire sauce or even swap the egg wash for a tablespoon of olive oil on top to help with browning and keep things moist.
How do I turn this into a Cheeseburger Calzone Recipe instead of a pocket?
That’s a fantastic idea! The beauty of this filling is that it works perfectly for a larger format, too. If you want a proper cheeseburger calzone recipe, skip cutting the dough into small circles. Instead, take one full sheet of pie crust, spread the entire meat mixture over one half, leaving a generous border all around, and then fold the dough entirely over like closing a large book or a very giant turnover. You’ll need to adjust the baking time significantly—probably closer to 30 to 35 minutes at 400°F, depending on how thick you made it. Keep checking that internal temperature!
Can I freeze these before baking?
Yes, you certainly can! These are one of my favorite things to batch-prep. Once you have assembled the **homemade burger pockets** and sealed them firmly with the fork—this sealing step is non-negotiable when freezing—lay them flat on a baking sheet. Place the whole sheet in the freezer until the pockets are hard. Then, transfer them into a zip-top freezer bag. They’ll keep great for up to three months. When you want to bake them, just remove what you need, thaw them overnight in the fridge, and bake according to the recipe instructions!
Is the cottage cheese flavor noticeable in the filling?
This is the question I get the most, and I get why people worry! I promise you, no, the cottage cheese flavor is not noticeable at all. My goal with these **satisfying high protein meals** options is to use that cottage cheese purely as a protein booster and binder. As long as you blend it until it’s completely smooth and creamy—like smooth ricotta—it just disappears into the meat mixture, providing moisture and that protein punch without getting in the way of that classic burger taste!
Estimated Nutritional Data for These Pockets
I always include this section because I believe in transparency, especially when we are actively trying to make choices that support our health goals. Remember, the information below is based on the specific ingredients list I provided—using 90% lean beef and the standard refrigerated pie crusts. If you swap out the dough for a keto wrap or use a different fat percentage of beef, these numbers will change, so take this as a solid starting point!
This data gives us a great snapshot of why these **high protein cheeseburger pockets** are such a smart choice for quick dinners or **high protein lunch ideas**.
Here is the estimated breakdown per one pocket (Yield: 6-8 servings):
- Calories: 380
- Protein: 30g (That’s why we love these!)
- Total Fat: 18g
- Carbohydrates: 25g
- Sugar: 3g
I want to be super clear: These figures are estimates based on the ingredients listed. If you use a different brand of crust or swap out the cheddar for a full-fat version, your fat and calorie counts will shift a bit. Always treat this as a guideline to ensure these delicious **homemade burger pockets** keep fitting perfectly into your eating plan!
PrintHigh Protein Cheeseburger Pockets (Easy Baked Hand Pies)
Make satisfying, high-protein cheeseburger pockets using lean ground beef and a simple dough. These baked hand pies deliver classic burger flavor in a portable format.
- Prep Time: 20 min
- Cook Time: 20 min
- Total Time: 40 min
- Yield: 6 to 8 pockets 1x
- Category: Lunch
- Method: Baking
- Cuisine: American
- Diet: Low Fat
Ingredients
- 1 pound lean ground beef (90% lean or higher)
- 1/2 cup low-fat cottage cheese, blended smooth
- 1/4 cup finely chopped onion
- 1 tablespoon Worcestershire sauce
- 1 teaspoon dried mustard powder
- 1/2 teaspoon garlic powder
- 1/4 teaspoon salt
- 1/8 teaspoon black pepper
- 1 cup shredded reduced-fat cheddar cheese
- 1 package (14 ounces) refrigerated pie crusts (or use a high-protein dough alternative)
- 1 large egg, beaten (for egg wash)
- 1 teaspoon sesame seeds (optional)
- Ketchup and mustard, for serving
Instructions
- Preheat your oven to 400 degrees Fahrenheit. Line a baking sheet with parchment paper.
- In a large bowl, combine the lean ground beef, blended cottage cheese, chopped onion, Worcestershire sauce, mustard powder, garlic powder, salt, and pepper. Mix gently until just combined; do not overmix.
- Stir in the shredded cheddar cheese until evenly distributed throughout the meat mixture.
- Unroll the refrigerated pie crusts onto a lightly floured surface. Use a round cutter or a plate to cut out large circles (about 5-6 inches in diameter). You should get about 6 to 8 circles depending on the size.
- Place about 2 to 3 tablespoons of the meat mixture onto one half of each dough circle, leaving a 1/2-inch border around the edge.
- Fold the empty half of the dough over the filling to create a half-moon shape. Crimp the edges firmly with a fork to seal the pocket completely. This seals in the flavor.
- Place the sealed pockets onto the prepared baking sheet. Brush the tops lightly with the beaten egg wash. Sprinkle with sesame seeds if you are using them.
- Bake for 18 to 22 minutes, or until the crust is golden brown and the filling is cooked through.
- Let the high protein lunch ideas cool slightly on the pan before serving. Serve immediately with ketchup and mustard for dipping.
Notes
- For a lower-carb option, substitute the pie crusts with low-carb tortilla wraps or a homemade protein dough base.
- To make the cottage cheese smooth for binding, pulse it in a food processor or blender until completely creamy before adding it to the meat.
- You can prepare these ground beef and cheese recipes ahead of time; assemble the pockets, place them on a tray, cover, and refrigerate for up to 24 hours before baking.
Nutrition
- Serving Size: 1 pocket
- Calories: 380
- Sugar: 3
- Sodium: 550
- Fat: 18
- Saturated Fat: 8
- Unsaturated Fat: 10
- Trans Fat: 0.5
- Carbohydrates: 25
- Fiber: 1
- Protein: 30
- Cholesterol: 75