

There’s just something about traditional baking that wraps you up in a warm hug, isn’t there? When I think of comfort food that feels instantly special, I think of stunning, delicate pastries that look like they belong in a fancy bakery case. Well, today we are conquering those gorgeous treats together! I finally perfected this recipe for italian nut roll cookies, and I promise you, they taste exactly like tradition. They feature that wonderful, slightly crumbly pastry wrapped around a rich, sweet filling that just melts in your mouth. I’ve tested this batch repeatedly to make sure the dough stays tender and the filling stays put, so you can bake these festive treats with total confidence!
- Why This is the Best Italian Nut Roll Cookies Recipe You Will Make
- Gathering Ingredients for Authentic Italian Nut Roll Cookies
- Easy Nut Roll Instructions for Perfect Italian Nut Roll Cookies
- Tips for Success with Your Homemade Nut Roll Cookies
- Variations for Your Italian Nut Roll Cookies
- Serving Suggestions for These Festive Baking Treats
- Storage and Keeping Italian Nut Roll Cookies Fresh
- Frequently Asked Questions About Italian Nut Roll Cookies
- Nutritional Estimates for Your Italian Nut Roll Cookies
- Share Your Experience Making These Classic Italian Cookies Recipe
Why This is the Best Italian Nut Roll Cookies Recipe You Will Make
I know there are a million recipes out there, but I truly believe this one nails the texture game. The absolute magic here lies in balancing two things: an incredibly buttery pastry cookie that doesn’t crack when you roll it, and a filling-to-dough ratio that ensures you get that nutty flavor in every single bite. When I first started testing these, my dough was always a little too tough—not the soft, tender dream I was aiming for.
The breakthrough came when I added the sour cream to the dough. Seriously, that simple addition is why we get those unbelievably tender dough cookies. It keeps them from being dry, even if you bake them just a minute too long. I even shared a batch of these with my neighbor, Brenda, who swore they were just like the ones her Nonna used to make! You can read more about how others loved them over at this great resource, but I promise, the texture you get from my method is superior for home bakers!
Gathering Ingredients for Authentic Italian Nut Roll Cookies
When we talk about traditional Italian baking, we focus on quality ingredients that don’t require a trip to a specialty store. That’s the Kings Cook philosophy! For these italian nut roll cookies, we keep things accessible while still delivering that incredible flavor and texture. Everything you need should be available on your next big grocery run. The power in this recipe comes from the combination of cold fat and that secret weapon, sour cream, in the dough!
If you want truly authentic results, attention to detail on the filling ingredients is key. You can see a really comprehensive ingredient setup that others have found helpful by checking out this link, but trust the proportions I’ve laid out here for guaranteed success.
For the Buttery Pastry Dough
This mixture is what gives us that characteristic delicate structure. Make sure your butter is truly softened—not melted! The introduction of sour cream here is non-negotiable; it’s essential for those tender dough cookies that keep their shape after baking.
- 2 ½ cups all-purpose flour
- 1 cup (2 sticks) unsalted butter, softened
- 1 cup sour cream
- 1 egg yolk
- ½ teaspoon salt
- 1 tablespoon sugar
For the Sweet Walnut Filled Cookies
Your filling needs to be fragrant and mix together easily. Grinding your walnuts finely helps them incorporate smoothly into the dough, so you don’t end up with giant, tough chunks. This blend creates the best walnut filled cookies.
- 1 ½ cups finely ground walnuts
- ½ cup granulated sugar
- 1 teaspoon ground cinnamon
- 1 tablespoon melted butter
Easy Nut Roll Instructions for Perfect Italian Nut Roll Cookies
I know the word “rolled” can sometimes sound intimidating, but trust me, these instructions for our italian nut roll cookies move quickly once you get into a rhythm. We’ll break this down into three simple phases: dough prep, filling assembly, and the final bake. Set your timer right at the beginning for chilling, because that’s when the magic sets up! And if you’re looking for other fun rolled cookies, I have a great guide on shaping sugar cookies that might give you some extra rolling confidence.
Making and Chilling the Tender Dough Cookies
First things first, let’s deal with the dough. In a big bowl, you just need to mix everything for the pastry—flour, softened butter, sour cream, egg yolk, salt, and that single tablespoon of sugar. Mix it until it just comes together into a soft ball. Do not, I repeat, do not overmix! Overmixing is what activates the gluten too much and gives you tough cookies instead of our desired tender crumb. Wrap that dough tight in plastic wrap and get it into the fridge for a minimum of one full hour. This chilling time is absolutely necessary so the dough firms up enough for rolling later. Trust me on the chill time; it stops sticking!
Assembling the Rolled Filled Cookies
While the dough chills, mix up all your filling ingredients until they are well combined. Once an hour is up, preheat your oven to 350°F (175°C) and line two baking sheets with parchment paper. Take one half of the dough out at a time—keep the other half cold! On a lightly floured surface, roll that dough out into a thin rectangle. We are aiming for about 1/8 inch thickness—thinner is better here! Spread half of that sweet walnut filling evenly across the dough, but leave about an inch border clear on one long side. This clear edge is crucial!
Now for the rolling technique: start at the long edge *opposite* that clear border and roll the dough up as tightly as you possibly can. You want a sturdy log, not a loose jelly roll, otherwise your center will collapse! Pinch that seam shut firmly, brush the log lightly with your beaten egg wash, and then slice it right into one-inch pieces. Stand those pieces cut-side up on your prepared sheets. Repeat with the second half of dough and filling. You can see some beautiful examples of tight rolling over at this recipe site for visual inspiration.
Baking and Finishing Your Italian Nut Roll Cookies
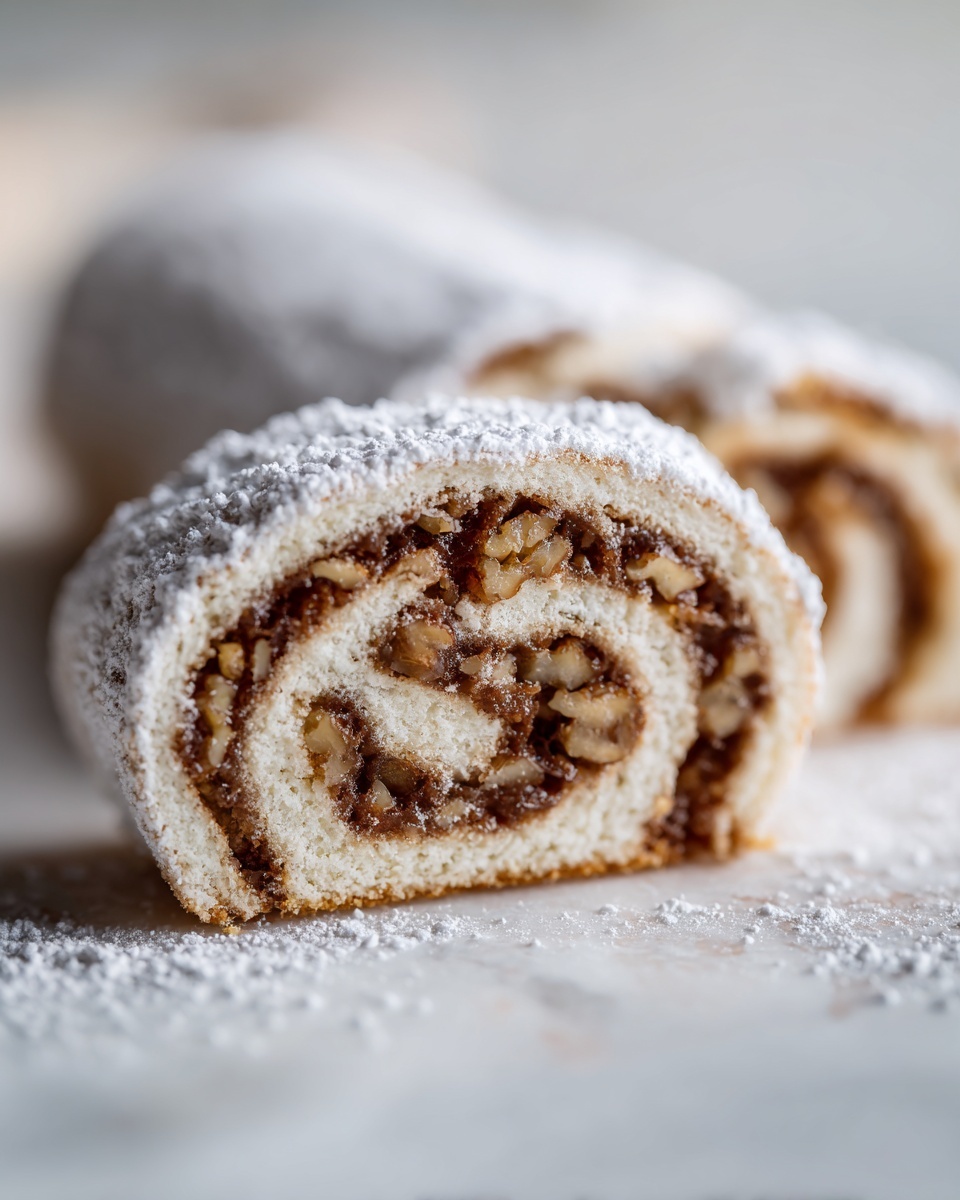
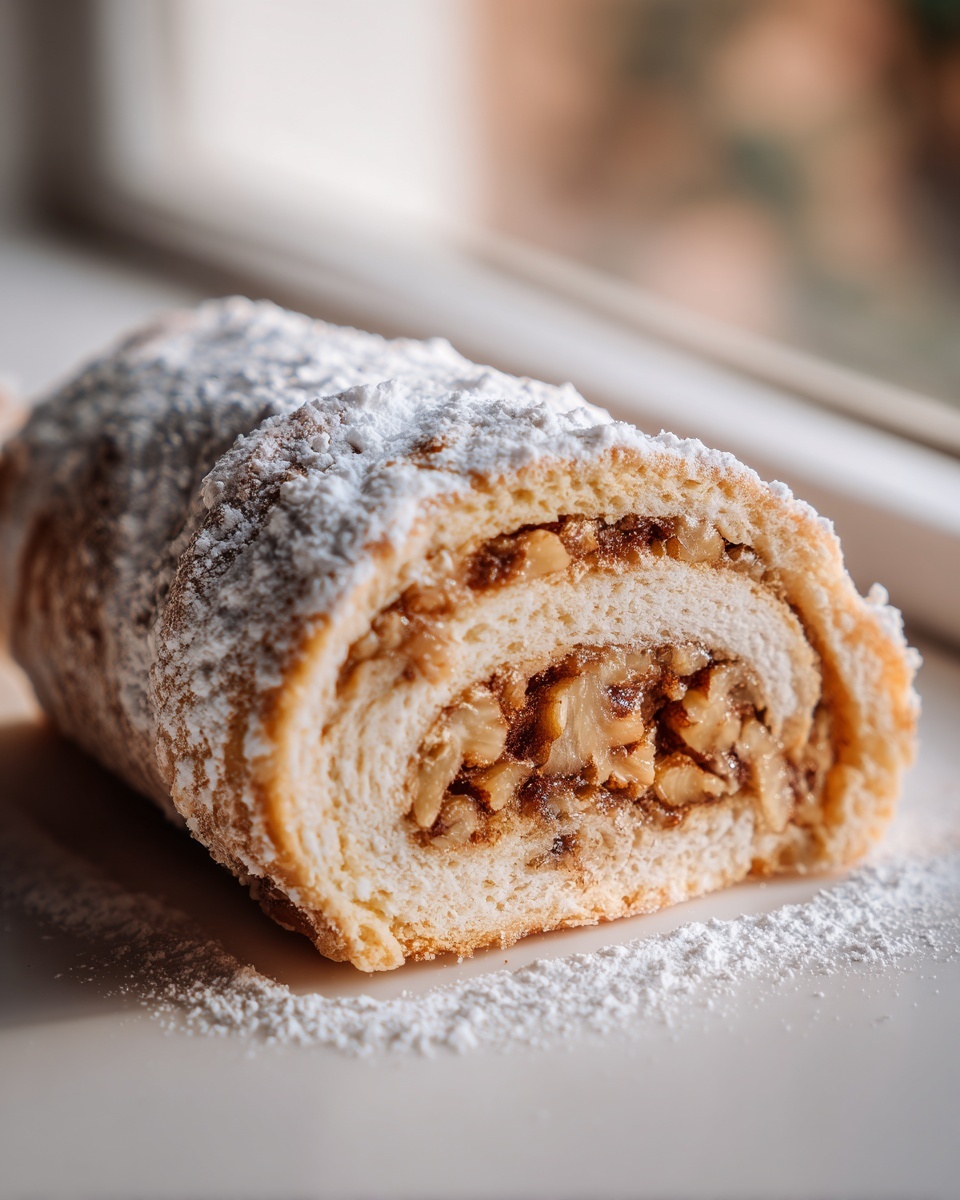
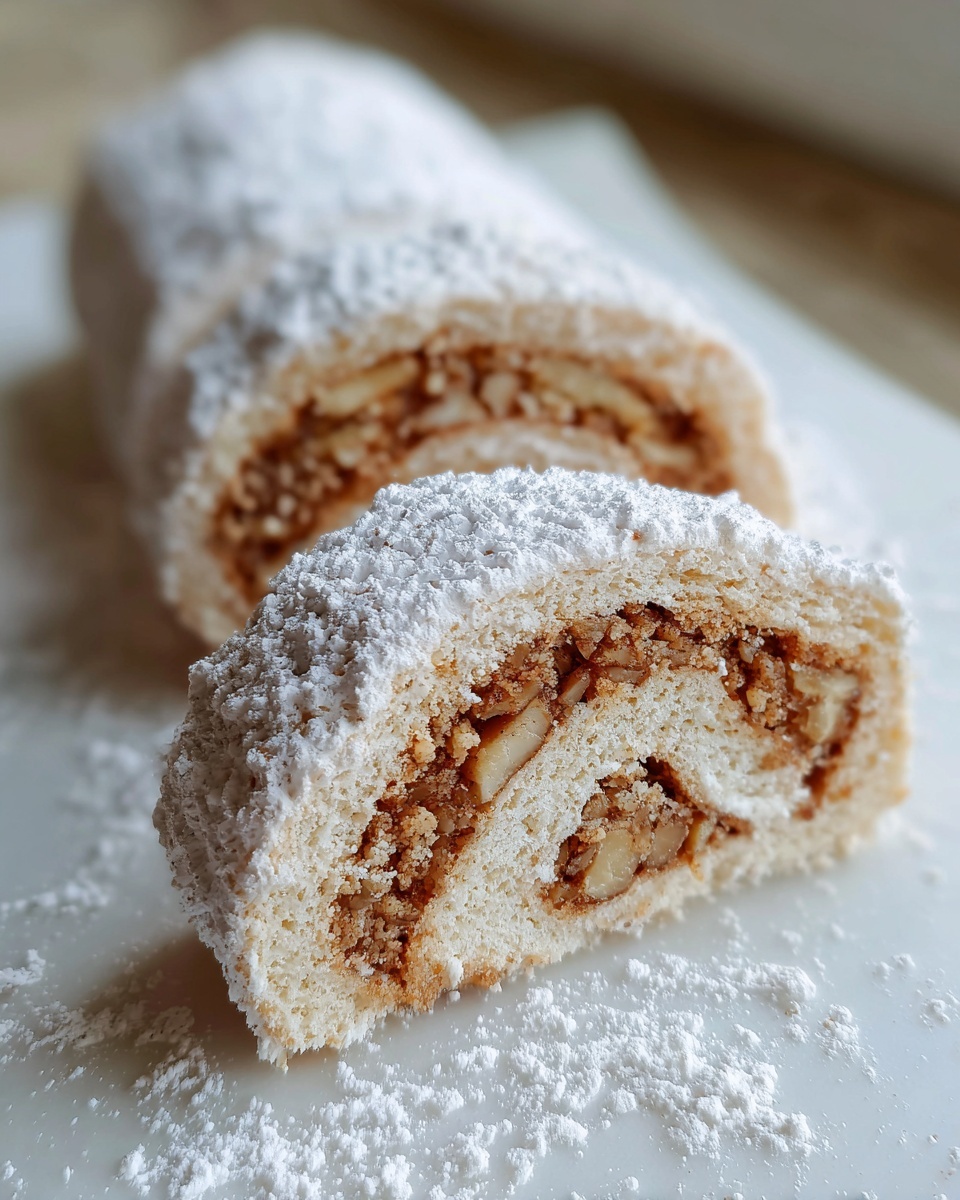
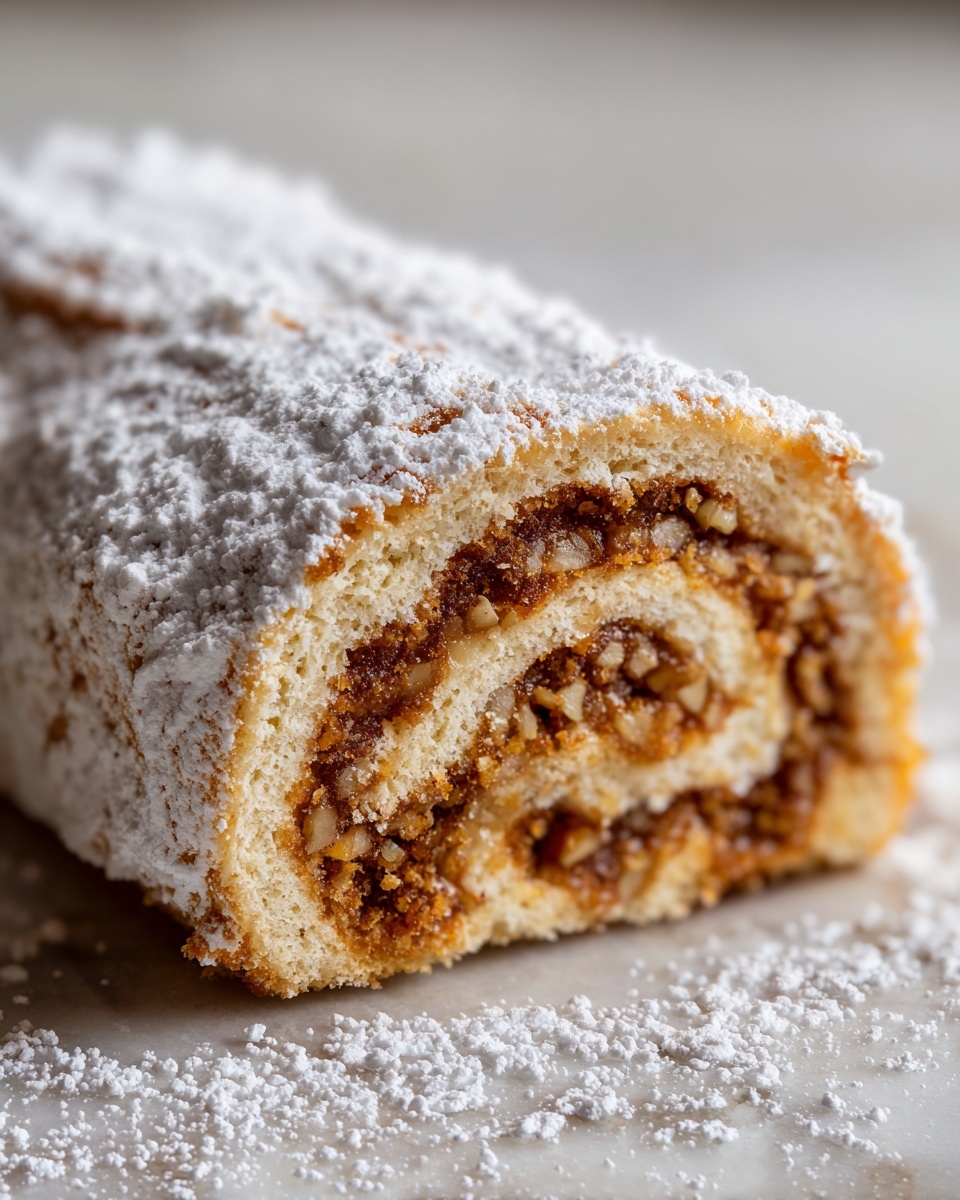
Pop those trays into the preheated oven and bake them for about 15 to 18 minutes. You’re looking for edges that are just barely turning golden brown. We don’t want them dark; remember, we are aiming for tender and pale! Once they come out, let them sit on the hot pan for just a minute or two to firm up slightly, then transfer them gently to a cooling rack. The final, most satisfying step happens while they are still slightly warm: generously dust them with powdered sugar until they look completely snow-covered. Let them cool completely before moving them, and you’ll have perfectly formed rolled filled cookies!
Tips for Success with Your Homemade Nut Roll Cookies
Making homemade nut roll cookies should be fun, not frustrating! Since we are aiming for that pristine, Italian bakery style cookies look, I’ve gathered a few things I learned over my testing sessions that can prevent those common little kitchen mishaps. Seriously, these little tweaks make a huge difference between a good cookie and a showstopper!
First and most important: Temperature control is everything. If your dough gets too warm while you’re rolling, it becomes soft and sticky, and the filling starts to ooze out the sides when you slice it. If you notice sticking or smearing while rolling, don’t hesitate—just pop the remaining dough back into the fridge for 15 minutes! It’s better to take a short break than salvage a messy roll.
Next, let’s talk about the cut. When you slice your log into those one-inch pieces, use a very sharp, thin knife, and wipe the blade clean between every couple of cuts. Wipe it with a clean cloth moistened slightly with warm water. This prevents the dough from dragging against the sugary filling, ensuring those pretty spirals stay intact when they hit the baking sheet. This little trick guarantees that picture-perfect cross-section!
Also, remember to utilize the egg wash thinly, just like the recipe says. Too much egg wash, and the top of your cookie will get hard and crackle weirdly instead of absorbing that lovely dusting of powdered sugar. A light brush is all you need for that beautiful, slightly glazed finish that says, “I baked these with love.” If you keep these pointers in mind, you’ll have professional-looking results! For more tips on keeping things neat while baking, I have a few pointers over on my guide to making perfect chocolate chip cookies that apply here too!
Variations for Your Italian Nut Roll Cookies
While this recipe is designed around the classic walnut filling, that’s the beauty of making a **traditional Italian dessert** at home—you get to tweak it! If you’ve run out of walnuts or just want a slight change, feel free to swap them out for pecans. They add the most wonderful buttery depth to the spice mix.
Also, don’t forget those little boosters I mentioned in the notes. Adding 1/4 cup of plump raisins or even some mini chocolate chips right into the filling mixture is a fantastic way to surprise your tasters. Imagine the richness of the nut filling blending with a little pocket of chocolate—wow! These small additions really take these italian nut roll cookies to the next level for any gathering. If you love layered pastry desserts, you might enjoy my recipe for baklava as well!
Serving Suggestions for These Festive Baking Treats
These italian nut roll cookies look absolutely stunning arranged on a platter, making them the star of any holiday spread. Seriously, the contrast between the buttery white dusting and the rich, dark filling slices just screams celebration! They are definitely keepers on my list of favorite holiday cookie recipes.
But let’s talk about the best time to actually eat them, because these aren’t just for looking pretty! Because the pastry is so tender and rich, they pair unbelievably well with a strong, hot beverage. They are the perfect little dipping companion for a bold espresso shot. Trust me on this one; the strong coffee cuts through that butter perfectly. They are also fantastic alongside a creamy cappuccino or even just a strong cup of black coffee in the afternoon when you need that cozy moment.
If you are making a big batch for a party, try putting them next to something bright to balance out the richness. Maybe a tart lemon shortbread if you have any, or even just some fresh berries. They don’t require any extra glaze or topping, which is why they are ideal for making ahead! If you enjoy these types of rich, spiced treats, I also have a killer recipe for apple cinnamon muffins that follow a similar comforting flavor profile.
Storage and Keeping Italian Nut Roll Cookies Fresh
One of the best things about these italian nut roll cookies, besides how delicious they taste right out of the oven, is that they are truly fantastic for making ahead! This is why they are my absolute go-to for big holidays or when I know I’ll be busy hosting. You don’t want to fiddle around with fresh baking when guests arrive, right?
Since these are relatively sturdy little guys and they aren’t frosted with a creamy icing that spoils, storage is super simple. You just need an airtight container. That’s it! Keep them at room temperature, and they should stay perfectly fresh and tender for at least a week. The high sugar content in the filling acts as a natural preserver, so they hang out happily on your counter or in your pantry without drying out.
Now, if you’re asking about freezing—and I often do, because I like to bake huge batches!—the answer is a resounding yes. These freeze beautifully. You have two options here for your homemade nut roll cookies. You can freeze them after they are baked and fully cooled, just dust them lightly with powdered sugar *after* thawing. Or, if you’re feeling super ambitious, you can freeze the sliced, unbaked dough logs. Just make sure they are well wrapped in plastic and then placed in a freezer bag. When you’re ready to bake, just pull the log out, let it thaw on the counter for about 20 minutes so you can slice it, brush with egg wash, and bake from frozen, adding maybe 5 extra minutes to the baking time.
I highly recommend making a test batch just for freezing, so you know exactly how they behave when you bring them back to life! For more ideas on how to keep your beautiful bakes looking their best, you can check out some great tips over on this cooking resource!
Frequently Asked Questions About Italian Nut Roll Cookies
Whenever I release a recipe this special, I always get a flood of thoughtful questions from you all! That’s wonderful because it means you’re planning to bake them! These **italian nut roll cookies** are meant to be accessible to everyone, whether you’re whipping them up for a big holiday party or just craving a truly satisfying **coffee accompaniment cookie**. Here are answers to the questions I hear most often when people get ready to bake.
Can I use jam instead of nuts in these rolled filled cookies?
Absolutely, you can! While this version focuses on the **walnut filled cookies** center, these **rolled filled cookies** are fantastic with jam too. If you want to swap it out, just use about ¾ cup of thick jam—apricot or raspberry work beautifully. Just keep in mind that if you use jam, you might want to reduce the baking time by just a minute or two, since the jam filling doesn’t need to dry out or cook down quite as much as the ground nut mixture does.
How do I get the buttery pastry cookies to stay tender?
This is my number one tip, and I’ll repeat it until the cows come home! The secret to those perfectly soft, **buttery pastry cookies** is making sure you do not overmix the dough once the flour goes in. You want everything to come together into a shaggy ball, and then stop mixing immediately. If you keep beating it, you develop gluten, and gluten equals toughness rather than that delicate, crumbly texture we are famous for! Remember: mix just until combined. The chill time is just as important as the mixing technique!
Are these Italian nut roll cookies difficult for beginners?
Not at all! I designed this recipe to be shockingly straightforward since I know many of you are looking for easy nut roll instructions. The chilling step does require patience, but the actual hands-on work is very simple. If you can mix ingredients in a bowl and roll out cookie dough, you can master these! The rolling technique is the trickiest part, but if you wipe your knife often, you’ll get those beautiful spirals every time. Seriously, these are so rewarding for a beginner baker!
If you are looking for more foolproof recipes that deliver amazing flavor, check out my collection of the best dessert recipes on the site!
Nutritional Estimates for Your Italian Nut Roll Cookies
Now, let’s talk fuel! When you’re baking something this comforting and delicious, you might be curious about the numbers. Keep in mind that because we are using real butter and ground nuts, these are indulgent little treats perfect for a holiday spread or a special afternoon coffee break. I always tell people that baking for joy is just as important as baking for nutrition, but it’s good to have a general idea!
This information is based on the ingredients listed above, making standard assumptions about ingredient sourcing. Please see these numbers as a friendly guideline rather than strict medical advice. These estimates are calculated for one individual cookie from the batch.
- Serving Size: 1 cookie
- Calories: 180
- Sugar: 10g
- Sodium: 50mg
- Fat: 12g
- Saturated Fat: 6g
- Unsaturated Fat: 6g
- Trans Fat: 0g
- Carbohydrates: 16g
- Fiber: 1g
- Protein: 3g
- Cholesterol: 30mg
Share Your Experience Making These Classic Italian Cookies Recipe
Whew! We did it! I truly hope you feel like royalty having mastered these tender, beautiful italian nut roll cookies. Baking is always better when we share it, so I really want to hear how they turned out for you. Did your dough stay perfectly soft? Did your rolls keep their beautiful spiral shape? Don’t keep all that deliciousness a secret!
Please head down to the comments below and let me know what you thought! A star rating lets me know how reliable this recipe was for you, and if you share photos online, tag me! I absolutely love seeing my recipes come to life in your kitchen—it’s what makes all my testing worthwhile.
If you enjoyed this experience and are ready to tackle another winner, I highly recommend trying out my recipe for the best bruschetta next time you’re looking for an Italian cookies recipe alternative for your next gathering. Happy baking, and thank you for cooking with me!
PrintAuthentic Italian Nut Roll Cookies: Tender Pastry with Sweet Walnut Filling

Make these classic Italian Nut Roll Cookies featuring a tender, buttery dough wrapped around a sweet, spiced walnut filling. This reliable recipe gives you the perfect festive treat for any occasion.
- Prep Time: 45 min
- Cook Time: 18 min
- Total Time: 63 min
- Yield: About 3 dozen cookies 1x
- Category: Dessert
- Method: Baking
- Cuisine: Italian
- Diet: Vegetarian
Ingredients
- 2 ½ cups all-purpose flour
- 1 cup (2 sticks) unsalted butter, softened
- 1 cup sour cream
- 1 egg yolk
- ½ teaspoon salt
- 1 tablespoon sugar
- 1 ½ cups finely ground walnuts
- ½ cup granulated sugar (for filling)
- 1 teaspoon ground cinnamon
- 1 tablespoon melted butter (for filling)
- 1 beaten egg (for egg wash)
- Powdered sugar (for dusting)
Instructions
- Prepare the dough: In a large bowl, combine the flour, softened butter, sour cream, egg yolk, salt, and 1 tablespoon of sugar. Mix until a soft dough forms. Do not overmix.
- Wrap the dough in plastic wrap and chill in the refrigerator for at least 1 hour.
- Prepare the nut filling: In a separate bowl, combine the ground walnuts, ½ cup granulated sugar, cinnamon, and 1 tablespoon of melted butter. Mix well until the ingredients are evenly distributed.
- Preheat your oven to 350°F (175°C). Line baking sheets with parchment paper.
- Divide the chilled dough into two equal halves. Work with one half at a time, keeping the other chilled.
- On a lightly floured surface, roll the dough out into a thin rectangle, approximately 1/8 inch thick.
- Spread half of the nut filling evenly over the rolled-out dough, leaving a small border on one long edge.
- Starting from the long edge opposite the border, tightly roll the dough into a log. Pinch the seam closed.
- Brush the outside of the log lightly with the beaten egg wash.
- Slice the log into 1-inch thick pieces. Place the cookies cut-side up on the prepared baking sheets.
- Repeat the rolling and cutting process with the second half of the dough and filling.
- Bake for 15 to 18 minutes, or until the edges are lightly golden.
- Remove cookies from the oven and let them cool slightly on the baking sheet.
- While still warm, generously dust the Italian nut roll cookies with powdered sugar.
- Let the cookies cool completely before serving or storing.
Notes
- For a richer flavor, you can substitute pecans for walnuts in the filling.
- If you prefer a slightly different texture, you can add 1/4 cup of raisins or chocolate chips to the nut filling mixture.
- This recipe yields a large batch, making it perfect for holiday cookie exchanges.
Nutrition
- Serving Size: 1 cookie
- Calories: 180
- Sugar: 10
- Sodium: 50
- Fat: 12
- Saturated Fat: 6
- Unsaturated Fat: 6
- Trans Fat: 0
- Carbohydrates: 16
- Fiber: 1
- Protein: 3
- Cholesterol: 30