
Wow, I know you’ve seen them flooding your feeds—those unbelievably crispy, impossibly cheesy sticks of heaven! Making the internet-famous Korean corn dog seemed like something only a Seoul street vendor could achieve, right? Well, forget that notion! Welcome! Let’s Master Your Kitchen, Together. I’m Kate Connolly, and I guarantee this Korean corn dog recipe works perfectly for you starting today. We are conquering that iconic, satisfying cheesy pull and achieving that signature crunch you see in all the best videos. This is the ultimate snack, and we are making it reliable and joyful right here at home!
- Gathering Ingredients for Your Korean Corn Dog
- How to Prepare the Best Korean Corn Dog Batter
- Assembling and Setting Up Your Korean Corn Dog
- The Deep Frying Process for a Perfect Korean Corn Dog
- Finishing Touches: Dusting and Serving Your Korean Corn Dog
- Tips for Success Making Korean Corn Dogs at Home
- Frequently Asked Questions About the Korean Corn Dog Recipe
- Storage and Reheating Instructions for Leftover Korean Corn Dogs
What makes this recipe the one you’ll stick with? Honestly, it’s the texture compromise we nail every single time. We aren’t settling for a standard, cakey batter here. We’re aiming for that incredible contrast: that chewy interior giving way to a shatteringly crisp exterior. When you use the right ingredients and handle the oil temperature correctly, you get that authentic street food quality. I promise you, once you see that perfect crust, you’ll feel like you mastered a famous technique!
Achieving That Viral Crispy Street Food Snack Texture
The texture is all about timing and coating. Resting the batter for a full hour is non-negotiable; it wakes up that yeast and gives you the slight chewiness that separates the good from the great. Then you have the crunch factor. You can stick to classic Panko breadcrumbs, which give a lovely, airy crispness. But if you’re feeling adventurous and want to make Gamja Hotdog Recipe-style dogs, finely chopping those frozen fries and pressing them onto the batter before frying creates the most insane, craggy, crispy exterior you can imagine! Remember, 350°F is your magic number for frying—too cool, and it gets greasy; too hot, and the outside burns before the inside melts.
Mastering the Cheesy Corn Dog with Mozzarella Pull
Listen, if you’re making these for your friends or family, the cheese pull is the main event! Seeing that glorious, stretchy mozzarella ribbon when you pull the dog apart is why we make the Cheesy Corn Dog with Mozzarella. My secret here is simple: make sure your cheese sticks are frosty!
The colder the cheese is when you thread it onto the skewer and dip it into the batter, the better it holds its shape. A cold center gives the batter and crust time to fully cook around it without the cheese melting prematurely and leaking out into the hot oil. Trust me, keeping that cheese chilled is the difference between a perfect pull and a melty mess!
Gathering Ingredients for Your Korean Corn Dog
Okay, let’s talk supplies! You can’t make street food magic without having all your ducks in a row first. I’ve listed everything you need below, but I want to point out a couple of things right away because they make a huge difference. For the batter, grabbing sweet rice flour is important if you want that slightly chewy glutenous texture that really sets this apart from a regular, fluffy pancake batter. Don’t panic if your store is out, though! You can substitute it with equal parts all-purpose flour. It just won’t have that exact same satisfying ‘give’ when you bite into it.
Next up are your hot dogs and cheese. I always recommend good quality all-beef dogs—you’re deep-frying them, so you want them to be flavorful. And the cheese? You absolutely need those firm mozzarella sticks that are pre-cut. They fry up beautifully and don’t melt out everywhere before the outer shell has set. We need precision when we’re dealing with hot oil, don’t we?
Coating Choices: Panko vs. Potato Crusted Corn Dogs
This is where things get fun because you get to choose your adventure! Most recipes you see online feature the simple Panko coating. That’s fantastic; it puffs up light and crispy, giving you that lovely golden armor for your dog. It’s fast and reliable for an Easy Homemade Corn Dog night.
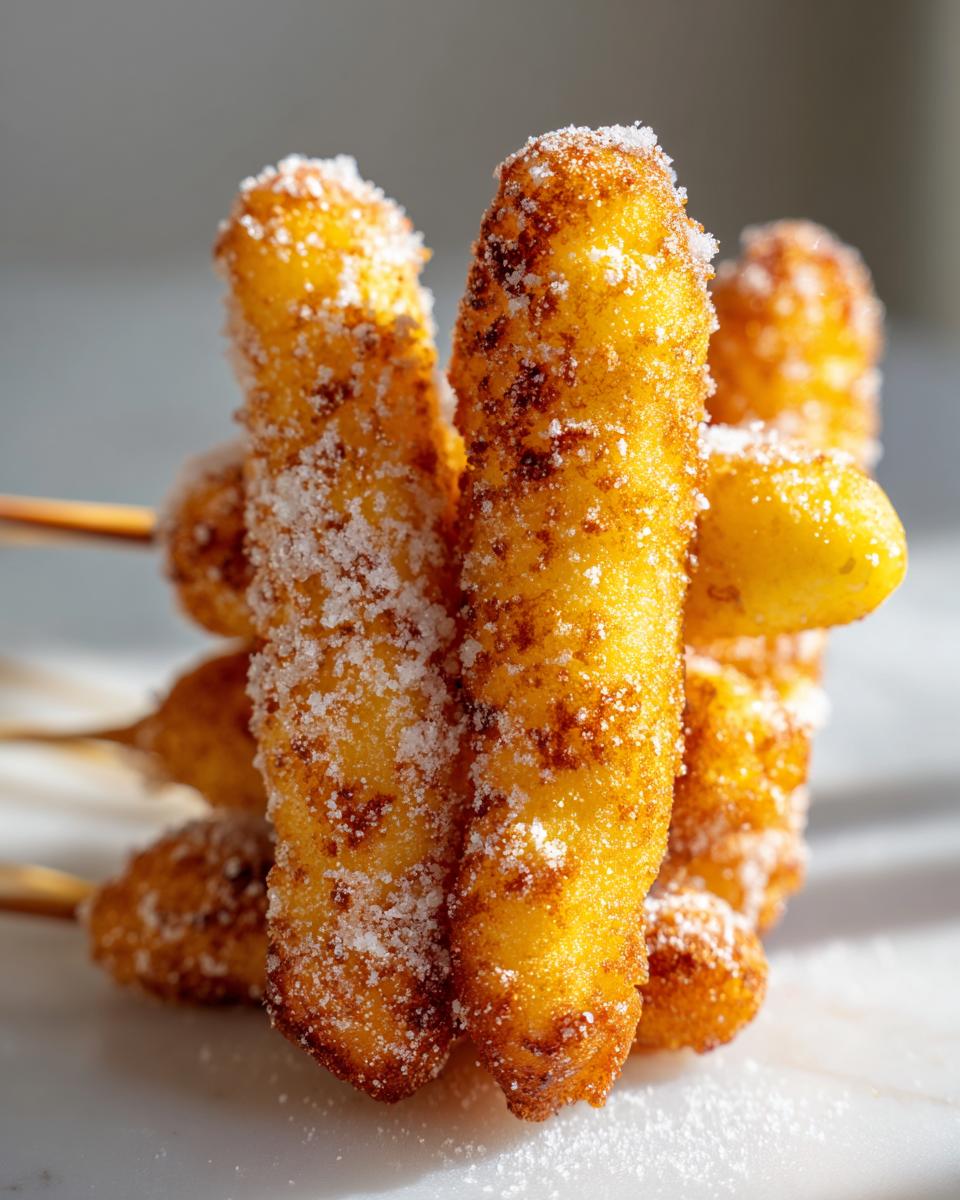
But if you are dedicated to recreating the absolute best Korean street experience, you have to try the Gamja Hotdog Recipe style. Gamja just means potato, and you cover the battered dog in small, chopped-up pieces of frozen french fries before chilling and frying. Seriously, the texture it creates is unbelievable—it’s crunchy, bumpy, savory, and just screams Korean Street Food Recipes. It takes an extra five minutes of prep, but trust me, it’s worth the extra crispy texture.
How to Prepare the Best Korean Corn Dog Batter
Alright, now we move into the real magic: the batter itself! This isn’t just flour and water, oh no. We need active ingredients to get that bounce and structure we crave, which is why we start by waking up our yeast. Take a tiny bit of your measured cold water—just a splash—and mix in your yeast along with a pinch of sugar. You let that hang out for about ten minutes until it looks foamy and happy. That tells me the yeast is ready to do its job and give our batter lift.
Once bubbly, we combine it with the dry ingredients: all the flours, baking powder, and salt. Mix those up well first. Then, you gently pour in the wet stuff, including your foamy yeast mixture and the rest of the cold water and egg. Here is the million-dollar tip for amazing texture when making any kind of fried snacks recipe: *Do not overmix the wet and dry ingredients!* Trust me on this one, mixing too much develops the gluten too fast, and instead of a light, chewy crust, you get a dense, tough layer.
Just whisk until you see everything incorporated smoothly. A few little flour lumps are totally fine—they’ll disappear when the batter rests. Cover that bowl up and find a warm spot in your kitchen for about an hour. This resting time is critical for the yeasted flavor to develop and for the batter to puff up just right before we assemble our How to Make Korean Corn Dogs!
Assembling and Setting Up Your Korean Corn Dog
We’ve got our glorious, puffy batter resting beautifully, so it’s time to get these hot dogs ready for their close-up! This is assembly time, and it’s kind of fun, like building tiny, edible sculptures. First things first: grab your skewers. If you’re making the classic, just slide your chilled hot dog right onto the stick, centering it nicely.
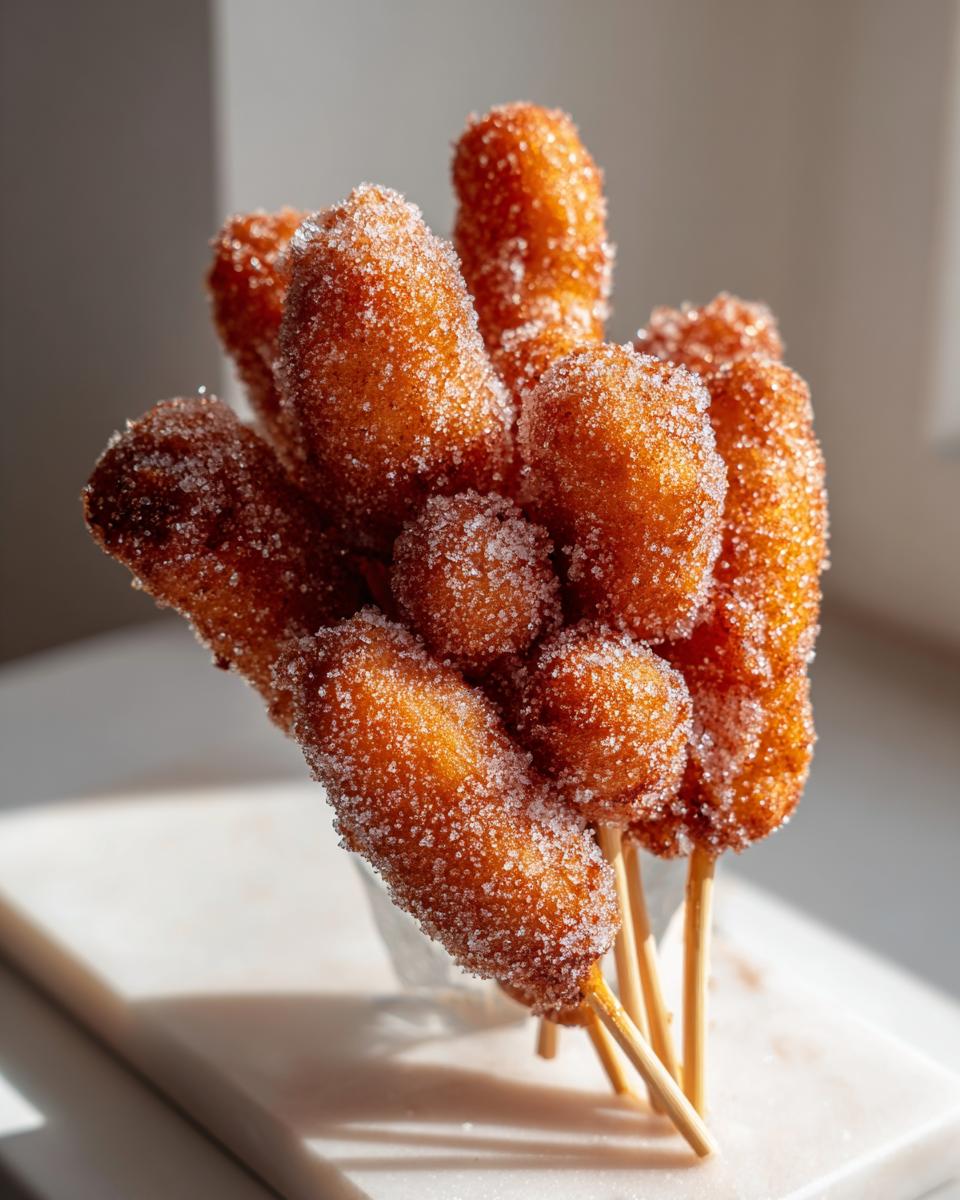
Now, if you want that *ultimate* experience, you absolutely must try the half-and-half assembly. I thread a cold mozzarella stick onto the skewer first, push it down almost to the bottom, and then I slide the hot dog right on top of the cheese. This ensures that when you bite in, you get that amazing double punch of savory meat and melty cheese. Remember, I mentioned keeping that cheese cold? Now is when that planning pays off big time!
Once they are skewered, it is dipping time! Hold the skewer firmly, dip the entire dog into the batter, and let the excess drip off for just a second—we don’t want gloppy dogs. Immediately, roll it over your chosen coating—whether that’s the Panko or our little chopped fries for the Deep Fried Snacks Recipe special. Make sure you press the coating gently so it sticks evenly all around the batter. This coating is what protects the hot dog and the cheese from the heat.
Here’s the part that separates the home cooks from the experts: the chill! Once they are perfectly coated, put them on a parchment-lined tray and send them directly to the freezer for at least 30 minutes. I know, I know, waiting is the worst when you’re hungry, but this hardening step is crucial! If the coating isn’t completely set and cold when it hits that hot oil, the whole thing will just slide right off the skewer and make a huge oily mess. Patience now equals perfection later, my friends!
The Deep Frying Process for a Perfect Korean Corn Dog
Okay, they’re chilled, they’re coated, and they are ready to face the heat! This is where we bring the street food experience right into your kitchen, but we have to be smart about the oil. You need a deep, heavy-bottomed pot—a Dutch oven works beautifully for consistency—filled with about three inches of vegetable oil. Before you even think about dipping, you need to bring that oil up to 350°F (175°C). Seriously, get a candy or deep-fry thermometer! Maintaining that specific temperature is the absolute secret to getting that stunningly crispy shell without a greasy flavor. If your thermometer reads lower, the batter soaks up oil; too high, and the outside burns before the inside finishes cooking.
When you’re ready, gently lower just one or, at most, two of your frozen Authentic Korean Corn Dog creations into the oil using tongs. Do not overcrowd the pot, or you’ll immediately drop that all-important temperature!
Let them sizzle and brown for about three to four minutes. You’ll see them start to float and bubble aggressively. You need to turn them gently every so often to ensure all sides get that beautiful, deep golden-brown color. If you made the cheesy version, fry until you can *feel* the slight give in the stick indicating the mozzarella is gooey inside. Once they look perfectly crisp, lift them out carefully and set them on a wire rack over paper towels. This drains the excess oil beautifully, keeping that crust crunchy right up until it hits the sugar!

For more foolproof frying tips that work for all your favorite fried snacks recipe, make sure you check out my main guide!
Finishing Touches: Dusting and Serving Your Korean Corn Dog
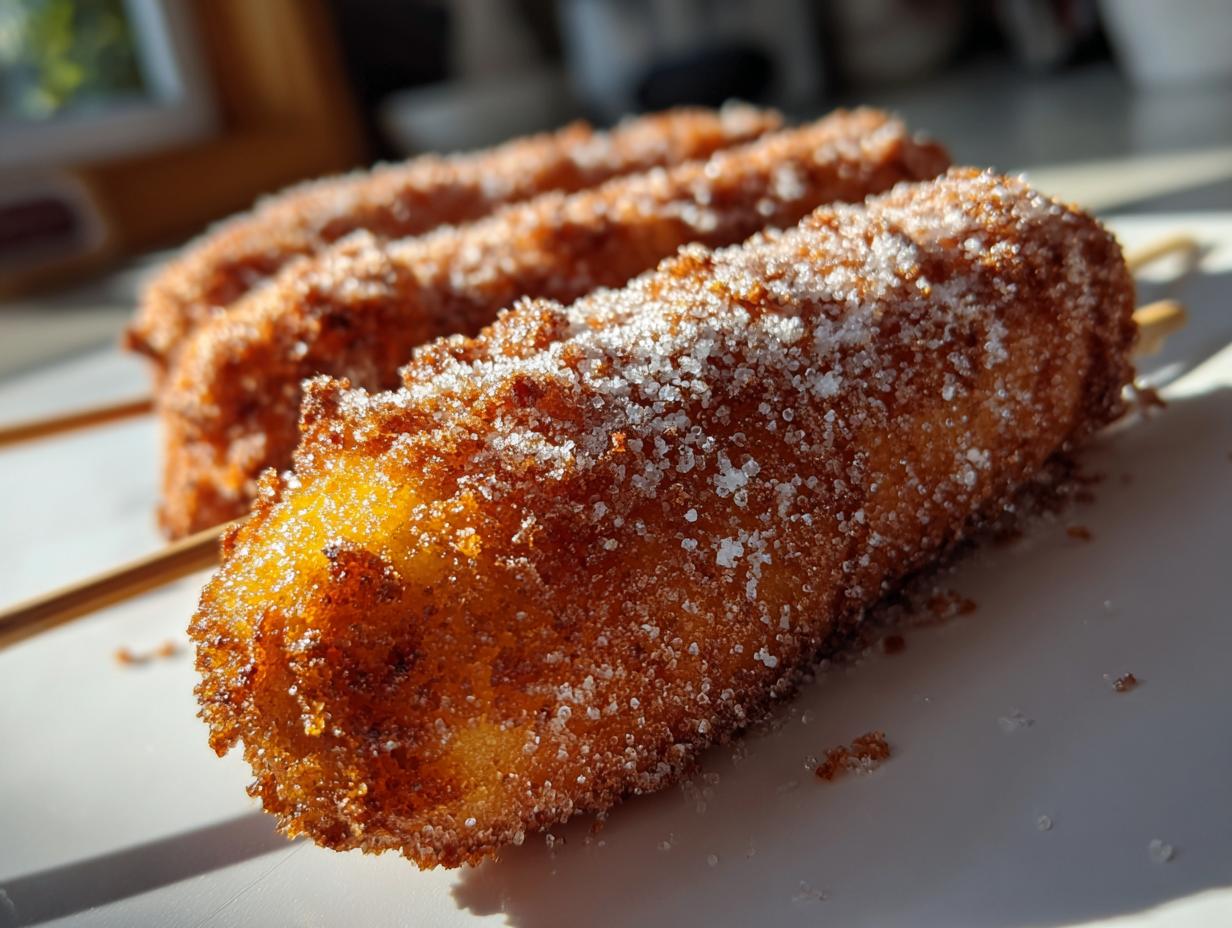
We’ve fried them perfectly; now for the step that truly tells everyone you’re making an *authentic* Korean corn dog! The moment those beautiful cylinders come out of the oil, you must get them into a shallow dish of plain granulated sugar. Don’t skip this! It seems odd to put sugar on a hot dog, but that sweet dusting against that savory, salty crunch is what makes this snack legendary. They must be hot when you roll them—the residual heat and slight oiliness help the sugar stick immediately. It takes maybe ten seconds per dog, and then they are ready for their final appearance!
Once dusted, you can serve them plain, but most of us want sauces, right? Ketchup and yellow mustard are classics, and honestly, they work perfectly because they echo that sweet-and-savory profile. But if you want to kick things up and make a real statement, you need a spicy drizzle. I’ve whipped up a ridiculously easy spicy sauce that pairs perfectly!
Quick Gochujang Sauce for Korean Corn Dogs
This little concoction is sunshine in a mixing bowl, and it’s way better than just using plain hot sauce on your sweet and savory snack. You just need three things from your pantry, and you mix them right here in a small ramekin.
- Take 2 tablespoons of ketchup—the base we all have.
- Add 1 glorious tablespoon of Gochujang paste. This brings the beautiful fermented heat and depth we want.
- Stir in 1 teaspoon of honey or maple syrup to balance that spice out perfectly.
Whisk it smooth. That’s it! You now have a spicy, slightly sweet dipping sauce that makes these crispy dogs absolutely addictive. Serve them immediately on a stick so everyone can grab and dip!
Tips for Success Making Korean Corn Dogs at Home
When testing this recipe hundreds of times—because, yes, I’ve made these *that* often—a few little habits really popped out that make all the difference. First, let’s talk batter consistency; if your batter seems too thin after that hour rest, don’t panic! Just whisk in another tablespoon of flour. We want it thick enough to coat heavily, not just drip off immediately. That thickness is what traps the steam and keeps the cheese gooey inside.

Second piece of advice from my trial-and-error sessions: make sure your oil is fresh, or at least clarified. Old oil tastes bitter and coats your beautiful crust in a muddy color. Keep that oil clean, and you’ll end up with that fantastic golden color that looks like it came straight from a Korean Foodie Favorites street stall.
Finally, that sweet and savory balance we crave in every Korean Corn Dog Recipe? It all comes down to the sugar dusting *after* frying. If you wait even two minutes after they cool down, the sugar won’t adhere as well, and the contrast won’t be as sharp. Do it immediately!
Frequently Asked Questions About the Korean Corn Dog Recipe
I know you probably have questions! It’s totally normal when trying a new recipe, especially one that looks as impressive as these Viral Food Trends Recipe dogs. I’ve answered the most common things people ask me when they try making these for the first time. Don’t worry, getting these Easy Homemade Corn Dogs right is simpler than they look!
Can I bake or air fry my Korean Corn Dogs instead of deep frying?
This is the question I get asked the most! Look, if you are chasing that authentic Korean street food crunch—that slightly chewy, super crisp shell that seems to shatter when you bite it—you really need to deep fry. Frying allows the batter to puff instantly and cook evenly while locking in that moist center.
If deep frying is completely off the table for you, you *can* try the air fryer. However, I need to be upfront: the texture won’t be the same. You’ll skip the greasy factor, which is great, but you’ll lose that beautiful, rugged crunch. You’ll need to heavily spray the outside with oil first, and even then, it tends to come out more baked than fried. It’s an okay option for leftovers, but for the first batch, go for the deep fry if you can!
What is the difference between a regular corn dog and a Korean Corn Dog?
That’s a great question because they look similar, but they are miles apart in flavor experience! The biggest difference starts with the batter. A traditional American corn dog usually uses a cornmeal-based batter that fries up more like a simple cake. Our Korean Corn Dog Recipe uses a yeast-activated batter that often includes sweet rice flour, which gives it that wonderful chewiness.
The other two huge differentiators are the filling and the finish. Most Korean corn dogs contain mozzarella cheese (or half cheese, half hot dog), which gives us that fantastic pull. And finally, you simply cannot call it authentic unless you roll it immediately in granulated sugar right after it comes out of the oil. That combination of salty dog, savory coating, and sweet exterior is what makes the Korean version so addictive!
Storage and Reheating Instructions for Leftover Korean Corn Dogs
I know, I know, the idea of having leftovers from these perfect Korean Corn Dogs feels almost criminal. They are absolutely at their peak quality—crispy, hot, and perfectly sugared—the second they leave that wire rack. If you manage to save any, though, we need to treat them right so they don’t turn into sad, greasy sponges!
If you’re planning on eating them within a few hours, the best way to store them is loosely wrapped on a plate on the counter. Don’t seal them tight in plastic; that trapped moisture is the enemy of crispiness! If you absolutely must keep them until the next day, wrap them loosely in paper towels and pop them in the fridge. But I’m warning you, even paper towels can’t completely protect that beautiful crust overnight.
Reheating is where you can bring most of the magic back, but you have to ditch the microwave. Microwaving steamed food is nice, but it will make your crispy coating rubbery, and nobody wants that!
For the best results and to try and bring back that glorious crunch, you need dry heat. The oven or the air fryer are your best friends here. Set your oven to about 375°F (190°C) and place the corn dogs directly on a wire rack set over a baking sheet. This lets hot air circulate all around the entire surface. Give them about 8 to 10 minutes. If you are using an air fryer, 350°F for 5 to 7 minutes works wonders!
You just want them heated through so the cheese melts ideally, but most importantly, you want that crust to re-crisp. Once they are hot, give them a quick fresh roll in some extra granulated sugar if they look a little dull. That little bit of extra sweetness makes all the difference when reheating those incredible sweet and savory snack!
PrintViral Cheesy Korean Corn Dogs (Gamja Style): Crispy, Street Food Perfected at Home
You can now make the internet-famous Korean corn dogs right at home. This recipe delivers a crunchy exterior, a gooey mozzarella center, and the classic sugar dusting for the ultimate sweet and savory street food snack.
- Prep Time: 20 min
- Cook Time: 15 min
- Total Time: 1 hour 35 min
- Yield: 10 servings 1x
- Category: Snack
- Method: Deep Frying
- Cuisine: Korean
- Diet: Vegetarian
Ingredients
- 1 cup all-purpose flour
- 1/2 cup sweet rice flour (or substitute with more all-purpose flour)
- 1 teaspoon baking powder
- 1/2 teaspoon salt
- 1 tablespoon granulated sugar
- 1 cup cold water
- 1 large egg
- 1 teaspoon active dry yeast
- 10 hot dogs (all-beef recommended)
- 10 wooden skewers or sticks
- 1 cup mozzarella cheese sticks (or half hot dog, half cheese combination)
- 1 cup panko breadcrumbs (for standard coating) OR 1 cup frozen french fries, chopped small (for Gamja/Potato coating)
- Vegetable oil, for deep frying
- Granulated sugar, for dusting
- Ketchup, mustard, or Gochujang sauce, for serving
Instructions
- Activate the yeast: In a small bowl, dissolve the yeast and 1 teaspoon of sugar in 1/4 cup of the cold water. Let it sit for 5 to 10 minutes until foamy.
- Prepare the batter: In a large bowl, whisk together the all-purpose flour, sweet rice flour, baking powder, and salt. Add the activated yeast mixture, the remaining cold water, and the egg. Whisk until just combined; do not overmix. Cover the bowl and let the batter rest in a warm place for 1 hour until slightly puffy.
- Prepare the coating: If making Gamja Hotdogs, finely chop the frozen french fries into small pieces and spread them on a plate. If using panko, spread the panko on a separate plate.
- Assemble the corn dogs: Pat the hot dogs dry. Carefully thread each hot dog onto a wooden skewer. If using the half-and-half style, thread a cheese stick onto the skewer, followed by the hot dog.
- Coat the corn dogs: Dip each skewered hot dog completely into the batter, letting excess drip off. Immediately roll the battered hot dog in your chosen coating (panko or chopped fries), pressing gently so the coating adheres well. Place the coated corn dogs on a parchment-lined tray.
- Chill: Place the coated corn dogs in the freezer for at least 30 minutes. This step helps the coating set and prevents it from falling off during frying.
- Heat the oil: Pour 2 to 3 inches of vegetable oil into a deep, heavy-bottomed pot or Dutch oven. Heat the oil to 350°F (175°C). Use a thermometer to monitor the temperature; maintaining this heat is key for a crispy exterior.
- Fry: Carefully lower 1 or 2 corn dogs into the hot oil, ensuring you do not overcrowd the pot. Fry for 3 to 4 minutes, turning occasionally, until the coating is deep golden brown and crispy. If using cheese, fry until the cheese is fully melted inside.
- Drain and dust: Remove the corn dogs with tongs and place them on a wire rack set over a paper towel-lined baking sheet to drain excess oil. While still hot, immediately roll the corn dogs generously in granulated sugar.
- Serve: Serve your crispy Korean corn dogs immediately with your preferred dipping sauces like ketchup, mustard, or a spicy Gochujang mixture.
Notes
- For the best cheesy pull, make sure your mozzarella cheese sticks are cold when you assemble them.
- If you want a slightly sweeter batter flavor, add 1 tablespoon of sugar directly into the main batter mixture.
- To make a quick spicy sauce, mix 2 tablespoons of ketchup with 1 tablespoon of Gochujang paste and 1 teaspoon of honey.
Nutrition
- Serving Size: 1 corn dog
- Calories: 350
- Sugar: 12
- Sodium: 550
- Fat: 20
- Saturated Fat: 7
- Unsaturated Fat: 13
- Trans Fat: 0
- Carbohydrates: 30
- Fiber: 1
- Protein: 15
- Cholesterol: 45