
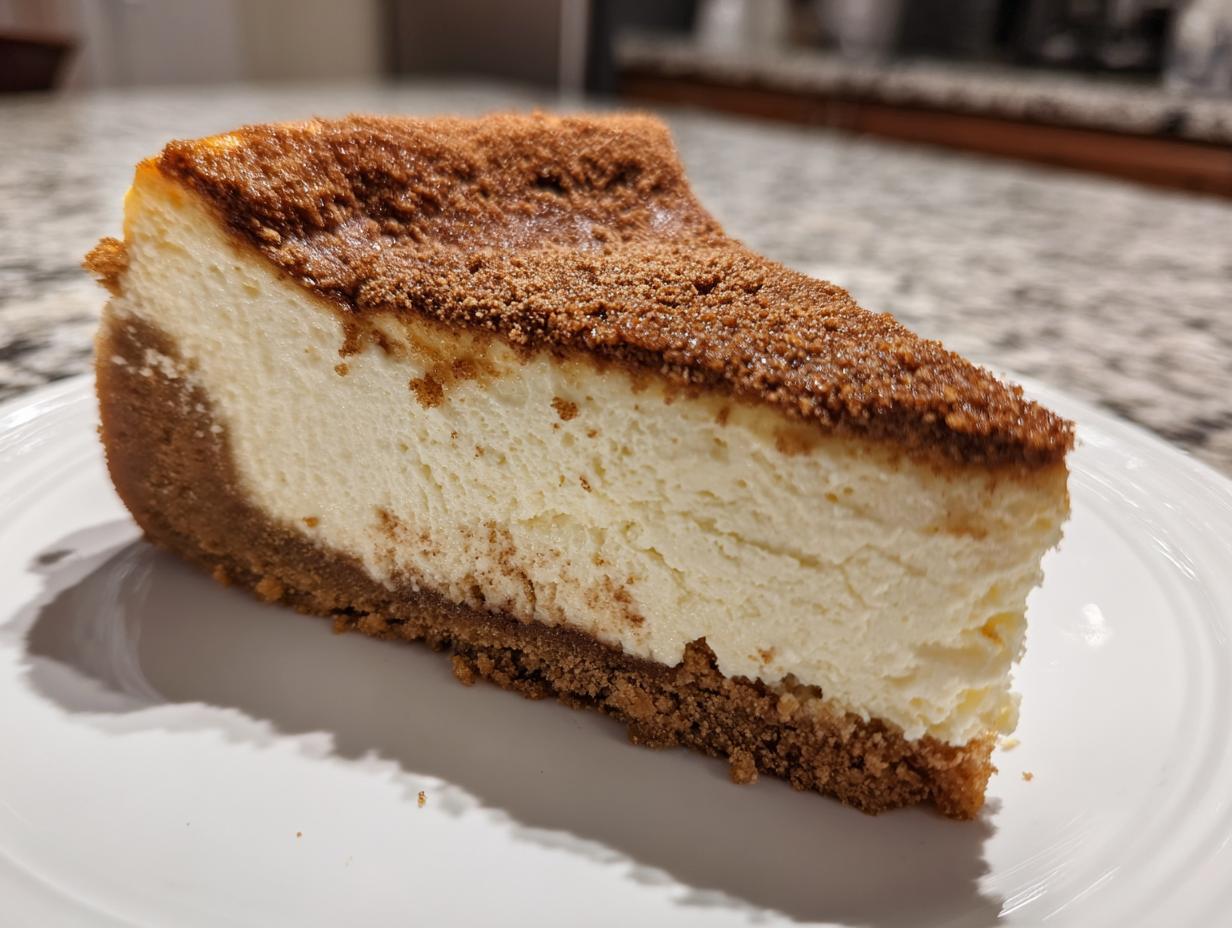
Listen, if you’re anything like me, you believe dessert mashups are where the real magic happens! We all love a classic snickerdoodle, and who can resist a silky cheesecake? Well, bringing those two powerhouses together gives us the Ultimate Creamy Snickerdoodle Cheesecake, and trust me, this is the quintessential cozy baking recipe you need this year. Every holiday spread deserves this showstopper. You know I test everything until it’s perfect; that’s the promise here at Kings Cook. I’ve rigorously tested batch after batch to ensure that every American home cook, beginner or seasoned pro, gets that perfectly smooth texture and that signature cinnamon warmth we all crave. Get ready for your new favorite centerpiece!
- Why This snickerdoodle cheesecake Recipe is Your New Favorite Holiday Cheesecake Dessert
- Gathering Ingredients for Your snickerdoodle cheesecake
- Step-by-Step Instructions for the Best Creamy Cheesecake Recipe
- Tips for Success with Your Homemade snickerdoodle cheesecake
- Ingredient Notes and Substitutions for this Cinnamon Cheesecake Dessert
- Serving Suggestions for Your Festive Desserts
- Storage and Reheating Instructions for snickerdoodle cheesecake
- Frequently Asked Questions about snickerdoodle cheesecake
- Estimated Nutritional Data for this Cinnamon Sugar Dessert
- Share Your Ultimate Creamy snickerdoodle cheesecake Creations
Why This snickerdoodle cheesecake Recipe is Your New Favorite Holiday Cheesecake Dessert
I get asked all the time what dessert stands out when the holidays roll around, and honestly, it’s this one. It’s not just another **cinnamon cheesecake dessert**; it’s the perfect marriage of two beloved treats. I’ve worked really hard on this **Snickerdoodle Cheesecake Recipe** so you don’t have to worry about cracks or a grainy texture. It’s designed to be reliable, even when things get hectic. You can see why people love this style of bake—check out this neat inspiration over here—but trust me, your batch made with my steps will be the talk of the table!
This cheesecake is a total winner for any festive occasion because:
- It delivers that incredible, soft texture, making it one of the **best cheesecake recipes** out there.
- The flavor profile is pure fall and winter comfort—warm, sweet, and deeply spiced, perfect for **festive desserts**.
- The assembly is surprisingly straightforward, giving you a huge payoff for the effort.
- It looks stunning next to pies, making a fantastic addition to your **Thanksgiving Dessert Recipes** spread.
If you enjoy experimenting with different spiced baked goods, you might want to check out my recipe for apple cinnamon muffins next!
The Velvety Cheesecake Filling Secret
When I tell you this filling is rich, I mean it! The secret to that velvety texture isn’t magic—it’s careful temperature control. You absolutely must use room temperature cream cheese and eggs; cold ingredients just won’t blend smoothly. We focus on beating the eggs in one at a time and stopping the mixer as soon as they disappear. Overmixing those eggs basically introduces too much air, which leads to cracking later. Plus, we use a water bath, which steams the cake gently, ensuring it cooks evenly from the outside in. It keeps everything luscious and smooth for that perfect **creamy cheesecake recipe**.
Perfect Cinnamon Swirl and Cinnamon Crumb Topping
This recipe is such a brilliant **cheesecake dessert mashup** because it layers all those snickerdoodle elements beautifully. We create this quick cinnamon-sugar crumb that acts as a layer right in the middle, and then it gets sprinkled again on top before baking! This dual presence of that spiced sugar mixture melts slightly into the filling while baking, giving you little pockets of intense flavor. It’s much better than just a simple swirl because you get that wonderful, slightly crisp, buttery **cinnamon crumb topping**. It brings all the cookie vibes right to the top of your **homemade cheesecake**.
Gathering Ingredients for Your snickerdoodle cheesecake
Alright, let’s talk supplies! As I always promise here at Kings Cook, we aren’t hunting for any fancy, hard-to-find items. Everything you need for this ultimate **snickerdoodle cheesecake** can be grabbed on your regular weekly run to the American grocery store. That’s the beauty of classic baking—wholesome, straightforward ingredients that deliver maximum flavor. We’re breaking this down into just three main areas: the crust that sets the stage, the rich filling, and that crucial spiced topping that brings the snickerdoodle party!
Get your list ready. We need this **creamy cheesecake recipe** to come together smoothly!
For the Cinnamon Graham Cracker Crust:
- 1 3/4 cups graham cracker crumbs
- 1/4 cup granulated sugar
- 1 teaspoon ground cinnamon
- 6 tablespoons unsalted butter, melted (Make sure this is fully melted and ready to go!)
For the Velvety Cheesecake Filling:
- 3 (8 ounce) packages cream cheese, softened (This is non-negotiable, remember room temperature is key!)
- 1 1/2 cups granulated sugar
- 1/2 cup sour cream
- 1 teaspoon vanilla extract
- 1/4 teaspoon ground nutmeg (Just a pinch for warmth!)
- 3 large eggs (Also at room temperature, please!)
For the Cinnamon Swirl Layer/Topping:
- 1/2 cup all-purpose flour
- 1/2 cup packed light brown sugar (I love that molasses flavor it adds!)
- 1/2 teaspoon ground cinnamon (For that signature snickerdoodle punch)
If you’re curious how to use up that brown sugar in another easy bake, you should definitely save my easy pumpkin bread recipe for later. But for now, let’s focus on getting this cheesecake into the oven!
Step-by-Step Instructions for the Best Creamy Cheesecake Recipe
Okay, deep breath—we are diving into the main event! This is where the science of a perfect **creamy cheesecake recipe** comes into play, but don’t let that scare you. I’ve condensed all my testing into a straightforward guide. We need precision here for that gorgeous dessert; we’re aiming for minimal cracking and maximum flavor payoff from our **Snickerdoodle Cheesecake Recipe**. Remember, patience during the cooling stage is just as important as the baking itself! If you want to see how I handle a couple of other simple bakes, check out my easy cheesecake recipe guide, or browse all my best dessert recipes!
Preparing the Cinnamon Spiced Crust
First things first, let’s get that base ready. Preheat your oven to 350 degrees F—we need it nice and hot for that initial 10-minute bake. Now, grab that 9-inch springform pan. This is crucial: wrap the outside bottom TIGHTLY with heavy-duty aluminum foil. I usually do two or three complete layers. This barrier protects the crust from splashing water in the bath later on. Next, in a bowl, mix your graham cracker crumbs, the 1/4 cup of sugar, and 1 teaspoon of cinnamon. Pour in that 6 tablespoons of melted butter and stir until every crumb looks evenly damp. Press this mixture firmly, using the bottom of a flat glass or measuring cup, into the bottom of your prepared pan. You want a solid foundation! Bake it just for 10 minutes. Pull it out, let it cool a tiny bit while you whip up the filling.
Creating the Velvety snickerdoodle cheesecake Filling
This step determines how luscious your final product tastes! Remember what I said about room temperature cream cheese? Start there! Beat the softened cream cheese in a large bowl until it’s truly smooth—no lumps allowed! Then, slowly stream in that 1 1/2 cups of sugar while mixing. After that, add your sour cream, vanilla, and that tiny bit of nutmeg for warmth. Mix it until it looks happy and even. Now, the eggs. Add them one at a time, mixing on low speed until *just* combined. Don’t be tempted to speed up the mixer here! If you incorporate too much air, bam—cracks city! We want dense and creamy, not airy.
Here’s where we build the snickerdoodle flavor structure:
- Pour *half* of that beautiful, smooth filling right over your slightly cooled crust.
- In a small bowl, quickly whisk together the flour, brown sugar, and the other 1/2 teaspoon of cinnamon. This is our flavor layer! Sprinkle this **cinnamon sugar dessert** mix evenly over the filling. Be generous but careful not to dump it all in one spot.
- Gently pour the remaining cheesecake filling on top of that spiced layer. Try to pour it on the back of a spoon if you can, to keep the cinnamon mixture from sinking too much.
Baking the snickerdoodle cheesecake in a Water Bath
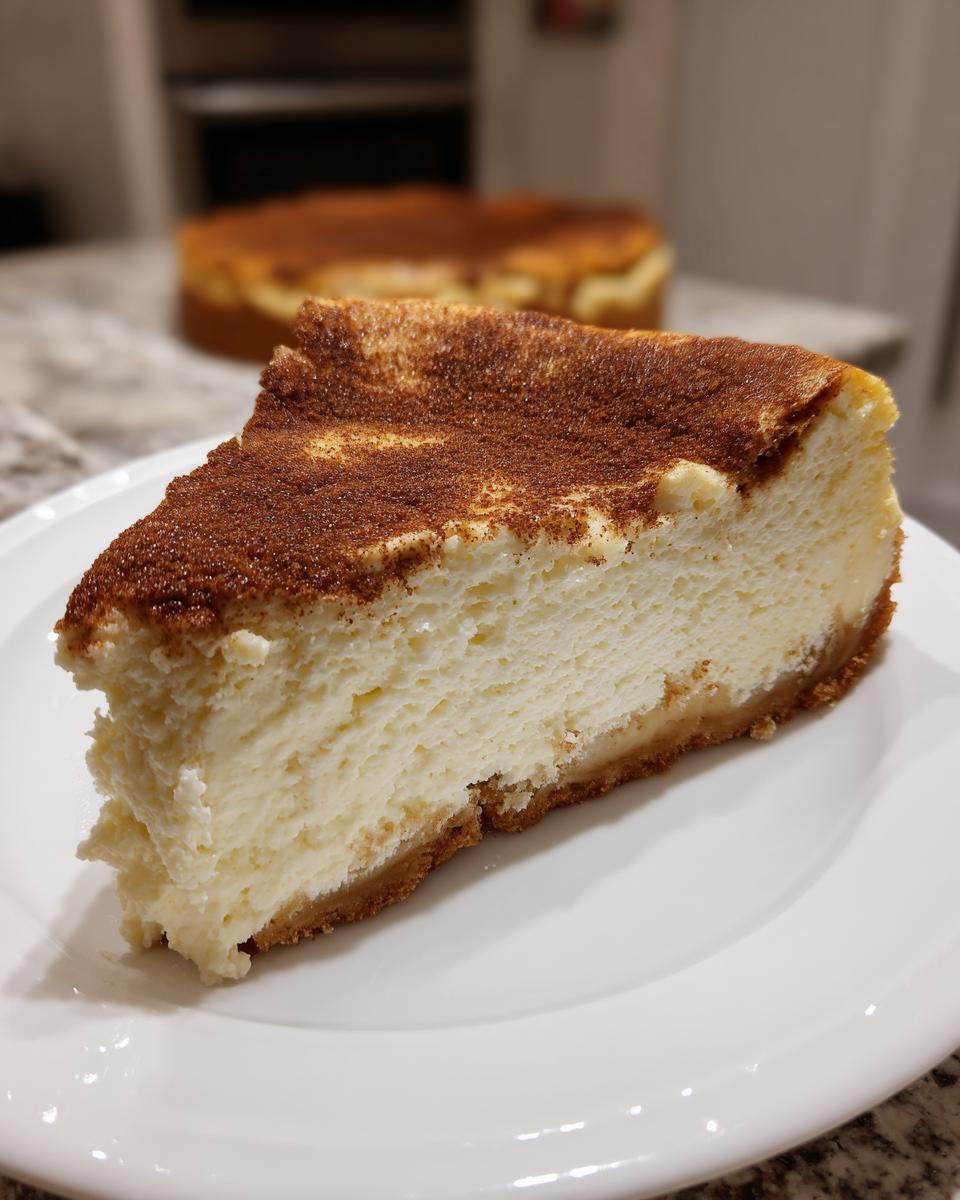
Don’t skip this step if you want that perfect, **velvety cheesecake filling**! Find a roasting pan that is significantly bigger than your springform pan. Carefully set your foil-wrapped cheesecake inside the roasting pan. Now, here is my little safety tip from the kitchen: place the roasting pan securely on the middle rack of your oven *before* adding the water. Trying to carry a roasting pan full of hot water across the kitchen? Nope, not worth the risk! Once the pan is safely in the oven, fetch some hot water—the hotter, the better—and slowly pour it into the roasting pan until the water level comes about halfway up the sides of the cheesecake pan. This water bath keeps the oven environment humid, which is essential for even baking. Bake for 60 to 70 minutes. You’ll know it’s done when the edges look set but the center still has a slight wiggle, like soft gelatin. For the best results, check out this handy article on baking tips here.
The cooling process is the final trick to avoid cracks! Turn the oven OFF. Crack the door open just a little—a wooden spoon wedged in the door works perfectly—and let the **homemade cheesecake** cool slowly inside for a full hour. After an hour, take it out of the water bath, let it sit on the counter until totally cool, then wrap it up and chill for at least 6 hours, or truly overnight. Trust me, the wait makes the rewards that much sweeter!
Tips for Success with Your Homemade snickerdoodle cheesecake
Look, I’ve made this **snickerdoodle cheesecake** recipe enough times that I practically dream in cream cheese swirls. Because I’ve made every single mistake in the book—from curdled filling to giant, tragic cracks—I wanted to share the final lessons learned. Consider these your cheat sheet for guaranteed indulgence. When it comes to baking, especially rich desserts like this, the small details make all the difference in achieving that truly **creamy cheesecake recipe** result.
Here are the three things you absolutely cannot skip for the best result:
- Use Full-Fat Everything! I know, I know, you sometimes try to lighten things up, but for cheesecake luxury, you need the full-fat cream cheese and the full-fat sour cream. Anything less will mess up the structure and you won’t get that dense, beautiful set you’re looking for. Skimping here is how you end up with a runny center that just won’t firm up properly.
- Don’t Rush the Chill Time: I get it; the smell of warm cinnamon sugar is intoxicating, and you want to cut into this immediately. But the chilling time—6 hours minimum, overnight preferably—is crucial for texture. It allows the fats to solidify and the proteins to relax. If you cut it early, it might look cooked, but it will collapse into a puddle. Patience wins the dessert game here!
- Maximize That Cinnamon Flavor: Since we are leaning heavily into the snickerdoodle profile, you want your spices to pop! Before adding the cinnamon sugar topping, actually toss the brown sugar and cinnamon for it in a tiny, dry skillet over medium-low heat for about 30 seconds. Just stir constantly until you can really smell it blooming. This toasting step wakes up the spice so it doesn’t taste muddy next to that sweet cheesecake. It’s a tiny extra step, but oh my goodness, it amps up the flavor depth.
If you want to practice another cozy, comforting bake that’s much faster, you should check out my favorite way to make moist banana bread while your cheesecake is chilling. Happy baking!
Ingredient Notes and Substitutions for this Cinnamon Cheesecake Dessert
So, you found a great recipe, but you’re standing in the pantry realizing you’re short one tiny thing? Hey, that happens! Life doesn’t always let you run to the store for exactly what’s listed, and that’s okay. My goal is to give you reliable results using accessible ingredients, so let’s chat quickly about tweaks for this amazing **Cinnamon Cheesecake Dessert**.
The good news is that the core structure of this **Snickerdoodle Cheesecake Recipe** is super dependable, but here are my thoughts on swapping a few things out without ruining that precious creamy texture we worked so hard for:
Butter Saltiness and Crumb Choices
What if you only have salted butter instead of the unsalted I specified? Don’t stress about it! Just reduce the added salt in your crust mixture by half a pinch, or skip it entirely. Since the graham crackers already have some salt, it usually balances out just fine in the end. We aren’t adding salt anywhere else!
For the crust, the graham cracker is classic, but if you ran out or just don’t love them, crushed vanilla wafers or even good quality shortbread cookies work beautifully. Just make sure you crush them super fine and treat them exactly as you would the graham crumbs—you still need that measured melted butter to bind things together for your **Cheesecake with Cookie Crust**!
Nutmeg and Vanilla Adjustments
You might be wondering about that tiny whisper of nutmeg. Honestly, if you absolutely hate nutmeg, you can skip it. It’s just there to give that deep, cozy background note that reminds you of old-school baking. We use vanilla for the sweetness lift, but feel free to use clear vanilla extract if you’re worried about the color, though I doubt anyone notices in the filling!
Now, if you are missing one of these extracts altogether, you can bump up the other slightly, but just a tiny bit. For instance, use 1 1/4 teaspoon of vanilla instead of 1, but please don’t skip the vanilla entirely! It sharpens the flavor against all that richness. If you are looking for another great option using warm spices that is much less involved than a cheesecake, try my zucchini bread; it’s a fantastic staple!
What About Using Cold or Over-beaten Ingredients?
I know this isn’t really a substitution, but it is the most common issue! If your cream cheese or eggs were cold, or if you accidentally beat the filling too long, you might end up with a slightly curdled look before it even hits the bath. If this happens, don’t panic yet! Sometimes, adding the eggs slowly and using a water bath rescues it perfectly. If you skip the water bath or over-bake, you risk that structure breaking down regardless of how perfectly you mixed it.
Remember, for the very best results next time, stick to room temperature for your dairy and eggs. That’s the number one rule for a truly **velvety cheesecake filling**!
Serving Suggestions for Your Festive Desserts
Serving up this gorgeous **snickerdoodle cheesecake** is almost as fun as baking it, I swear! Since this dessert is rich and full of wonderful spice, you actually don’t need to do a whole lot to dress it up. Seriously, it stands tall on its own, which is exactly what we want when we’re busy hosting huge holiday meals. This is definitely one of those **Christmas baking treats** that looks incredible just the way it is!
Here are a few simple ways to present your masterpiece, depending on the vibe you’re going for:
- The Classic Dusting: This is my minimalist favorite. Once the **homemade cheesecake** is perfectly chilled (and I mean *perfectly* chilled!), just use a small sieve to lightly dust the top with a mixture of powdered sugar and a tiny bit more cinnamon. It looks frosted and brightens up the dark spice layer underneath.
- The Salty Contrast: If you’re serving this rich dessert after a big, savory meal—like Thanksgiving—a touch of salt can actually make the sweetness sing louder. I love adding a few large flakes of sea salt sprinkled lightly right before serving. It’s unexpected and adds a fantastic little crunch.
- Simple Caramel Drizzle: For a truly decadent flair, go for a very thin drizzle of good quality, slightly warm salted caramel sauce. You want fine lines, not a heavy pour, because too much liquid on cold cheesecake can weep. This complements the brown sugar beautifully.
If you need more inspiration for getting your whole dessert table ready, make sure you browse through my favorites for Christmas baking treats. And if you’re looking for an alternative way to serve smaller portions, this recipe pairs wonderfully with ideas found in posts like this one, which discusses creamy baked dessert variations here. But honestly, when you present this beauty, just watch everyone’s eyes light up—that’s the best garnish there is!
Storage and Reheating Instructions for snickerdoodle cheesecake
Now that you’ve successfully navigated the water bath (yay, you!), the last thing you need to worry about is storage, because leftovers—if you have any—need special treatment! This **snickerdoodle cheesecake** is absolutely best when served cold because that chill time is what allows the filling to firm up into that perfect, melt-in-your-mouth consistency. You’ve worked for that **velvety cheesecake filling**, so let’s keep it intact!
Saving this beauty is easy, but you have to be gentle:
- How Long It Keeps: Stored correctly, this cake is fantastic for up to 4, maybe even 5 days in the refrigerator. I always prefer to slice off what I need each day rather than cutting into the whole thing at once, just because exposure to air dries out the cut edges faster.
- Cover It Right: You need to protect it from that dry fridge air! Once the whole cheesecake is fully chilled, carefully cover the top with plastic wrap, making sure the wrap doesn’t actually touch the surface if you have an extra-delicate topping. Then, I highly recommend placing the whole thing in a large, sealed container or covering the springform pan with a dome lid if you have one. This traps the humidity it needs.
Now, let’s address reheating, because cheesecake really isn’t a “reheat” kind of dessert. You generally shouldn’t try warming up a classic baked cheesecake!
Serving Temperature is Key, Not Reheating
If you try to microwave or oven-warm a slice of this rich **homemade cheesecake**, you’ll probably end up with a sad, runny mess where the cream cheese structure breaks down. That’s not what we want at all. Instead of reheating, we focus on bringing it to the *perfect* serving temperature.
If your cake has been chilling forever and feels rock-hard straight from the fridge, take a slice out about 20 to 30 minutes before you plan to serve it. This short time on the counter lets it temper slightly. It maintains that firm, cool texture but softens just enough so that the flavors of the cinnamon and the cookie crust truly shine. It’s the difference between eating cold cream cheese and eating luxurious, cool **cinnamon cheesecake dessert**!
Keep testing those temperatures, and you’ll nail the perfect slice every time. Enjoy those leftovers!
Frequently Asked Questions about snickerdoodle cheesecake
I always get a ton of questions when I post a recipe that combines two favorites like this! It shows me you all take your baking seriously, and I love that! Here are some quick answers to the most common things I hear about achieving the best **snickerdoodle cheesecake** result. If you’re planning ahead for your parties, you might want to check out some quick tips in my guide to easy holiday baking!
Can I make a No Bake snickerdoodle cheesecake variation?
That’s a great question, because sometimes you just don’t want to deal with the oven, right? You absolutely *can* make a **No Bake snickerdoodle cheesecake**, but you have to know it’s going to be a completely different experience than the one we just made. Our recipe relies on eggs and baking to achieve that dense, rich slice. A no-bake version usually relies on heavy whipping cream, whipped into stiff peaks, or softened gelatin to help it set. Because we skip the oven, the texture will be lighter, airier, and more mousse-like. If you want that true, heavy, melt-in-your-mouth cheesecake experience, stick to the baked version, but for a quicker fix, no-bake is totally possible!
How do I prevent my snickerdoodle cheesecake from cracking?
Oh, the dreaded crack! It’s the bane of every cheesecake baker’s existence, but we worked hard to avoid it in this recipe, didn’t we? The primary defense against cracks is two-fold: first, the water bath. That steamy environment keeps the sides of the cake from setting faster than the center, preventing that stressful pull that leads to fissures. Second, the slow cool-down. Seriously, never skip turning the oven off, cracking the door, and leaving your **Cinnamon Cheesecake Dessert** in there for a full hour. It adjusts slowly to the cooler room temperature. If you’re looking for an alternative presentation that hides imperfections well, you might also consider baking this as **Snickerdoodle Cheesecake Bars**—the crust-to-filling ratio changes things up nicely. You can see their recipe over here if you want to compare techniques! But for the full round cake, slow and steady wins the race!
I’ve also heard from readers who had great success sprinkling the center layer (the flour/sugar/cinnamon mix) a little thinner. Too much sugar mixture packed in the middle can weigh things down and cause stress points as the cake bakes. Keep that cinnamon layer light and evenly distributed!
Estimated Nutritional Data for this Cinnamon Sugar Dessert
Okay, now for the necessary disclaimer part! I always say that when you’re deep into baking something this comforting and delicious—especially one of our favorite **cinnamon sugar desserts**—you probably aren’t thinking too hard about the macros, but I know some of you are curious! Because I rigorously tested and re-tested this **snickerdoodle cheesecake** to make sure it was the *best*, I can give you a solid estimate based on the ingredients listed.
Remember, this is for one generous slice of the finished cheesecake. These numbers are estimates, and they can definitely shift based on the specific brands of cream cheese or sugar you choose to use in your kitchen. But this gives you a great baseline for enjoying a piece of this incredible **holiday cheesecake idea**!
- Serving Size: 1 slice
- Calories: 450
- Sugar: 35g (Hello, brown sugar and graham crackers!)
- Fat: 28g
- Saturated Fat: 17g
- Carbohydrates: 42g
- Protein: 7g
- Cholesterol: 110mg
You can see why we call this an indulgence! But what a decadent indulgence it is. Don’t you dare eat this while standing over the sink—it deserves a plate, maybe a tiny fork, and a moment of quiet appreciation for being such a wonderful fusion of two classic cookie and dessert styles.
Share Your Ultimate Creamy snickerdoodle cheesecake Creations
And there you have it! We’ve navigated the water bath, mastered the creamy filling, and created a **snickerdoodle cheesecake** that I truly believe is crown-worthy. Now that your kitchen smells like heaven and you’re ready to dig in, I really, really want to hear what you think!
Baking for you all is truly why I started Kings Cook, so please don’t be shy. Once you’ve let it chill and you finally slice into that perfect texture, come right back here and leave a comment below. Did you stick strictly to the recipe, or did you dare to make a little adaptation? I’m interested in hearing how it went! Rating the recipe out of five stars helps me know which tried-and-true classics I need to keep sharing.
If you managed to capture a picture of your finished, beautiful **cinnamon cheesecake dessert**—maybe sitting next to your favorite holiday mugs—I absolutely want to see it! Tag me on social media! Seeing your success stories and tasting your comments is the best reward for all that recipe testing.
If you have any deep-dive questions that I didn’t cover in the FAQs section, or if you need clarification on that tricky water bath setup, please head over to my contact page. I read every email and I’m always here to help you master your kitchen!
Happy sharing!
PrintUltimate Creamy Snickerdoodle Cheesecake with Cinnamon Crumb Topping
Make this rich, creamy cheesecake that combines the warm spice of snickerdoodle cookies with a smooth, luscious filling and a buttery cinnamon crust. This dessert is perfect for holidays or any gathering.
- Prep Time: 25 min
- Cook Time: 70 min
- Total Time: 8 hours 35 min
- Yield: 12 servings 1x
- Category: Dessert
- Method: Baking
- Cuisine: American
- Diet: Vegetarian
Ingredients
- 1 3/4 cups graham cracker crumbs
- 1/4 cup granulated sugar
- 1 teaspoon ground cinnamon
- 6 tablespoons unsalted butter, melted
- 3 (8 ounce) packages cream cheese, softened
- 1 1/2 cups granulated sugar
- 1/2 cup sour cream
- 1 teaspoon vanilla extract
- 1/4 teaspoon ground nutmeg
- 3 large eggs
- 1/2 cup all-purpose flour
- 1/2 cup packed light brown sugar
- 1/2 teaspoon ground cinnamon (for topping)
Instructions
- Preheat your oven to 350 degrees F. Wrap the outside bottom of a 9-inch springform pan tightly with heavy-duty aluminum foil.
- Prepare the crust: In a medium bowl, combine graham cracker crumbs, 1/4 cup granulated sugar, and 1 teaspoon cinnamon. Pour in the melted butter and mix until the crumbs are evenly moistened. Press the mixture firmly into the bottom of the prepared springform pan. Bake for 10 minutes. Remove from the oven and let cool slightly.
- Prepare the cheesecake filling: In a large bowl, use an electric mixer to beat the softened cream cheese until smooth. Gradually beat in 1 1/2 cups granulated sugar until fully combined. Mix in the sour cream, vanilla extract, and nutmeg until smooth. Beat in the eggs one at a time, mixing just until each egg is incorporated. Do not overmix.
- Pour half of the cheesecake filling over the cooled crust.
- Prepare the cinnamon swirl layer: In a small bowl, whisk together the flour, brown sugar, and 1/2 teaspoon cinnamon until combined. Sprinkle this mixture evenly over the filling layer. Pour the remaining cheesecake filling over the top.
- Bake the cheesecake in a water bath: Place the foil-wrapped springform pan into a larger roasting pan. Carefully pour hot water into the roasting pan until the water reaches about halfway up the sides of the springform pan.
- Bake for 60 to 70 minutes, or until the edges are set but the center still jiggles slightly.
- Turn off the oven, crack the oven door open slightly, and let the cheesecake cool in the oven for 1 hour. This prevents cracking.
- Remove the cheesecake from the water bath and let it cool completely on a wire rack. Once cool, cover and refrigerate for at least 6 hours, or preferably overnight, before serving.
Notes
- For the creamiest texture, ensure your cream cheese and eggs are at room temperature before starting.
- If you prefer a stronger cinnamon flavor, add 1 teaspoon of cinnamon to the main cheesecake batter.
- Serve chilled with a light dusting of powdered sugar, if desired.
Nutrition
- Serving Size: 1 slice
- Calories: 450
- Sugar: 35g
- Sodium: 250mg
- Fat: 28g
- Saturated Fat: 17g
- Unsaturated Fat: 11g
- Trans Fat: 0.5g
- Carbohydrates: 42g
- Fiber: 1g
- Protein: 7g
- Cholesterol: 110mg