
Listen, I know what you’re thinking. Beef Wellington seems like one of those completely intimidating, restaurant-only things you see on cooking shows, right? Like something that’s guaranteed to make you hide in the pantry. But trust me on this, because I’ve been where you are. This specific beef wellington recipe is the one that transforms that fear into pure culinary confidence. I’ve tested every searing time and every chilling period right here in my kitchen so that when you try this beef wellington recipe, you’re guaranteed a flawless, show-stopper main course. Forget the stress, we’re making something truly elegant together!
- Why This Classic Beef Wellington Recipe Delivers a Showstopper Main Course
- Ingredients for Your Classic Beef Wellington Recipe
- How to Prepare the Mushroom Duxelles for Your Beef Wellington Recipe
- Assembling the Perfect Beef Wellington Recipe: Wrapping Techniques
- Wrapping and Scoring: Final Steps Before Baking This Beef Wellington Recipe
- Baking Guide for the Best Beef Wellington
- Resting and Serving Your Showstopper Main Course
- Ingredient Notes and Substitutions for Your Beef Wellington Recipe
- Frequently Asked Questions About Making Beef Wellington
Why This Classic Beef Wellington Recipe Delivers a Showstopper Main Course
When you serve this dish, it’s not just dinner; it’s an event! We want that perfect combination of textures that makes people gasp when you slice into it. My testing here at Kings Cook has zeroed in on the things that make the difference between a good Wellington and the kind people talk about for years.
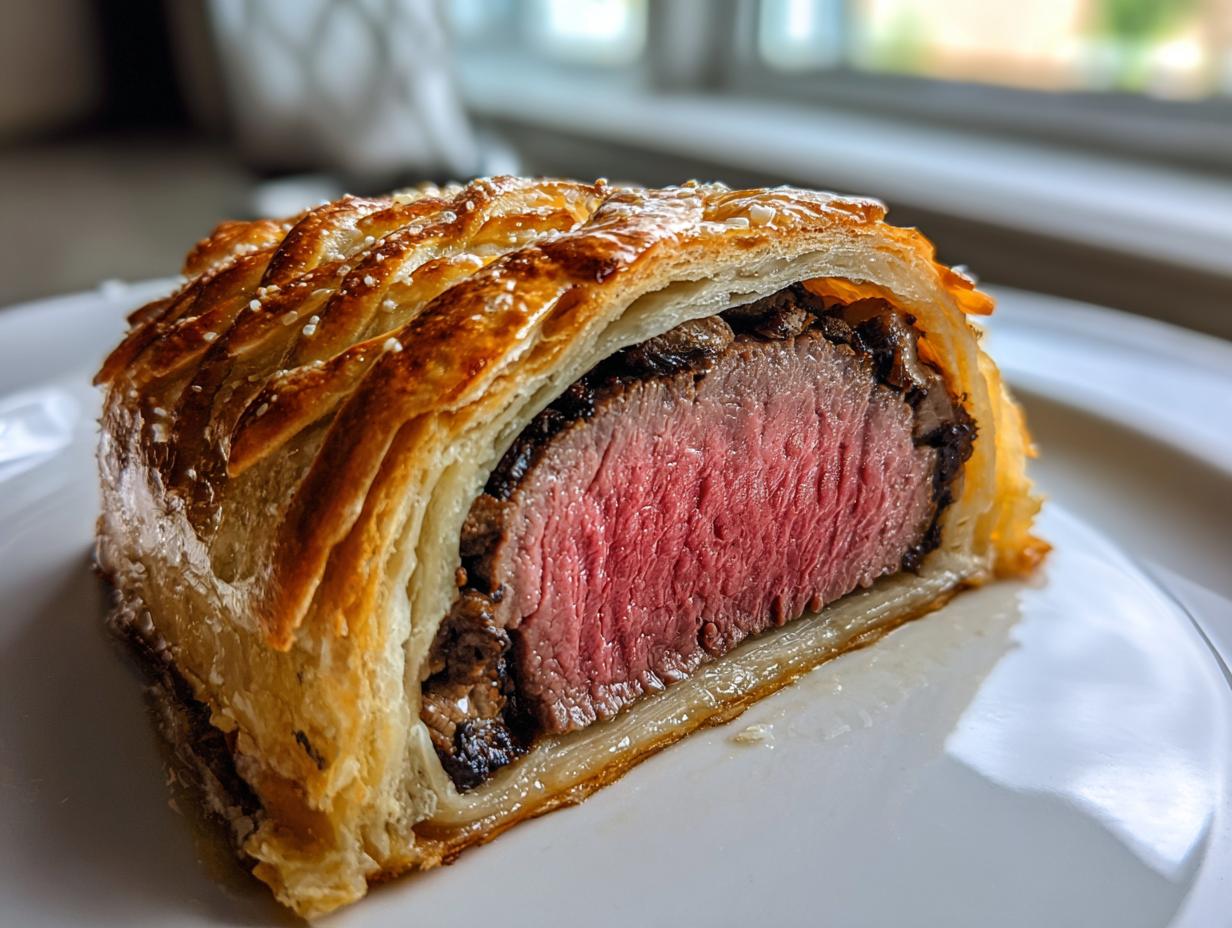
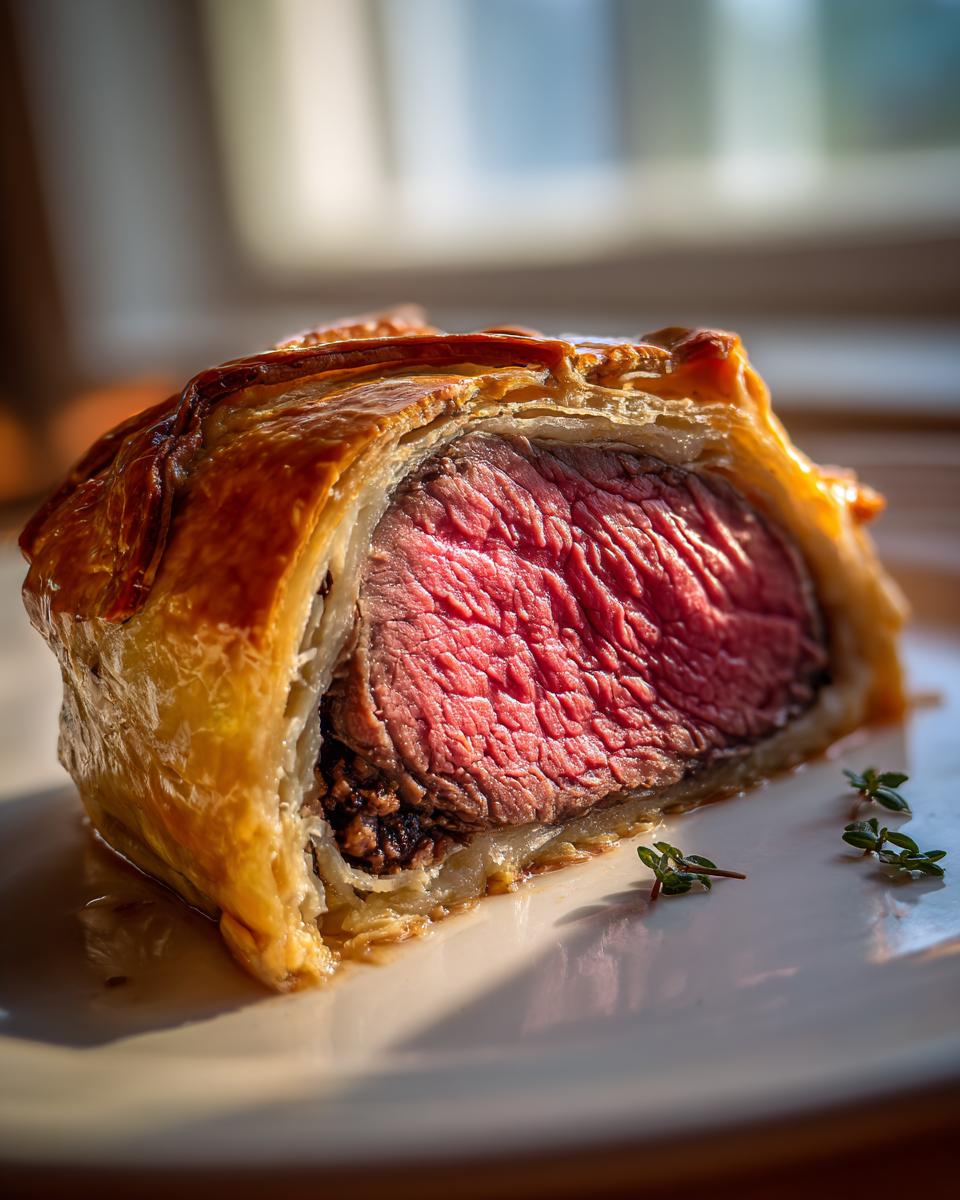
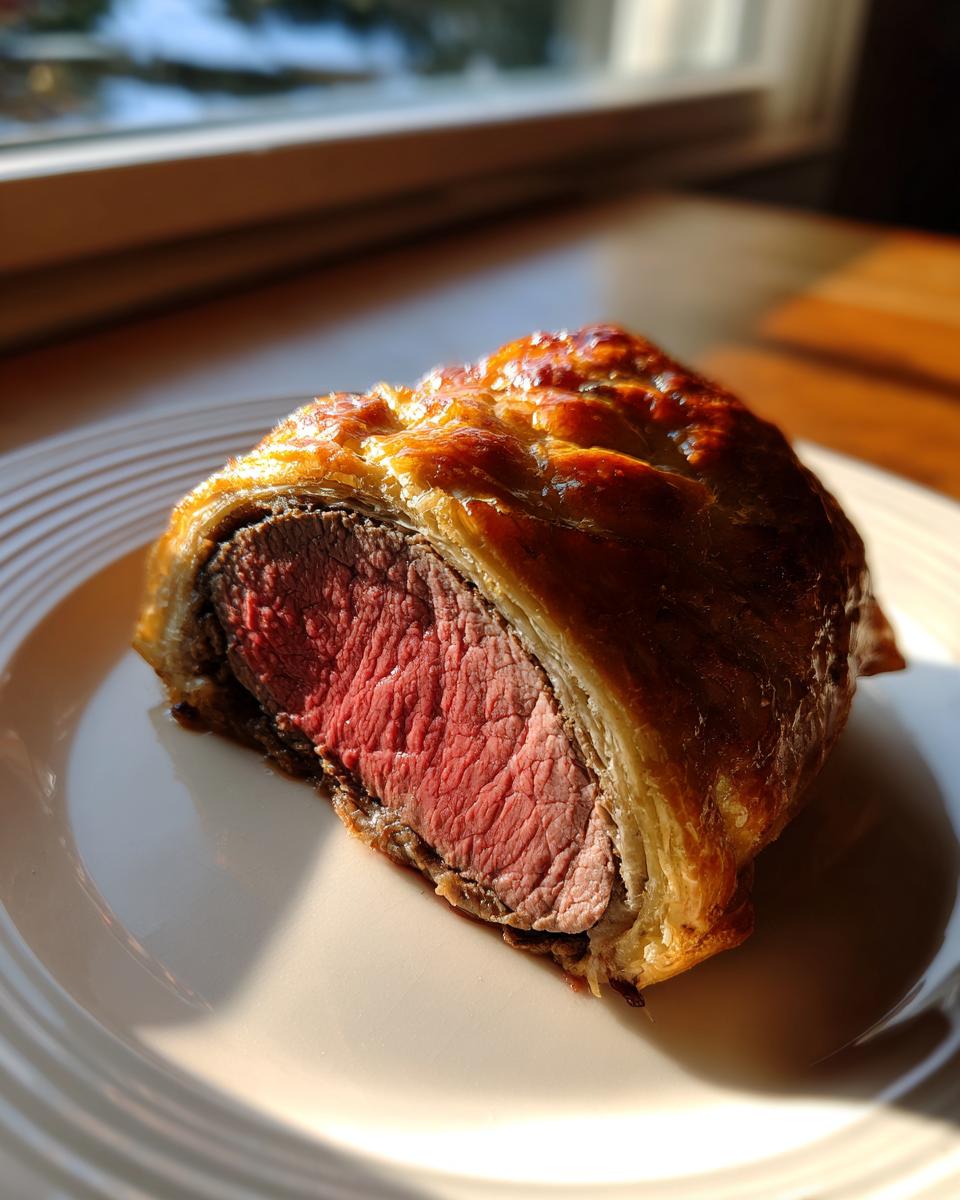
- It guarantees that gorgeous, rosy center—never grey and overcooked.
- The pastry gets shatteringly crisp and golden brown around the outside.
- Every single layer, from the mustard to the duxelles, actually contributes flavor instead of just taking up space.
This is how you achieve that amazing restaurant-quality result without needing to be a trained chef. Ready to see the secrets? Check out my tips for getting a perfect sear over on my perfect ribeye steak recipe—the searing principle is the same!
Achieving Tender Beef Wellington Every Time
If you want that truly tender beef wellington everyone dreams about, you absolutely must sear the tenderloin hard and fast. We are building a deep, dark crust on the outside in hot oil—that’s for flavor, by the way! But after that quick sear, you must let it cool down completely before you do anything else. If you wrap hot beef, you steam the pastry, and that’s when things go sideways fast. A good rest after searing locks those beautiful juices right where they belong.
Mastering the Flaky Puff Pastry Recipe
The biggest panic point for everyone is the dreaded soggy bottom, right? Well, our secret weapon here in the Classic Beef Wellington structure is that gorgeous layer of mushroom duxelles we make. That savory paste acts like a little waterproof jacket, protecting the delicate pastry from the meat’s juices. If you cook all the liquid out of those mushrooms correctly, you get that superb, flaky puff pastry recipe result every single time. It’s engineering, really, but delicious engineering!
Ingredients for Your Classic Beef Wellington Recipe
Okay, let’s talk ingredients! You absolutely need quality components here because this isn’t the time to skimp. Since this is such a centerpiece dish, every item really shines through. We aren’t dealing with a thousand things spread across ten different bowls—it’s focused, which I love. You’ll need pretty much everything laid out here for the full experience, and make sure that tenderloin cut is nice and clean!
You’ll need that stunning 2 pound center-cut beef tenderloin, of course, along with 2 tablespoons of olive oil for searing, plus salt and pepper to taste. Don’t forget 1 tablespoon of Dijon mustard—that’s for the flavor layer after searing! For our savory mushroom duxelles, grab 1 pound of cremini mushrooms, 2 finely chopped shallots, 2 sprigs of fresh thyme leaves only, 1/4 cup of dry white wine, and 1 tablespoon of unsalted butter. For wrapping, you’ll need 1/2 cup of flour just for dusting, 8 thin slices of prosciutto, and the entire 14.1-ounce package of all-butter puff pastry. And for that beautiful golden sheen? Just 2 large egg yolks, beaten.
If you’re feeling extra gourmet, you can add about 1/4 cup of pâté for an extra layer of richness, but that’s totally optional! It’s like adding an extra layer of velvet! If you’re looking for ideas on handling other large cuts of meat, you might want to peek at my pork tenderloin garlic herb roast for general temperature tips.
How to Prepare the Mushroom Duxelles for Your Beef Wellington Recipe
Oh, the duxelles! This earthy, intensely flavored mushroom paste is the backbone of our flavor profile, but honestly, it’s also the MVP when it comes to keeping that pastry dry. If you’re aiming for a tender beef wellington, listen closely to this step. We need to chop the mushrooms and shallots super fine—a food processor is your best friend here. Pulse them, but watch carefully so you don’t turn them into soup!
Now, here is the non-negotiable expert tip that separates the pros from the panic-bakers: you must cook every single drop of water out of that mixture. Seriously, keep cooking and stirring in that skillet until it looks almost dry and concentrated. If you leave any steam in there, that moisture is going to hit your pastry layer and make it gummy—we don’t want that!
Once it’s finally dry, we add the white wine and thyme, cook that off, and then spread it out on a plate to cool completely. Completely! I sometimes even pop the plate in the fridge to speed it up, because patience here guarantees that glorious, crisp crust later. If you love earthy mushroom flavors, you’ll want to check out my recipe for stuffed mushrooms too!
I know the famous chefs, like Gordon Ramsay, are very strict about this drying process. You can read exactly how intense he gets over at MasterClass, but my method gets you that concentrated flavor without all the fuss. Trust me, dry duxelles equals flaky pastry!
Assembling the Perfect Beef Wellington Recipe: Wrapping Techniques
Okay, time to build our luxurious package! This assembly step is where that beautiful, tidy shape of your Classic Beef Wellington really comes together. You want a big sheet of plastic wrap down first—don’t skimp on the plastic, we need it to be our temporary construction scaffolding. Lay out your thin slices of prosciutto overlapping slightly. This is another protective layer we add between the duxelles and the pastry, an absolute must if you want that truly professional look.
Spread that cooled, dry duxelles evenly over the prosciutto blanket. If you decided to be extra fancy, this is where you’d lightly brush on that optional pâté. Then, very carefully, place your mustard-coated, chilled beef tenderloin right along the bottom edge of your prosciutto layer. Now, we roll!
Use the plastic wrap like a giant piece of tape to help you roll the prosciutto and mushrooms tightly around the beef. I mean tight! You want to push out any air pockets as you go. Once it’s wrapped, twist the ends of the plastic wrap super firmly—like you’re sealing a big sausage—to make sure that log is rock solid. If you’re looking for more advice on handling that centerpiece beef tenderloin, check out my standalone beef tenderloin recipe post for sourcing tips!
Chilling Time: A Non-Negotiable Step for Beef Wellington Success
This step is where so many home cooks get impatient, and honestly, it’s what separates a sloppy wrap from a perfect cylinder. You have to chill this wrapped log in the fridge now for at least half an hour, but I always push for the full hour if I can manage it. Why? Because when the beef is cold and firm, it holds its shape, and that makes rolling out the puff pastry and getting a tight seal so much easier later on.
If it’s wobbly, the pastry will slide, and you’ll end up with thin spots or gaps—and we definitely don’t want to expose any beef to the direct oven heat! Getting that log chilled solid is the secret to achieving that crisp, clean edge when you finally slice into your restaurant style beef wellington.
Wrapping and Scoring: Final Steps Before Baking This Beef Wellington Recipe
We’ve chilled our prosciutto log until it’s firm, which is halfway to success! Now it’s time for the beautiful puff pastry. Dust your counter lightly with flour—just a little bit, we don’t want too much flour sticking to the outside of our masterpiece. Roll out that pastry until it’s big enough to completely cover the beef log without stretching it too thin. Remember what I said about those tricky edges? Brush all the edges of the pastry generously with your seasoned egg yolk wash—this is the glue that holds everything together!
Carefully place your chilled beef cylinder onto the pastry sheet and start rolling it up. You want to wrap it snugly, just like wrapping a present, but make sure you trim any massive overlap so the pastry doesn’t end up thick and doughy in one spot. Pinch those long seams together really well. Give the ends a little fold and seal them tight, too. Place the whole thing seam-side down on your parchment-lined baking sheet.
Finally, the fun part: presentation! Give the entire Wellington a lovely, even coat of egg wash; this is what gives us that incredible, gorgeous crust we’re aiming for. Then, using the back of a small knife—never cut all the way through to the meat—gently score a decorative pattern on top. Think criss-cross lines or maybe diamonds. It just looks fancy! If you are making cinnamon rolls later, the technique for neat sealing is similar to how we handle these pastry edges; you can check out my cinnamon rolls recipe for general dough handling tips!
Baking Guide for the Best Beef Wellington
We’ve done all the hard work—the searing, the chilling, the wrapping—now we just need the oven to do its magic! This is the step where you might feel a little nervous because you can’t see inside, but don’t panic. We are going to use precision, not guesswork, to get that stunning, rosy center.
First things first: get that oven cranked up to 400 degrees Fahrenheit, or 200 degrees Celsius. Hot and fast is our friend here, especially because we want that pastry to puff up beautifully before the beef has time to overcook. We are aiming for a medium-rare finish, which is honestly the best way to enjoy your beautiful beef tenderloin.
The timing is always a little tricky because every oven decides to run its own race, but generally, you’re looking at about 30 to 35 minutes. But here is the golden rule, the thing I will shout from the rooftops: you absolutely must use a meat thermometer if you want a perfectly cooked beef wellington. Don’t rely on the clock alone!
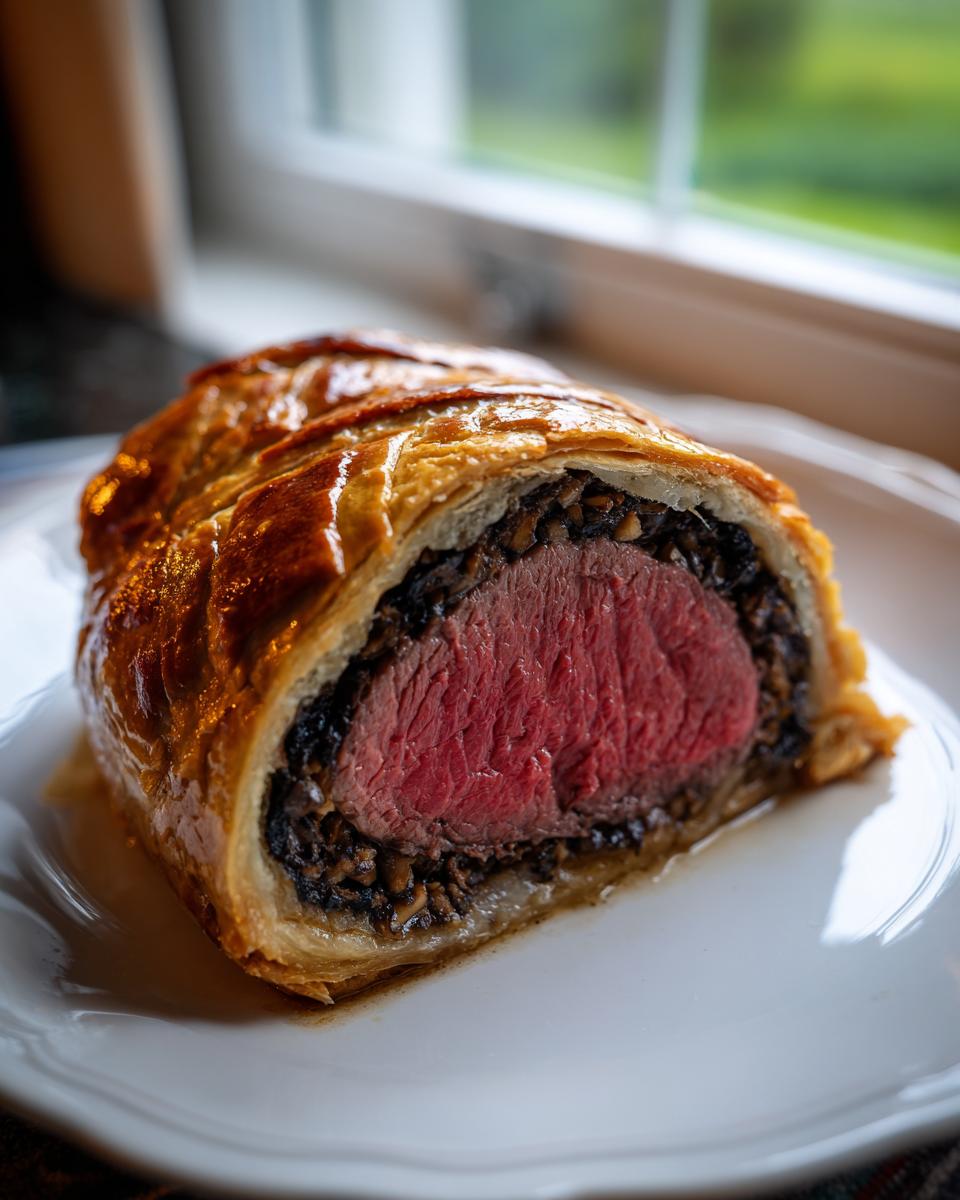
Carefully insert that thermometer into the thickest part of the beef, making sure you’re hitting pure meat and not just touching the duxelles layer. We are pulling this masterpiece out of the oven the second that thermometer reads between 125 and 130 degrees Fahrenheit. If you’re curious about how deep searing impacts meat in general (like pan-fried recipes), I talk a bit about different cooking methods over at my chicken fried steak recipe post!
If you don’t have a thermometer, you’re taking a huge gamble, and I promised you recipes that actually work! So please, grab that little tool. It’s the difference between a perfect centerpiece and a sad, grey roast.
Resting and Serving Your Showstopper Main Course
Whoa, you did it! The oven time is up, and now you have this incredible golden package sitting on the counter. But please, gather your patience right now! The absolute worst thing you can do after making a perfect Beef Wellington recipe is to slice into it immediately. We absolutely have to let it rest for a solid 10 minutes.
When that beef comes out of the oven, all those delicious juices are super excited and running around like crazy inside the meat. If you cut it immediately, those juices will flood right out onto your pretty cutting board, leaving you with dry beef and a soggy pastry base. Resting lets those juices settle back down and redistribute evenly through the tenderloin! It’s essential for serving that beautiful showstopper main course.
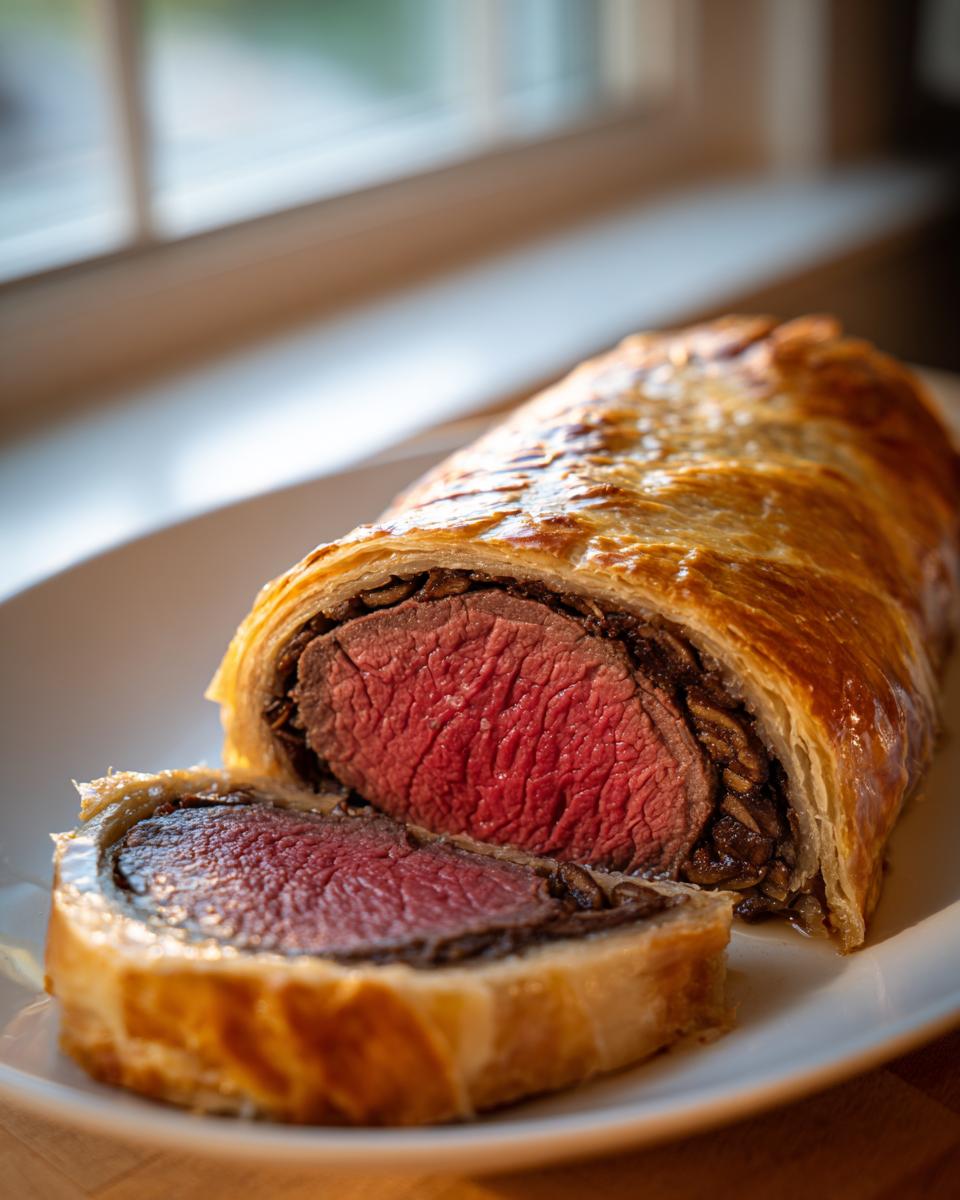
Once rested, slice it into thick, generous portions. If you’re getting ready for next week’s baking, maybe you’ll want to try my dinner rolls recipe, because you’ll need something fluffy to soak up any of those remaining, glorious pan drippings!
Ingredient Notes and Substitutions for Your Beef Wellington Recipe
Look, once you’ve got the technique down, we start talking about leveling up the ingredients themselves. Because this is a high-profile dish, the centerpiece of your meal, the quality of what goes in really matters. I want you to feel confident sourcing these things at your regular supermarket!
Let’s chat prosciutto, shall we? If you’ve ever watched any of those incredible step-by-step videos for a Gordon Ramsay Beef Wellington recipe, you always see that thin layer of cured ham wrapped around the beef before the mushrooms go on. That’s not just for decoration! Prosciutto creates a barrier—it helps absorb any last bits of moisture the duxelles might be hiding, ensuring that pastry stays crisp. It also adds a fantastic salty depth that the beef just drinks up.
And what about that optional pâté? I mentioned it, and honestly, it’s pure decadence. It melts into the duxelles as it cooks, making the whole interior unbelievably silky. If you aren’t keen on it, skip it! This Beef Wellington recipe is still a winner without it, but if you see a good quality one, it’s worth adding for a true gourmet experience.
My biggest tip for sourcing is the beef tenderloin itself. You want the center cut—we call it the Chateaubriand—because it’s the most consistent shape and the most tender part of the whole roast. Avoid any pieces that taper off too much, or you’ll end up with one end perfectly cooked and the other end burnt or raw! If you need a great appetizer to serve while you’re waiting for the main event, you seriously have to try my bruschetta recipe!
Frequently Asked Questions About Making Beef Wellington
It’s totally normal to have questions when tackling an elegant dish like this! I get asked about making things easier all the time, so I put together a little guide for those last-minute worries before you serve this incredible centerpiece. Don’t let the gourmet reputation scare you; this is just a well-organized assembly project!
Can I make this beef wellington recipe ahead of time?
Yes, absolutely! This is one of my favorite tricks for keeping stress low, especially when serving up Holiday Dinner Recipes. You can complete everything up to the point right before the final egg wash and scoring. That means you can sear the beef, make your duxelles, wrap the whole thing tightly in prosciutto and plastic wrap, and chill it! I find chilling it overnight is best so the log is really firm for the final pastry wrapping. Just keep it tightly wrapped in the fridge, and when you’re ready to bake, let it sit on the counter for maybe 30 minutes to take the chill off before you wrap it in the pastry and bake it per the main instructions. Easy, right?
What temperature indicates a perfectly cooked beef wellington?
This is the make-or-break moment, so please, grab that meat thermometer! For that beautiful pink center—the sign of a successful Perfectly Cooked Beef Wellington—you are aiming for an internal temperature of 125 to 130 degrees Fahrenheit when you pull it out of the oven. That’s for a perfect medium-rare. You need to account for carryover cooking, too. That beautiful beef is going to keep cooking for several minutes while it rests (remember that crucial resting step?). So, once it hits that target on the thermometer, pull it out right away. If you trust the temperature, you don’t have to worry about turning this into an Easy Beef Wellington Tutorial that ends in tears!
I always recommend checking my shepherd’s pie recipe if you want another comforting meal that relies on oven temperature control for success, though this Wellington is certainly fancier! Check out shepherd’s pie recipe for comparison.
PrintClassic Beef Wellington Recipe
Make this show-stopping Beef Wellington featuring tender beef tenderloin, savory mushroom duxelles, and flaky puff pastry. This recipe delivers restaurant-quality results for your special occasions.
- Prep Time: 45 min
- Cook Time: 35 min
- Total Time: 1 hour 35 min
- Yield: 4 servings 1x
- Category: Dinner
- Method: Baking
- Cuisine: British/French
- Diet: Low Calorie
Ingredients
- 2 pound center-cut beef tenderloin (Chateaubriand)
- 2 tablespoons olive oil
- Salt and black pepper to taste
- 1 tablespoon Dijon mustard
- 1 pound cremini mushrooms, finely chopped (for duxelles)
- 2 shallots, finely chopped
- 2 sprigs fresh thyme, leaves only
- 1/4 cup dry white wine
- 1 tablespoon unsalted butter
- 1/2 cup all-purpose flour (for dusting)
- 1/4 cup pâté (optional, for layering)
- 8 thin slices prosciutto
- 1 package (14.1 ounces) all-butter puff pastry, thawed
- 2 large egg yolks, beaten (for egg wash)
Instructions
- Season the beef tenderloin generously with salt and pepper. Heat olive oil in a large skillet over high heat. Sear the beef on all sides until deeply browned, about 1 minute per side. Remove the beef and let it cool completely. Once cool, brush the entire surface evenly with Dijon mustard.
- Prepare the duxelles: Pulse the mushrooms and shallots in a food processor until finely chopped. Melt butter in the same skillet over medium heat. Add the mushroom mixture and thyme. Cook, stirring often, until all the moisture has evaporated, about 10-15 minutes. Add white wine and cook until evaporated. Season with salt and pepper. Spread the duxelles on a plate to cool completely.
- Lay a large piece of plastic wrap on your work surface. Arrange the prosciutto slices in an overlapping rectangle large enough to wrap the tenderloin. Spread the cooled duxelles evenly over the prosciutto. If using pâté, spread a thin layer over the duxelles.
- Place the seared tenderloin at the bottom edge of the prosciutto layer. Use the plastic wrap to tightly roll the prosciutto and duxelles around the beef. Twist the ends of the plastic wrap to secure a tight cylinder. Chill in the refrigerator for at least 30 minutes, or up to 24 hours, to firm up.
- Lightly dust your work surface with flour. Roll out the puff pastry into a rectangle large enough to completely enclose the beef. Remove the beef from the plastic wrap and place it on the pastry. Brush the edges of the pastry with the egg wash.
- Wrap the pastry tightly around the beef, trimming any excess pastry. Seal the seams well. Place the Wellington seam-side down on a baking sheet lined with parchment paper. Brush the entire surface with egg wash. Chill for another 15 minutes.
- Preheat your oven to 400 degrees Fahrenheit (200 degrees Celsius). Brush the chilled Wellington one more time with egg wash. Score the top lightly with the back of a knife in a decorative pattern, avoiding cutting through to the meat.
- Bake for 30 to 35 minutes for medium-rare (internal temperature of 125-130 degrees Fahrenheit). Use a meat thermometer inserted through the pastry into the center of the beef.
- Let the Beef Wellington rest on a cutting board for at least 10 minutes before slicing into thick portions. Serve immediately.
Notes
- For a foolproof result, make sure the duxelles mixture is completely dry before wrapping the beef. Excess moisture causes soggy pastry.
- If you want a Gordon Ramsay style finish, use prosciutto to help seal the moisture and flavor around the beef before wrapping in pastry.
- Use a high-quality, center-cut beef tenderloin for the best texture.
Nutrition
- Serving Size: 1 slice
- Calories: 550
- Sugar: 2
- Sodium: 450
- Fat: 35
- Saturated Fat: 15
- Unsaturated Fat: 20
- Trans Fat: 0.5
- Carbohydrates: 25
- Fiber: 3
- Protein: 38
- Cholesterol: 150